Categories
Fact Sheet Fusion v2

Getting Started

Use this tutorial to jump start your understanding of Fact Sheet Fusion and all the new features of version 2. This outline is not intended to replace the Help documentation and will deal more in broad concepts, rather than the step by step how to.

First – before getting to Version 2, let’s look at the differences between version 1 and Version 2. For those of you who have experience with Fact Sheet Fusion v1, you will remember that you first have to name and open a file and then you enter a list of topics and a list of entities and then type in or paste in text for each topic/entity combination and add images and captions for each entity, using the same dialogue frame.

With Fact Sheet Fusion version 2, entering topics/entities and text is much the same as with version 1. The main difference is how you deal with images. In Fact Sheet Fusion v2 there is a separate Media Manager that enables you to import and edit images, add watermarks, etc. You can then add images from this media database to a specific project database.

So now let’s look at the way in which this new version of Fact Sheet Fusion is structured (see Fig. 1)

Figure 1. Fact Sheet Fusion v2 showing databases and projects and the common media library associated with each database

A Fusion database holds one or more projects. Projects hold the fundamental data associated with creating your fact sheets (i.e. Topic headings, Entities and their text content.) Each database has its own media library: projects within that database can then utilize images and other multimedia items from than common database. Projects within a database don’t need to be related in anyway, but they normally will be.

Therefore, if you are just starting or if your intended (new) project is completely unrelated to any existing database projects (that is, they are unlikely to share topics or media) then it is probably best to create a new database.

Fact Sheet Fusion database selection dialog

Creating projects

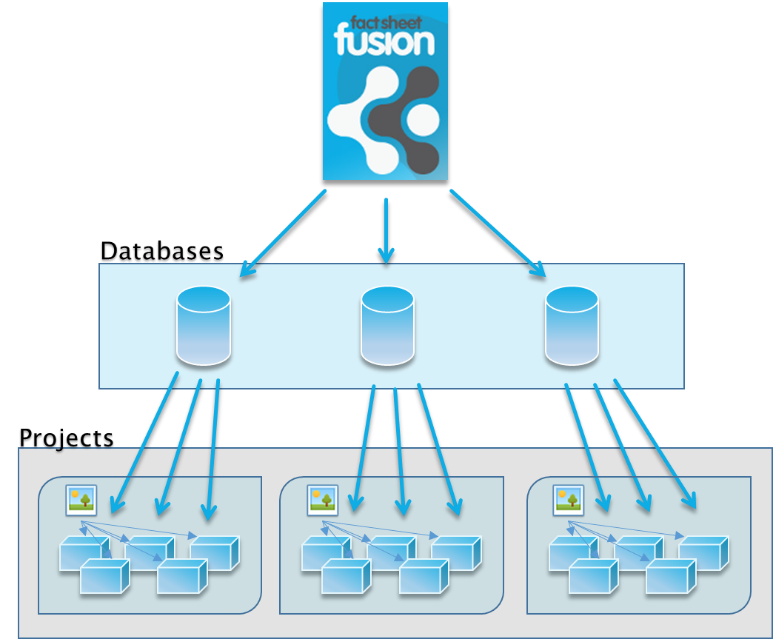
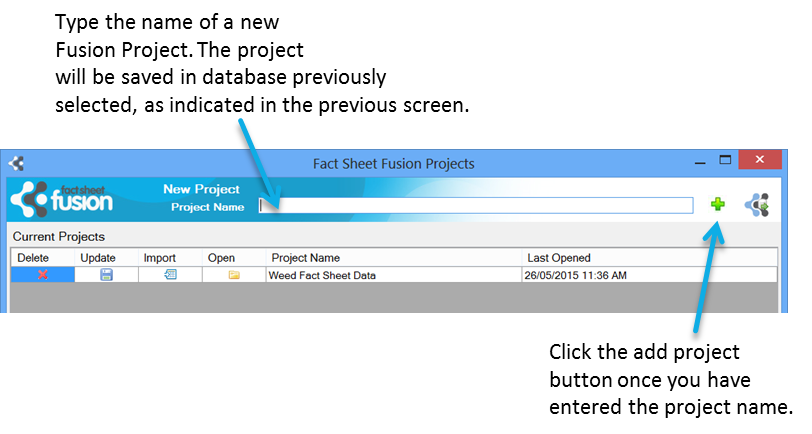
Once a Fusion database has been created you can create one or more projects.

Projects dialog

The most common reason for creating multiple projects within a database are likely to be where the entities in the different projects are related, don’t share topic headings but may share common media.

Note

It is possible to create all your projects within the one database to share a media library, even if they are completely unrelated. There is no functional disadvantage in doing so.

If you have common entities that share (many) topics headings, but you need to manage groups of discrete entities you can achieve this in a single project via the Subset feature. For example, if you had a large project containing plants species, you may want to have the ability to separate these species into groups such as weeds, natives, rainforest species, aquatics etc. Subsets will allow you to make these assertions and export them as separate sets of fact sheets, if desired.

Once a project has been created you can proceed to open it, rename it, delete it or import an older version 1.x databases into it.

Fact Sheet Fusion database projects selection dialog

You can import a v1.x database into a project anytime, though normally this would be done at the beginning of a project. The import dialog will allow you to select which Topics and Entities you wish to import, along with the media and glossary. It also offers a feature to clean any content in the older database that may be contaminated with undesirable formatting (e.g. MS Word HTML) that will override the export templates.

Importing MS Word documents, HTML pages or Lucid key data is done via the Content Import option accessible in the main interface.

To import a v1.x Glossary you need to assign a name (label) to the glossary. This is called a glossary set. The glossary features in version 2 has been greatly expanded and will be covered in more detail further below.

Tip

Importing will not create duplicates in your project. If for example you were to mistakenly select to import a topic that had been imported previously the import process will not overwrite the existing records for matching entities.

Managing Project data

If you’ve not used version 1.x before and are new to Fact Sheet Fusion then it is important to understand how data is managed. The three main points of data are:

  • Topics – These are the headings of the fact sheets.
  • Entities – These are the individual species, symptoms or other specific entities that the fact sheets are about.
  • Entity Topic Text – Each combination of a Topic and Entity can hold information (e.g. text and media related text).
Fact Sheet Fusions main interface

To start entering fact sheet content you first need to create one or more Topics and at least one entity. Once these have been created you can begin entering text. The fact sheet text is saved against the currently selected Topic and Entity. Think of this as a database record (which it is!).

Tips

There is no need to remember to save after making changes. Fact Sheet Fusion automatically saves changes when you move around the topics and entities. In fact there is no save button – there’s no need!

  • Topics and Entities can be renamed at any time.
  • If you already have a list of Topics or Entities to add to your project don’t retype them. Use the import option (right click in the Topic or Entity lists to see the context pop-menu options). The Import dialog is a simple text box where you can paste a list of Topics or Entities. Just ensure each are on a separate line.
  • Use keyboard shortcuts for faster data entry. For example, when editing text for a given Topic/Entity combination you can use Ctrl + Up/Down arrows to change Topics. Or Ctrl + Left/Right arrows to change Entities while remaining on the selected Topic.

Whenever you click on or select a Topic or Entity (or media items) you will see on the top right of the main interface a properties window. These properties give you various options and control over how they are dealt with during the export process. For example you can hide the Topic Label as a heading but still retain its content in the fact sheet.

Managing Media

Fact Sheet Fusion supports a diverse range of media attachments such as images, video, sound, PDFs, and Office documents. The way Fact Sheet Fusion now handles media is a large change from the first edition. Media within Fact Sheet Fusion is held at the database level and can be accessed by all the separate projects held within that database. This means that you only need to write captions and apply watermarks, among other properties, once and these details will be used whenever you attach the media item in a project.

While managing media at a global level reduces workload and removes duplication issues when managing multiple related projects, Fact Sheet Fusion still allows you to customize the media each time it is attached within a project, if needed.

The Media Manager, as the name implies, allows you to “manage” your media items. You can think about the Media Manager as a “library”.

Fact Sheet Fusion Media Manager Interface

Adding Media Categories

To add a new media category either select the ‘Add’ option from the Categories menu, or right click in the Media Categories list and select ‘Add’ from the pop-up context menu. The add category dialog will appear.

Fact Sheet Fusion Add Media Category Dialog

Enter the category name and click the add button. The new category will be added below the currently selected category.

Tip

Media categories will be automatically created for you when add a new Entity. The automatic media category name will be the same as the Entity.

Adding Media to the Library

To add media, select the ‘Add’ (Add button) button from the Media panel toolbar, or right click in an empty area of the media panel and select ‘Add’ from the pop-up context menu.

Adding Media to an Entity, Entity Topic or Glossary term

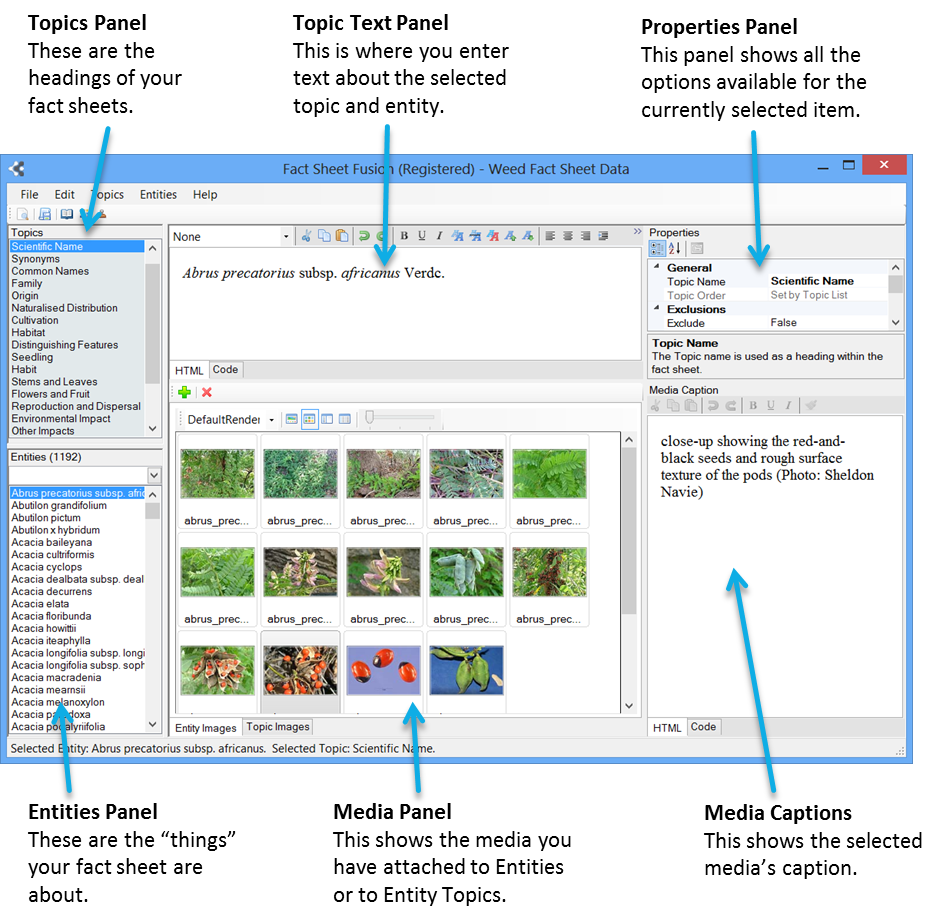
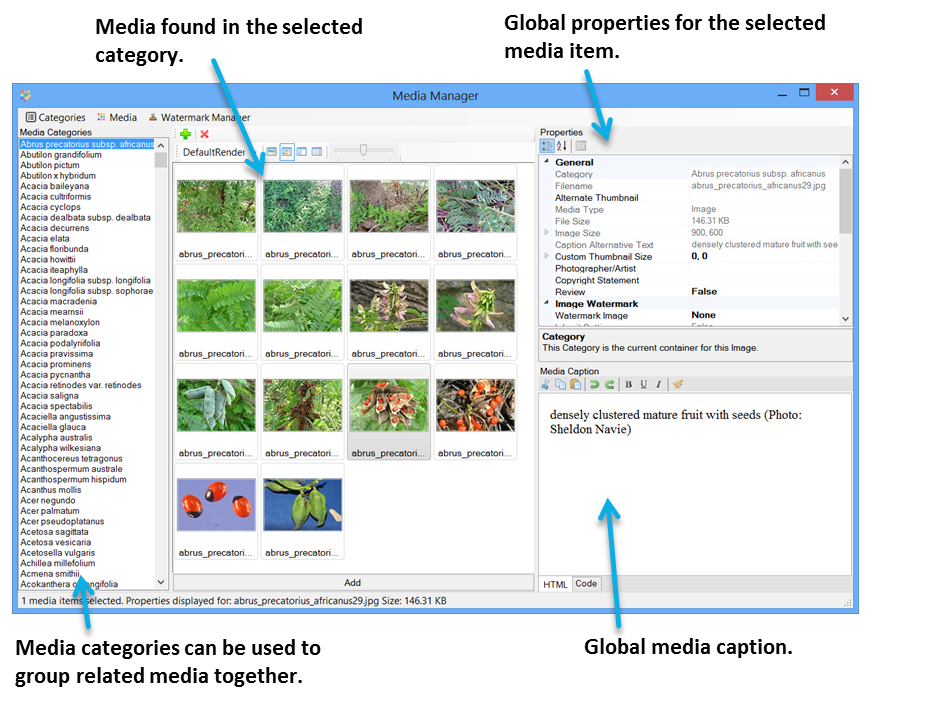
To associate media against an Entity, Entity Topic or Glossary term click the attach media button (Add button) in the main interface window for Entities or Entity Topics. Or via the Glossary dialog. This will load the Media Manager to allow you to select one or more media items. If you have selected to add media to an Entity the Media Manager will automatically load the matching category for you. Once you have selected the media you wish to attach, click the large Add button located at the bottom of the Media Manager.

Add media button at the bottom of the Media Manager dialog

Media Properties – Inherited vs Derived

By default when a media item is attached to an Entity Topic or to an Entity the “library” edition is used. All of the media properties, such as caption, photographer, copyright text, thumbnail image and watermark are inherited from the library copy. In most cases there is no need to re-enter the caption or adjust its settings as it’s already been done.

However, there may be circumstances where you do need to customize the details of a media item. For example, change the preferred watermark or customize the caption just for the current instance in the loaded project. In this scenario you can set the attached media item to be “derived” from the library. That is the media item still references the same file, but uses a different set of media properties. This leaves the global library edition unchanged, but allows a customized instance for use in the current project.

The main data entry interface allows easy editing of media properties that are global or derived. It’s just a matter to changing the view between the two states. This can be done above the properties panel (when a media has been selected). You can select to view the Library (global) properties of a media item or the derived (custom) properties.

If you have switched to the derived view you still need to tell Fact Sheet Fusion that the media item is to use a derived copy of the properties, otherwise every media item viewed would use a derived copy. You set a media item to be derived by setting the ‘Media Object Derived’ property to ‘True’.

Note

Any edits to media properties within the Media Manager are global in nature.

Tip

If you set a media item derived status back to false (e.g. return to using the library properties) the derived properties will still be kept in case you want to use the derived properties again.