
Media Manager
Media Properties
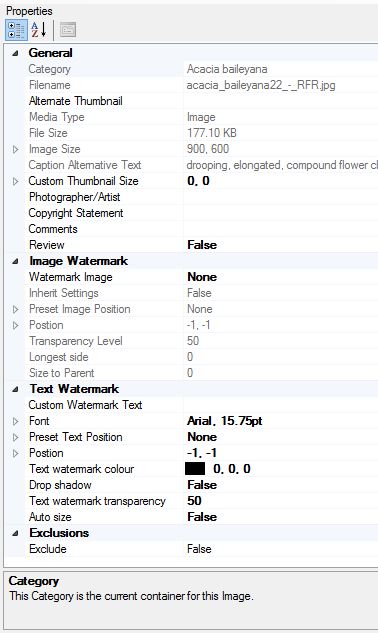
The Media Properties panel is located to the top right of the media list panel. It displays all of the properties that are associated with the currently selected media item. Different properties may be available depending on the media type. For example only images have watermarking properties available. Some media properties are informative (read) only, that is they can’t be modified. For example the media file size is informative only. Informative or read-only properties are identified by ghosted (light grey) labels, while editable properties are shown with regular text labels.
Properties are grouped within related categories. Each property group has a Group name (bold) which can be expanded and collapsed.
Editing a property depends on the property type. Some properties such as Custom Thumbnail size require two values to be entered for width and height, while others may be free form text. Each property has explanatory text associated with it that is displayed at the bottom of the property panel. This explanatory text is displayed when the property is selected.
Properties
General (Section)
Category – Shows the name of the Category the selected media is located in.
Filename – Shows the filename associated with the media item. You can, if needed, change the file associated with the media item by clicking on the file browse option on the right ([…]). This will replace the media file with the selected file while maintaining the media properties such as caption and copyright etc. This is useful ,for example, where your filename is extremely long and causes a problem when the exported path exceeds the maximum length. Or if you’ve modified the media store filename outside the scope of Fact Sheet Fusion, an action which is not recommended unless you are an advanced user.
Alternate Thumbnail – Allows you to select an image to represent the media item. Media types that don’t have a natural image association such sound files will automatically be assigned a default alternative thumbnail for that media group. These default thumbnails are located in the ‘Icon’ folder of the Fusion Database media store folder. Selecting this property will show a browse option that will let you select a custom thumbnail image file anywhere on your file system. The selected alternative image will automatically be copied across to your Fusion media store. Video media items will automatically have a frame captured and associated as the Alternate Thumbnail. These defaults can be changed by selecting a different image as describe above.
Media Type – Displays file type of the media item. E.g. Image, Video, PDF etc.
Caption Alternative Text – This text is automatically captured from the HTML Media caption associated with the media. It is a plain text version of this caption. This alternative text, without HTML formatting, can be useful when used in export templates that use JavaScript or require no HTML tags.
Custom Thumbnail Size – You can set a preferred thumbnail size for an individual media item. This can be used rather than the default export thumbnail size. The export dialog will allow you to override the Custom Thumbnail size. Normally consistent thumbnail sizes within fact sheets are desired, but this option allows you to fully customize each thumbnail, if needed.
Photographer – When selected this property will display a small text box to enter the media photographer’s details.
Copyright Statement – Similar to the Photographer property a small text box will be displayed allowing you to enter a copyright statement for the media item.
Comments – Author comments regarding the media item. These comments are private and not exported with the fact sheet. However, they are included as a part of the Media List file, if exported.
Review – You may mark a media item for review. By doing so, you can control via the export option whether this media is included in the fact sheet.
Image Watermark (Section)
Watermark Image – A drop down list of all watermark images that have been added to the project via the Watermark Image Manager. See the Watermark Image Manager for more information on this topic.
Inherit Settings – The Watermark Image Manager can set global default settings for an individual watermark image. This can save applying the same watermark settings to every image the watermark is associated with. If you wish to override the global watermark settings for any selected watermark image then change the Inherit Settings to false. You can change back to the global settings for the selected watermark image anytime. Any custom watermark settings will be saved in case you wish to revert back to the individual custom settings.
Present Image Position – This setting is only available if a Watermark image has been selected and the Watermark Image Inherit settings are set to False.
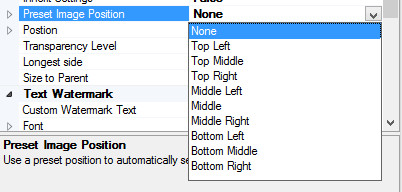
There are nine preset positions where the image watermark can be placed on the image as shown in the screen capture above. If a present position is selected this will take precedence over a manually set position (see Position Property below).
Position – The position property allows you to set an X & Y pixel coordinate in relation to the watermark image and the main image. The image watermark image will be positioned from its top left at the defined XY coordinates of the main image. Setting this property is often easier via the Image viewer as it will dynamically preview the watermark as the properties are changed. See the Image Viewer help topic for more information on this. The Position value will be overridden by the Preset Image Position, if selected.
Transparency Level – The transparency level of the watermark image determines how much of the underlying image shows through the watermark. The transparency level can be between 1 and 100. The lower the value the more transparent the watermark image will be. If the value is set too low the watermark image may be very difficult to see in the main image. Setting a value of 100 means no transparency will be added to the watermark image.
Longest side – You can set the size of the watermark based on the longest side in pixels. This effectively is like defining the size of a square box that the watermark image must fit within while maintaining its aspect ratio. A watermark image will not be resized beyond its actual size if the longest size exceeds the watermark dimensions. Also if the longest side value exceeds the exported image size the watermark will be resized to fit within the image boundary.
Size to parent – You can define a percentage value for the watermark to the parent image. The Size to parent value must be between 1 and 100.
Text Watermark (Section)
Custom Watermark Text – Enter the text you wish to use as the watermark.
Font – Define the font type and size you prefer for the text watermark.
Preset Text Position – There are nine preset positions where the text watermark can be placed on the image. If a present position is selected this will take precedence over a manually set position (see Position Property below).
Position – The position property allows you to set an X & Y pixel coordinate in relation to the watermark text and the image. The text watermark will be positioned from its top left at the defined XY coordinates of the main image. Setting this property is often easier via the Image viewer as it will dynamically preview the watermark as the properties are changed. See the Image Viewer help topic for more information on this. The Position value will be overridden by the Preset Text Position if selected.
Text Watermark Color – Define the color of the text watermark.
Drop Shadow – Applies a drop shadow to the text watermark. The drop shadow can add more definition to the text making it clearer on the image it’s applied to.
Text watermark Transparency – The transparency level of the text watermark determines how much of the underlying image shows through the text watermark. The transparency level can be between 1 and 100. The lower the value the more transparent the text will be. If the value is set too low the text may be very difficult to see in the main image. Setting a value of 100 means no transparency will be added to the text watermark.
Auto Size – The auto size option automatically sizes the font based on the size of the image it’s being applied to and the position that has been selected.
Exclusions (Section)
Exclude – If set to true the media item will be excluded from Exports.
Media Caption
Add text associated with the image. The caption text is HTML based and has the mini HTML editor associated with it.
Global Caption Clean
See Global cleaning options.