Categories
Fact Sheet Fusion v2

Advanced Entity Options

Create scientific name topic from Entities

If your project is dealing with scientific names as your entities, then you will no doubt want the name (entity label) to be correctly formatted when exported.  Rather than relying on the Entity name label, which doesn’t support html tagging, the alternative is to create a topic that represents the entities formatted scientific name and use it in its place.

To save you from re-entering all the entities into a topic field and formatting them with italics Fact Sheet Fusion can do it automatically for you. From the ‘Entities menu…Advanced’ menu select  ‘Create scientific name topic for entities’ options.
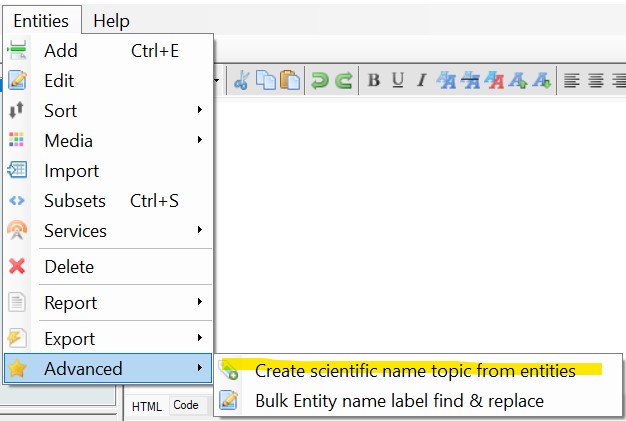
Create scientific name topic from entities menu option

A topic called ‘Scientific Name’ will be created and for each entity Fact Sheet Fusion will create a formatted scientific name based on the entity label.

For example, if your project contained an entity ‘ Acartia tonsa’ it would add ‘Acartia tonsa‘ to its corresponding Scientific Name topic.

Tip

The 'Create scientific name topic from entities' option will not create a 'Scientific Name' topic if one already exists. If you've made a lot of changes to your entity labels and want to regenerate your Scientific Names, delete the 'Scientific Name' topic and then recreate it.

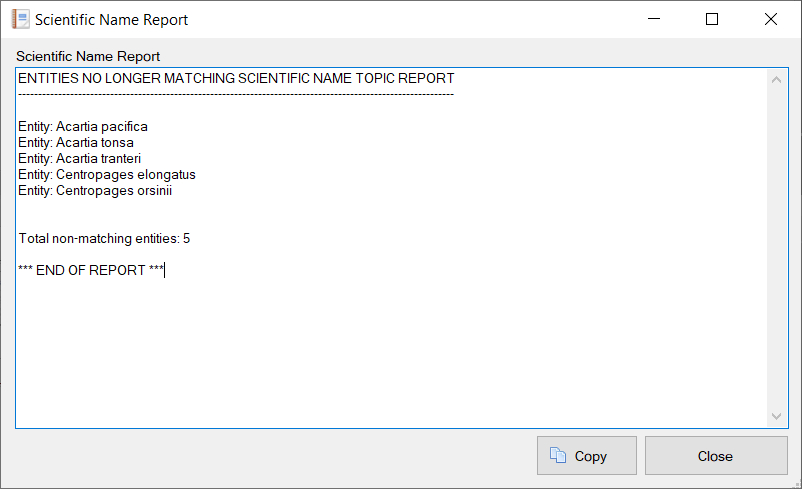
If you’ve made changes to your Entities list after creating your Scientific Name topic or are unsure if they are now out of sync, use the ‘Entities that no longer match Scientific Name topic’ report to look for differences.
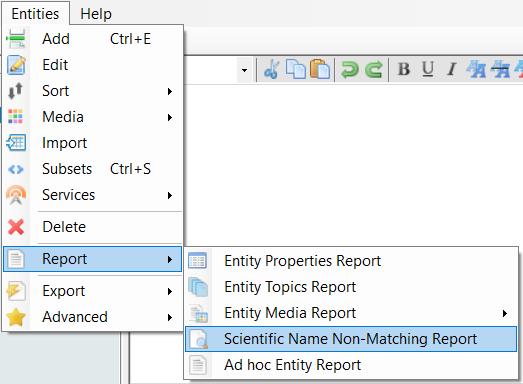
Entities no longer matching Scientific Name topic report menu option

Scientific Name topic Entities differences report example

The differences can be manually edited in the ‘Scientific Name’ topic, especially if you have customized the topic text for many entities. Or the ‘Scientific Name’ topic could be deleted and recreated.

Bulk Entity name label find & replace
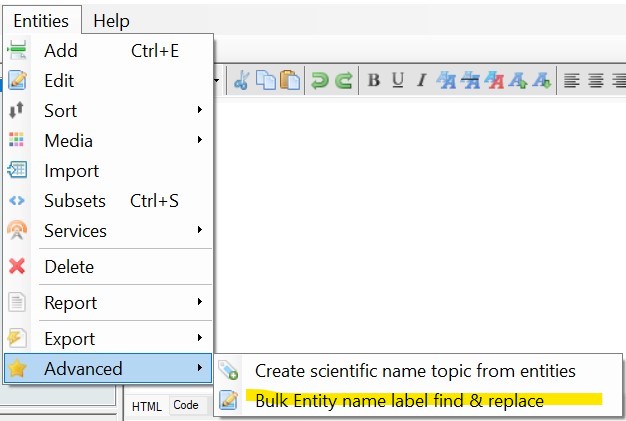
Bulk entity label find and replace menu option

This advanced option allows you to find and replace label text across all Entities within your project.

For example, if your entity list contained several entities with the word ‘tonas’ that needed to be changed to ‘tonnas’ then this find & replace option will allow you to do this without having to individually edit each Entity.
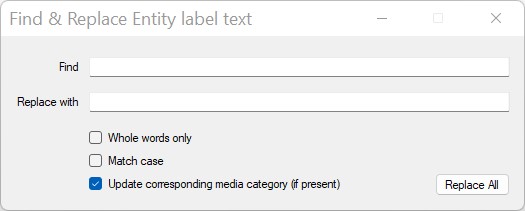
Bulk Entity label find and replace dialog

Find

Enter the text you wish to find within the Entity labels.

Note: If the find criteria is found in multiple places within the Entity label each will be replaced with the replace criteria. 

Replace

Enter the text you want to replace the find text with.

Note: The replace text can be left empty. When left empty the any text matching the find text within the label will be deleted.

Whole words only

If selected, the search for the find text within the Entity label must have spacing. In other words the find text must not be part of another word.

For example, if we were to find on ‘and’ with the Whole words only option selected. The following would be the result in these examples.

And this label                     <— Would be found

Anderson is his name      <— Would not be found

This label ends in and      <— Would be found

This label ends in ‘and’      <— Would be not found

Match case

If selected, for a match to be found within the Entity label the same letter case must match the find text letter case. Using the above example, with this option selected searching on ‘and’:

And this label                     <— Would not be found

Anderson is his name      <— Would not be found

This label ends in and      <— Would be found

Update corresponding media category (if present)

By default when an Entity is created a corresponding media category with the same name is also created. This helps speed up the finding and selection of media within the Media Manager. This connection is simply based on matching the labels between the two.

This option will automatically update the corresponding media category label, if present, with the same label changes made to Entity to preserve this linkage between the two

Replace All

This will perform the find and replace on the Entity list using the options entered within the dialog.

After successfully updating any matching labels the Entity list will be automatically refreshed.

While performing the find and replace operation each label change is checked to ensure it won’t cause a duplicate Entity label. Where this is the case, a list of matching Entity labels skipped will be listed for review.

Categories
Fact Sheet Fusion v2

Export – Advanced Options

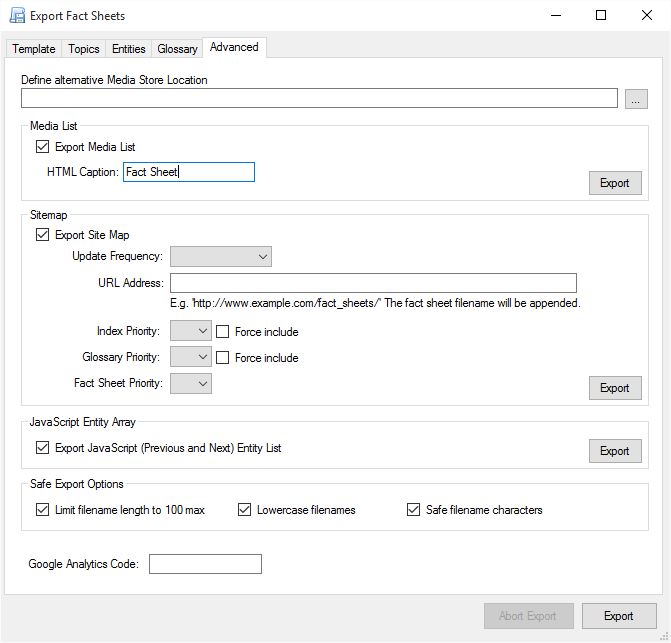
Export dialog Advanced Options tab

Define alternative Media Store location

Normally when a Fact Sheet Fusion database is exported, all media is stored within an Assets folder within the selected Destination folder, as defined in the Templates Tab of the Export dialog. As shown below.

\
\Assets\
\Image
\Sound
\PDF
\Other
\Video

However, under certain circumstances, it is desirable to choose another location for the media. For example, if fact sheets are destined for the Lucid Builder, it is preferable to export the media to the key’s Images folder, rather than to the Html folder. This will save doubling up media when it is to be attached to the Lucid key.

If an alternative location for the media store is defined, then relative paths within the fact sheets will be created to this location, unless the alternative location is defined on another hard drive. In the case of defining another hard drive absolute paths will be created. This is not recommended as it will require the same drive and folder location to be available, if the fact sheets are moved.

Media List

Media List Export options

The Media List is an XML file containing a listing of all exported fact sheets and their associated media items. You can select the export Media List check box prior to clicking the main Export button, in which case it will be included as a part of the main export process. Alternatively, you can export a media list without having to perform a full export by selecting the Media List Export button. It is also possible to export a media list while the main export is running. The Media List will then be added to the export jobs in process.

The HTML Caption is the label you wish to give the fact sheets within the Media List. Applications that use this list apply this caption when attaching the fact sheet within their data structures. For example, when Lucid imports from a Media List file it attaches the fact sheet and stores the HTML Caption, which is used within the Lucid Player Fact sheet menu. Normally this is why ‘Fact Sheet’ is an appropriate HTML Caption, though you can also use the Entity Name token [Entity]. This token will be replaced with the actual entity name during the Media List creation.

Sitemap

Site Map Options within the Advanced tab of the main fact sheet export dialog

Fact Sheet Fusion can create an XML based sitemap that can provide search engines and other webcrawlers about your content. The XML sitemap is not designed for human readers, the index page is the human equivalent of the sitemap.

For more information on sitemaps and their use please see www.sitemaps.org

Update Frequency

Set how often you think you may update the fact sheet content. This will let the search engine know how often it should come back and re-index your content.

URL Address

The URL address is the planned location on your website where the exported content will be copied. This should be the full internet address as shown in the example ‘http://www.example.com/fact_sheets/’. Using this example, it is be assumed that the exported content was copied to a root folder on the web server called ‘fact_sheets’.

Tip

After the exported content has been copied to the web server you should check that this URL address information is correct, otherwise the search engine could potentially not find the content and so may rank your site lower within its search results.

Priorities

The priority of URLs relative to other URLs on your web site. Valid values range from 0.0 to 1.0. (Default value is 0.5). This value does not affect how your pages are compared to pages on other sites—it only lets the search engines know which pages you deem most important for the crawlers.

Index Priority

Due to the nature of the index page and its links across to all other fact sheets it is recommended that the index page should have a higher priority than the fact sheets. The Force include option will include a reference to the index page, even if the index page has been excluded from the current export options.

Glossary Priority

Select the desired priority for your glossary page. The Force include option will include a reference to the glossary page, even if the glossary page has been excluded from the current export options.

Fact Sheet Priority

Select the desired priority for the fact sheets. Normally the default 0.5 is fine for this option.

Exporting

Check the Export site map checkbox if you want the sitemap created as a part of the main export process. You may also export the Sitemap separately from the main export process by clicking on the export button within the sitemap options. You can also select to export the sitemap during the main export process by clicking on the export button. This will add the sitemap creation task to the list of export jobs currently underway.

JavaScript Entity Array

JavaScript Entity Array export options within the Advanced tab of the main fact sheet export dialog

Often it is useful to have a JavaScript containing an array of the Entities, particularly in more sophisticated export templates. The JavaScript array can be used in other JavaScript’s, for example, providing navigation between fact sheets or searches etc. To take full advantage of this option, the export template must support it. You can check if your selected template supports this option via the Template Settings dialog.

Check the Export JavaScript (Previous and Next) Entity List checkbox if you want the JavaScript Entity Array created as a part of the main export process. You may also export the JavaScript Entity Array separately from the main export process by clicking on the export button within the JavaScript Entity Array options. You can also select to export the JavaScript Entity Array during the main export process by clicking on the export button. This will add the JavaScript Entity Array creation task to the list of export jobs currently underway.

Safe Export Options

Safe Export Options within the Advanced tab of the main fact sheet export dialog

These export options are normally reserved for specialised uses or destinations such as exporting for a mobile platform. Or they can be used simply to generate ‘cleaner’ filenames.

Limit filename length to 100 max – Selecting this option will automatically reduce any filenames for HTML pages, PDFs or images to 100 characters.

Lowercase filenames – All filenames output during export will be in lowercase.

Safe filename characters – All filenames exported will consist of a limited range of standard ASCII characters (a-zA-Z0-9_.). Spaces within a filename will be converted to underscores. This option is not recommend for languages that do not use this character set.

Google Analytics Code

Google Analytics is a popular (and free) choice for tracking the use of your website content. After you have signed up for a Google Analytics account and entered your website details you will be given a Google Analytics site code. Enter this code into the box. If the code is present during the export process the Google Analytics JavaScript, containing your code, will be automatically applied to each fact sheet.

For more information on Google Analytics please see https://analytics.google.com/analytics/web/

Tip

Do not enter the Google Analytics JavaScript into the text box, only the tracking code. This tracking code should be in the following format: UA-XXXX-Y