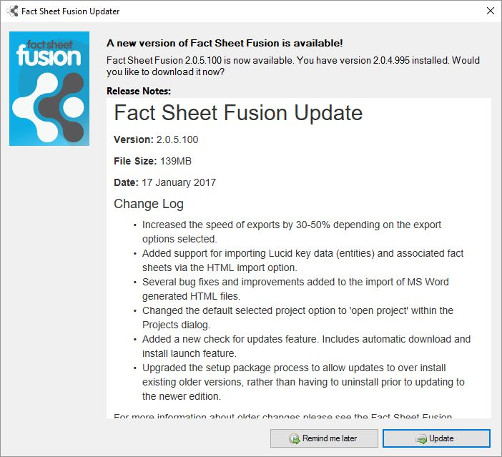
Fact Sheet Fusion can now check for the availability of new and updated editions. By default the check will occur in the background once Fact sheet Fusion has loaded. If a newer edition has become available the update dialog will be loaded. This will show the details of the new version available and allow you to download and install it.
Fact Sheet Fusion Update interface
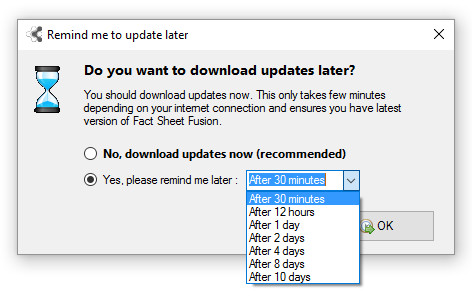
Remind me later options: If the ‘Remind me later’ button is clicked, then you will be given the option of deferring the update and checking for further updates until the selected time period has expired.
Fact Sheet Fusion Update remind me later option
The remind me later period can be overridden by manually selecting to check for updates via the ‘Help…Check for Updates’ in the main interface menu.
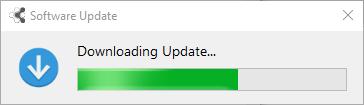
Update option: Clicking the Update button, or selecting ‘No, download updates now‘ option from the remind me later dialog will initiate the download of the newer edition setup package. Progress of the download will be shown via the download dialog as shown below.
Download progress dialog
Once the new setup package has been downloaded, it will be automatically launched and Fact Sheet Fusion will close. All data will be saved automatically before exiting. The setup package, even though it was launched by Fact Sheet Fusion, requires the current users Windows account to have install privileges. The Setup package will automatically request an elevation in privileges to complete the install. If your account is unable to provide the increase in privileges, then you will need your Systems Administrator to complete the installation for you. See below for instructions on manually launching the setup package.
Tip
The download can be cancelled anytime by closing the download dialog.
Manually launching the Setup Package
If for some reason the automatic launched option of setup package fails you can try manually launching it. The Updater saves the setup package to your user account temporary folder. This is normally located in the following location:
C:\users\<your username>\AppData\Local\Temp\
Note: The AppData folder may be hidden by your operating system. Use Windows Explorer’s View Options to show hidden folders and files to view it.
Double click the setup package executable, normally identified by the following naming convention ‘Fact-Sheet-Fusion-<version number>-Setup.exe‘, to launch it. Administrative or installer privileges are required to install the update. If your account does not have these privileges please see your Systems Administrator for help installing the update.
Fact Sheet Fusion by default logs certain user actions, warnings and error messages. The log file can be very useful when trying to determine a problem you may be experiencing. The log file by default is located in the following folder:
Windows Vista and above C:\users\<username>\AppData\Local\Fusion.log
Windows XP C:\documents and settings\<username>\AppData\Local\Fusion.log
Fact Sheet Fusion will also log some details about your operating system and hardware for diagnostic purposes. Below is an example of this:
2015-01-20 16:38:23,108 [10] INFO – [FSF_Logger] Product Name: Fact Sheet Fusion 2015-01-20 16:38:23,109 [10] INFO – [FSF_Logger] Product Version: 2.0.0.0 2015-01-20 16:38:23,208 [10] INFO – [FSF_Logger] OS Name: Microsoft Windows 8 Enterprise 2015-01-20 16:38:23,209 [10] INFO – [FSF_Logger] OS Version: 6.2.9200.0 2015-01-20 16:38:23,209 [10] INFO – [FSF_Logger] OS Platform: x64 2015-01-20 16:38:23,210 [10] INFO – [FSF_Logger] Physical Memory: 2.47 GB / 7.88 GB (Free / Total) 2015-01-20 16:38:23,210 [10] INFO – [FSF_Logger] Virtual Memory: 1.65 GB / 2.00 GB (Free / Total) 2015-01-20 16:38:23,215 [10] INFO – [FSF_Logger] Getting current projects. 2015-01-20 16:38:23,215 [10] INFO – [FSF_Logger] Connection String is: metadata=res://*/Fusion_Model.csdl|res://*/Fusion_Model.ssdl|res://*/Fusion_Model.msl;provider=System.Data.SqlClient;provider connection string=”data source=(LocalDB)\v11.0;AttachDbFilename=C:\Apps\Test Fusion\Another Test.fusion2;integrated security=True;MultipleActiveResultSets=True;App=EntityFramework” 2015-01-20 16:38:24,936 [10] INFO – [FSF_Logger] Finished retrieving current projects. 2015-01-20 16:38:26,192 [10] INFO – [FSF_Logger] Projects Form – Project Opened: Test Project 2015-01-20 16:44:28,752 [8] INFO – [FSF_Logger] Product version is within licence limits.
The log file is set to only grow to a maximum of 1MB and begin overwriting the oldest log entries when this limit has been reached.
Note
You can clear the log anytime via your preferred text editor.
Tip
If you are experiencing an issue with Fact Sheet Fusion and you cannot resolve the problem after looking in the log file please contact the support help desk at lucidcentral.org and include the contents of the log file.
Understanding the operation of the files and folders included in your Fusion databases and projects is very important, especially when it comes to backing up.
When you create a new Fusion v2 database a file will be created with an extension ‘.fusion2‘. Along with this database file a folder of the same name (without the extension) will also be created. Within this folder the media, watermarks and icons you have attached will be stored.
For example, if a Fusion database called “Pest Insects” is created in the folder “C:\temp”, the following will be created:
It is critical that both the database file and folder are backed up.
When backing up your work always ensure that Fact Sheet Fusion has been closed or that the database to be backed up is not open. To save space when backing up your Fusion Database and folder you can use a ZIP archive program such as 7Zip to compress the database and folder into a single file. See https://www.7-zip.org for more information.
Restoring a Backup
If you need to restore a backup edition of your Fusion database, just copy the database file and corresponding folder to their new location.
Note
It is recommended that you don't copy a restored edition over the top of an existing, older edition of the database and folder as this may leave unwanted media in the database folder.
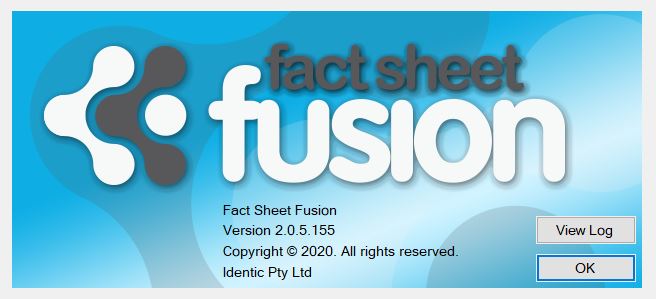
The Fact Sheet Fusion “About Dialog” provides information on the full product version number and gives quick access to the log file; clicking on the View Log button opens the Fact Sheet Fusion log file using your operating system’s default text editor. The About Dialog can be accessed via the help menu of the main interface. For more information about the Log file see the Log file help topic. The OK button will close the About Dialog.
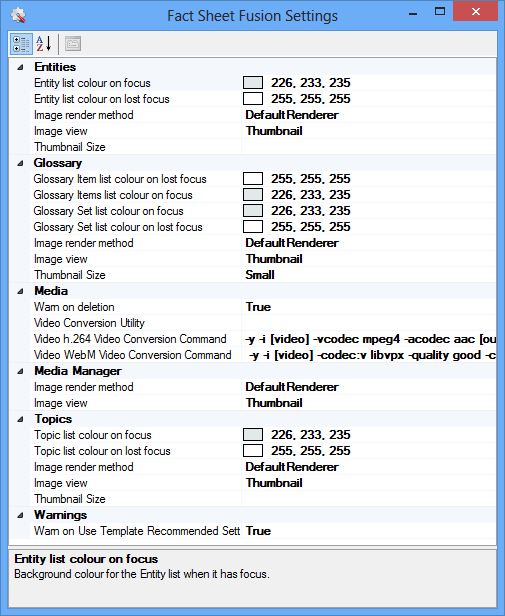
You can set various application settings through out the application. You can access the preferences options from the Edit menu in the main interface.
Interface States
Fact Sheet Fusion saves your preferred dialog postion, size and layout for the Main Interface (form), Glossary Manager, Media Manager and Image Viewer. This is done automatically each time you open (restores the last used settings) and close (saves the current settings) one of these dialogs.
If for any reason the dialog size or the position is problematic (E.g. Due to a screen resolution change), then you can hold down the shift key while opening the dialog. This will reset the dialogs opening settings to use Windows preferred settings.
Example Name Check dialog
Fact Sheet Fusion can interact with on-line services (APIs) offered by organizations such as Atlas of Living Australia (ALA – https://www.ala.org.au/), Global Biodiversity Information Facility (GBIF – https://www.gbif.org/) and Encyclopedia of Life (EoL https://www.eol.org/).
The first of these offered via Fact Sheet Fusion is a taxonomic name check from Atlas of Living Australia (via biodiversity.org.au). This service will pass your Entity names across Internet to the web service and, if matched to a species, return with the latest taxonomic concepts.
Accessing the Name Check Service
You can access the Name Check Service via the menu Entities…Services..Name Check (Biodiversity.org.au) or when right clicking on a selected Entity, via the context pop-up menu.
Tip
To use the Name Check Service you must have an Internet connection. Only use this name service if your Entities are plants or animals.
Searching for taxa (Entities)
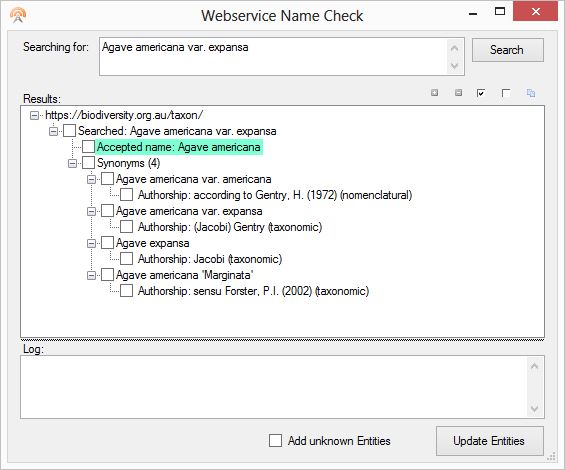
Name Check Web service search for name example
After the web service Name Check dialog opens you can search for one or more taxa (Entities). If searching for more than one taxon, you can add additional taxa separated by a semi colon or on separate lines. Next, click the search button to begin the search for these taxa.
Figure 1 shows a single taxon being searched with the results of the service shown in the results tree below.
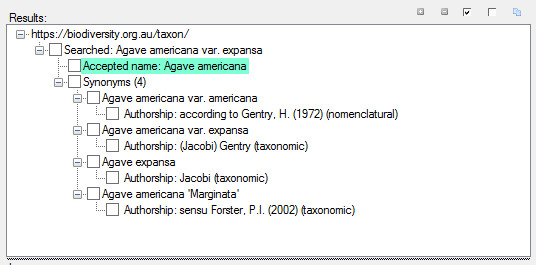
Results
Name Check Web Service example results
Once the search has been completed the results are returned in a hierarchical format (tree). Each child branch of the root service branch contains the results of a searched taxon. In the example above we can see the Entity named ‘Agave americana var. expansa‘ has returned a result. We can also see the current accepted name is now different to the one we searched for. Fact Sheet Fusion highlights the accepted name label where the taxon accepted name differs to make them easier to spot, especially when searching many names at once. Below the Accepted name is any synonymy, if present, along with authorship details.
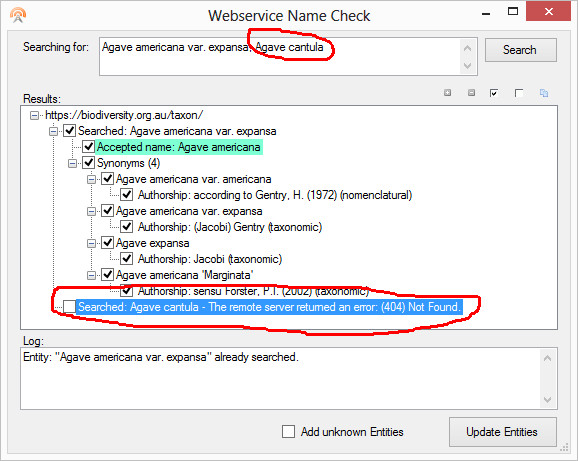
Names not found by the service
Name Check Web service name not found example
As shown in the screen shot above any Entity names that are not found by the service and will returned a (404) Not found error message in the results taxon searched node. This means there are either no current records for that name; Or you may have misspelled the name.
Using the Results
If you wish to use the results of the name check you can do so in several ways. If you want to use the accepted name, or include the synonymy, check the items within the tree and select the ‘Update Entities’ button.
Accepted Name – If you choose to accept the new name, Fact Sheet Fusion will automatically update the entities name and move the old name to the Alternate Names list. Synonyms – If selected, the synonym(s) will be added to the Alternate Names list for the searched entity, along with the Authorship details, if selected. Note: If there are several authorship records for a given synonym, these will be concatenated together, separated by a semi-colon, as Fact Sheet Fusion only stores one Alternate name to one Authorship field.
You may also take a copy of the results tree via the copy button. The results tree can then be pasted into another document. See Copy Results tree below for further details.
Adding unknown entities
Add unknown entities option
You may search on any names you desire within the Name Check dialog, whether they are Entities within the current project or not. If you have searched on Entities that are not present in the current project and you wish to add them, selected their results (Searched name, accepted name synonyms etc) and the ‘Add unknown Entities’ option. Once the ‘Update Entities’ button has been clicked these new Entities, along with any their selected results will be added to the project.
Tip
Adding new Entities via the Name Check service can be a great way of ensuring the latest taxonomy and capturing the related synonyms, which will give additional indexing and cross-linking opportunities when exporting your fact sheets.
Results Button Bar
Contains the following options:
Expand all Result nodes
This option will expand all branches of the results tree.
Collapse all Result nodes
This option will collapse all branches of the results tree.
Check all result nodes
Will cause all check boxes within the results tree to be selected.
Uncheck all result nodes
Will cause all check boxes within the results tree to be un-selected.
Copy Results tree
The results tree will be copied as a text representation to the clipboard, where it can be pasted into other applications such as MS Word or a text document.
Below is what the pasted text representation of the results looks like from Figure 1. shown above:
Searched: Agave americana var. expansa *** Accepted Name: Agave americana Synonyms (4) Synonym: Agave americana var. americana Authorship: according to Gentry, H. (1972) (nomenclatural) Synonym: Agave americana var. expansa Authorship: (Jacobi) Gentry (taxonomic) Synonym: Agave expansa Authorship: Jacobi (taxonomic) Synonym: Agave americana ‘Marginata’ Authorship: sensu Forster, P.I. (2002) (taxonomic)
Log
The Name Check log will show all actions that take place when searching or saving results back into the current project. This is particular useful to check if the selected results were successfully saved. You can select and copy (ctrl+c) these logs to a text document for later use, if desired.
Update Entities Button
The ‘Update Entities’ button will save any of the selected results back to the current project. Details of all actions from this will be output to the log window above.
Note
If you elect to update to an accepted name, but an Entity of the same name already exists, then the searched Entity's name will not be updated with the accepted name as duplicate entity names are not allowed. Synonyms and authorship will still be added in this event, if selected.
Occurrence Maps (Atlas of Living Australia)
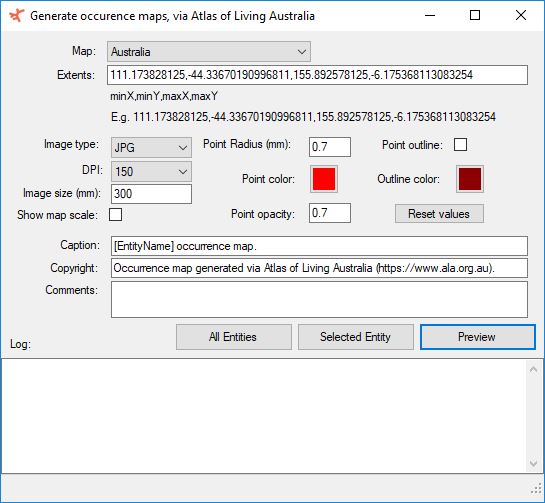
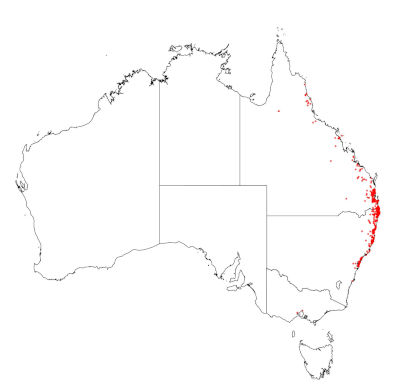
Occurrence maps interfaceExample occurrence map
The occurrence map service queries Atlas of Living Australia’s online data service for occurrence records of the selected entity. If records are found an occurrence map is generated. The occurrence map interface has many options for customising the map. Each option is outlined below. You must have an internet connection for this service to function.
Map
The map option drop down has several maps predefined with Extents (see below). Choose your preferred map, such as Australia or New Zealand. Only records found within the select map area (or extents) will be returned and added to the generated map.
Extents
Extents are the area in which to locate occurrence records and to produce the map. The Map drop down contains several predefined extents. You can however define your own, if you are only interested in a specific area. Use Atlas of Living Australia’s website mapping tool to explore the coordinates. The extents must be valid coordinates and entered in the format of min X,min Y, Max X, Max Y. As shown when selecting a predefined map.
Image type
Choose between JPG or PNG image formats for your map.
DPI
Dots per inch (DPI) – Quality of the image – 150 DPI should suit most instances, however if your fact sheet is targeting printing then you may want to consider 300 or 600 DPI. A higher value equals a greater image dimensions and file size.
Point radius
The size of dots within the map representing the occurrence record locations.
Point outline
Apply another color to outline of the occurrence points. This may give more indication of the points especially when many are clustered close together.
Point color
Define your preferred color of the occurrence points within the map. Click on the color chip to select your color.
Point opacity
Set the level of transparency of the occurrence points rendered on the map.
Outline color
Define your preferred colour of the outline of the occurrence points. For the color to be applied the Point Outline option must be selected. Click on the color chip to select your color.
Show map scale
Show a map scale on the occurrence map.
Reset values
Reset all the occurrence map options back to the default values.
Caption
Apply a caption to the occurrence map. Fact Sheet Fusion Tokens can be used to make the caption more specific. For example, if you had selected an entity called Ageratum houstonianum and set the caption to: ‘[EntityName] occurrence map.’. Then the occurrence map when output into the fact sheet would be labelled Ageratum houstonianum occurrence map..
Copyright
Enter any copyright details around the map. Out of courtesy to ALA, the default copyright is: ‘Occurrence map generated via Atlas of Living Australia (https://www.ala.org.au).’
Comments
Enter any additional comment text you may want to go with the occurrence map image.
All Entities
This option uses all the above preferences of the occurrence map dialog and initiates the occurrence map service for each entity contained in the current project. If occurrence records are found, Fact Sheet Fusion generates and attaches the map automatically. The map can then be found in the entities list of attached media or via the entities media category in the media manager.
Selected Entity
Similar to the All Entities option except only a map for the selected entity is generated, if occurrence records are found.
Preview
Will generate and display the occurrence map, based on the defined preferences, if occurrence records have been found for the selected entity.
Log
The log output will detail the communications to the service and actions taken by the service module. For example, previewing an occurrence map for Ageratum houstonianum may output:
Previewing occurrence map for: Ageratum houstonianum Checking for occurrence records. Found: 701 Occurrence map captured to: C:\Users\XXXXXXX\AppData\Local\Temp\ageratum_houstonianum_occurrence_map_aus.jpg
Often when dealing with large data sets it can be useful to search across the set based on a list of one or more Entities. When managing our own data sets we are asked “I have a list of species. Do you have any of these?”. Rather than manually searching through the list of entities you can now use the Ad hoc Entity Report.
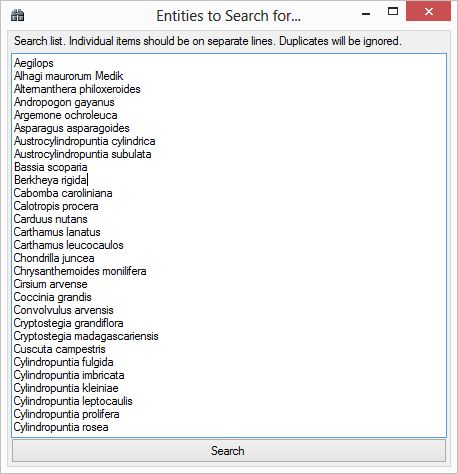
To begin with one or more Entities need to be supplied to search. You can add these via the ‘Entities to Search for…‘ dialog as shown below:
Example usage of the add Search Entities dialog. A species list pasted from Excel.
Once one or more entities have be provided to the Ad hoc Entity report dialog, these are searched for across the current projects Entity list and their alternate names. Any matches will be listed in the ‘Matched Entities’ list box, while close matched (by distance) will be listed in the ‘Similar Entities‘ list box.
If you are only interested in exact matches then you can untick the ‘Include up to [x] similar Entities’ check box, before clicking the Report button. Otherwise you can select the top 1-20 similar species to be included in the report. The Report button will then ask for a location in which to save the report. Once saved, Fact Sheet Fusion will then automatically open the report in your preferred web browser.
The report uses the following layout:
Matched Entities [Entity Name] (Synonym of: ) Associated Media [Entity Media] File: Caption: … Total Entities Matched: —————————————————– Remaining Entities with potential matches Entity Similar Entity names (by distance) Entity Name () Associated Media [Entity Media] File: Caption: … Total non-matched entities:
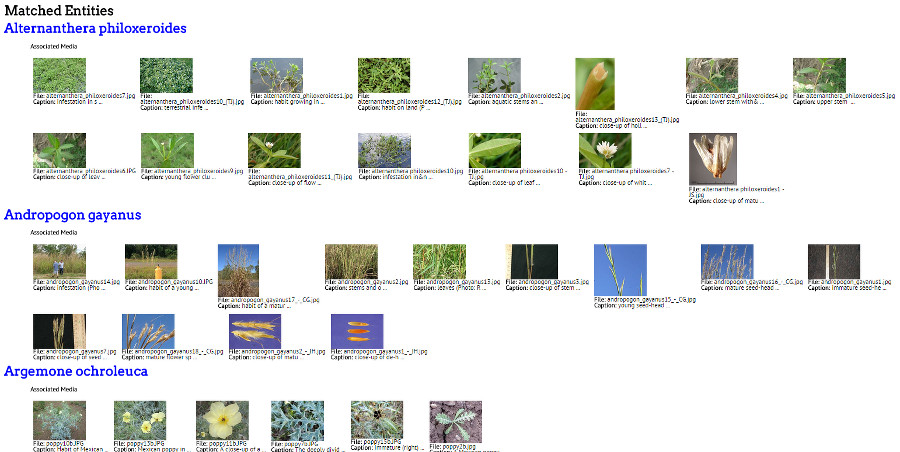
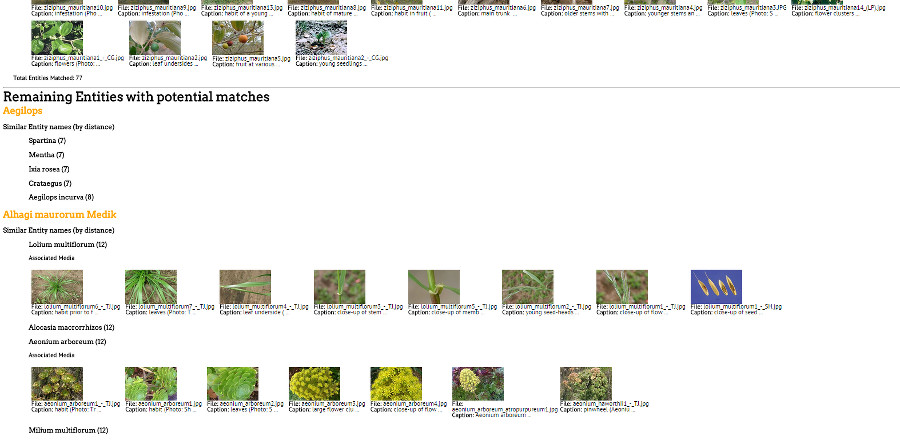
Example section of a report showing matched entities:
Example report showing matched entities
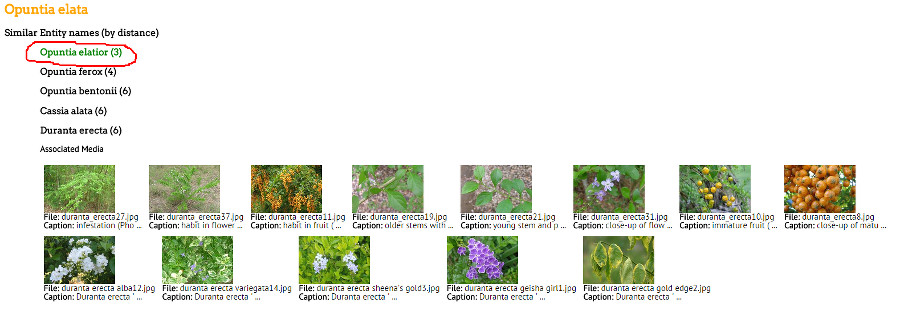
Example section of the end of matched Entities and the start of similar Entities:
Example report showing potential matches
Where a match distance is very close (3 or less) it is highlighted in green text to indicate closeness as outlined red in the example below.
Ad hoc report example with very close match
The report uses a very simple self contained HTML template page located in ‘Reports’ folder of Fact Sheet Fusion’s installation folder. If you have permission, you may customize the styles defined in this file, however do not change the filename. Or customize the saved report. Below is the report templates content:
{0}
Note
The reports content replaces the '{0}' token when generated to a file.
Tip 1
To have media displayed within the report relies on a previous export of the fact sheets as HTML. The export settings for the media are used as reference to the media in this report.
Tip 2
The report can be easily saved via your browser as a PDF document using a PDF print driver. E.g. 'Print as PDF'.
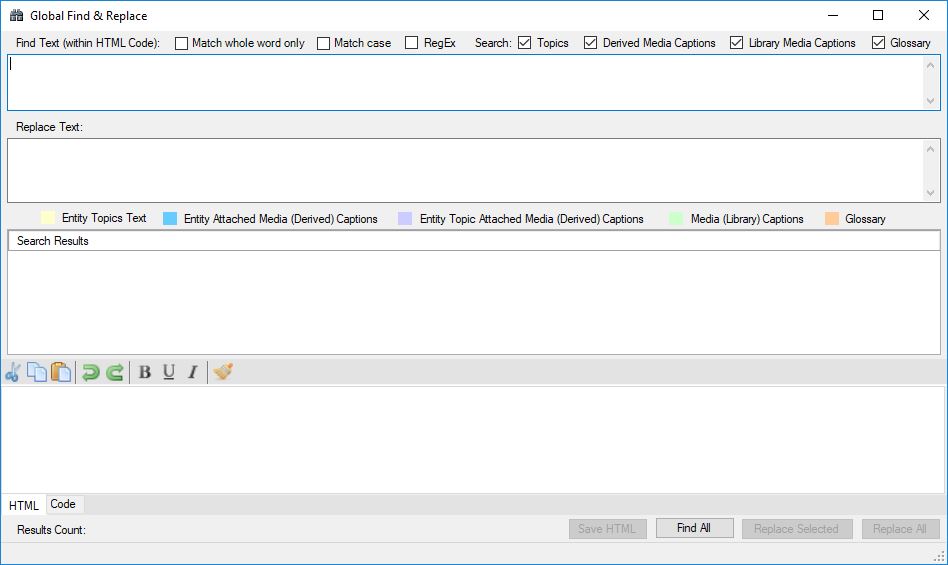
The Global Find and Replace dialog allows you to search and replace text within the currently opened projects topic text, derived media captions, the databases media library captions and glossary terms.
Note
The search for matching text is performed within the HTML code, not the rendered HTML view. This means you can find and replace not only words, but also HTML tagging (formatting). This is important to understand particularly when using the 'Match whole word only' option, as HTML tagging adjacent to search criteria may mean it's not found. See the 'Match whole word only' option below for more information on this.
Search Options
Match whole words only
This options will cause the search function only to return matches where the search criteria is clear of other characters. That is the search criteria doesn’t form part of another word. For example, if we searched on the following word ‘wiki’ with the ‘Match whole word only’ option selected. The following would apply:
“The wiki was a useful source of information.” – This instance of ‘wiki’ would be returned in the search results as it has no adjacent characters.
“The following comments were found in the wiki.” – This instance of ‘wiki’ would not be returned as found due to the full stop to the right.
“The wikipedia website is very popular.” – This instance of ‘wiki’ would not be returned as found due as it forms part of a word.
“The wiki was a useful source of information.” – This instance of ‘wiki’ would not be returned as found due to the surrounding bold tags.
The ‘Match whole word only’ option can be used in conjunction with the other search options.
Match case
This option allows you perform case-sensitive searches.
For example using ‘Wiki’ as our search criteria:
“The Wiki was a useful source of information.” – This instance of ‘Wiki’ would be returned in the search results.
“The wiki was a useful source of information.” – This instance of ‘wiki’ would be not returned in the search results.
‘Match case’ can be used in conjunction with other search options.
RegEx (Regular Expressions)
A regular expression is a special search string for describing a search pattern. You may already be familiar with wildcard notation such as ‘*.doc’ or ‘*.*’ etc when using your file manager. A regular expression is a much more sophisticated way of defining powerful search patterns. For example, if you wanted to remove all table tags from your HTML while leaving the table content intact you could use a regular expression like:
Don’t worry if you don’t understand the above example, it was to illustrate the power of regular expressions. Fact Sheet Fusion uses the .NET Framework library for regular expressions, each implementation of regular expressions is slightly different between programming languages, so when developing your own regular expressions or using others you might find on the Internet check that it will work for .NET.
Below are some regular expressions you may find useful when dealing with HTML based content in Fact Sheet Fusion, especially if you have copied and pasted the content from another source or imported it from MS Word.
If you have font tags within your content overriding your template output you can easily find all font tags by:
<font[^>]*>
If you have hard-wired styles within tags overriding your template output you can use:
style=”[^”]+”
If you want to remove all span tags from your content use:
</?span[^>]*>
If you want to remove all embedded image tags from your content use:
<img.*?>
Use the regular expression option to find content, via the global search and replace dialog, and use the replace option textbox to replace the matching content with whatever replacement text you prefer. Or replace matches with nothing (empty), which will remove the matched content from the topic or caption.
Search Filters
Topics
This option will include all entity topic text in the search.
Derived Media Captions
This option will include all media that has been attached to entities or entity topics that have derived captions
This option will include all library media captions, regardless if the media item has been attached within the project.
Important Note: Library media can be linked to objects (e.g. Entities & Topics) in one or more projects within the selected Fusion database. If you update a Library media caption this change will affect all projects where this item was attached. Using this option (by itself) will not include any derived media captions.
This option will include all Glossary Terms in the search.
Find Text
The find text (text to be searched for) can include any combination of characters, including HTML tags, spaces, alphanumerics.
Only text within the selected search filters that matches this will be returned in the search results panel.
Replace Text
This is text, which can include HTML tags, spaces, alphanumerics or nothing, that you wish to replace the found text.
Note: If the replace text criteria is left blank, and a replace function is used, the found text will be deleted in the matching results.
Results color key
Fact Sheet Fusion Global Find and Replace result color key
This color key indicates what type of record the search results match. You can set your preferred colors by clicking on each of the corresponding color swatches. Or by selecting the colors via the Fact Sheet Fusion preferences dialog
Search Results
Fact Sheet Fusion Global Find and Replace Search Results panel
The search results panel will list all records that match the search criteria after the ‘Find All’ button has been selected. Each matching record will be color coded and listed in this panel. You can select one or more records in which to apply the ‘Replace’ function.
When a record is selected within the Search Results panel its content is displayed within the display panel below. This will for example allow you to check the matching criteria prior to making a replacement.
Note
The Replace All function will replace all match text found in the search results records regardless of which records are selected.
Tip
You can navigate the Search Results (move up or down results) by using the keyboard shortcuts Ctrl + Up arrow and Ctrl + Down arrow.
Record Display Panel
Record Display panel (Rendered View)
When a search result record is click on its content is displayed in this panel. You can view the rendered HTML or the underlying HTML code of the record (via the code tab). This is useful for checking the search criteria matches what you intended.
The contents of the display panel can now be edited directly. You must use the ‘Save HTML’ button (Ctrl + S) to save any changes. You will be notified when the record has been saved successfully via a message in the bottom left status bar of the find and replace dialog.
Note
No save warning will be given if changes have been made within the Record Display Panel, if another search result record is selected. You must remember to save before moving on to the next record.
Record Display panel (Code View)
Find All
The Find All button will initiate the search using the defined search criteria. Any record that are found will be listed in the Search Results panel.
Replace
This function will replace all matching criteria with the replacement text to the selected records in the Search Results panel.
Note
You will be asked to confirm you wish to proceed with the replacement operation, unless you have selected to turn this warning off in the Fact Sheet Fusion preferences dialog.
There is no undo for this operation.
Replace All
This function will replace all matching criteria with the replacement text to all records in the Search Results panel, regardless of the records selected.
Note
You will be asked to confirm you wish to proceed with the replacement operation, unless you have selected to turn this warning off in the Fact Sheet Fusion preferences dialog.
There is no undo for this operation.
Tip
If you need to perform and find and replace operation on a common element found in HTML tags, for example the ampersand (&) then you may have to consider two find and replace operations:
If the ampersand has been entered via the editor it will be represented in its HTML code form i.e. '&'. You would search and replace on this basis. E.g. Find: &
If it was pasted from another source (or edited directly in the Html code view) as just a regular ampersand ('&'), you would search with a space on either or both sides to avoid finding the ampersands used as a part of other valid tags. E.g. '& ' or ' & ' won't find tags like ' ' or '&'
Fact Sheet Fusion templates are based on the following Internet standards called XML and XSL (eXtensible Stylesheet Language) and XSLT (XSL Transformations).
The following is not a tutorial on XML or XSLT. For further information on these standards please see the World Wide Web Consortium’s website https://www.w3.org.
A Fact Sheet Fusion template consists of the following components:
Template Settings Document
Style Sheets
JavaScripts
Template interface images
XSLT documents
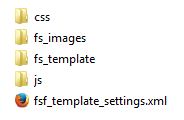
Here is a screen shot of a typical template folder:
Screen shot of a typical template folder structure
Each of these elements are described below.
Template Settings document
The fsf_template_settings.xml document is an XML description of the template that contains all the settings and recommendations associated with a template. The template author provides this along with the template.
The Template Settings document must be called ‘fsf_template_settings.xml‘, UTF-8 encoded and well formed. Each Template must contain a unique name.
The following example Template Settings document content contains all available options:
<?xml version="1.0" encoding="utf-8"?>
<FSF_Template name="Lucid Mobile Template" version="1.0">
    <Author>Fact Sheet Fusion</Author>
    <Description>This template has been specifically designed to export fact sheets for the Lucid Mobile application. The output uses very simple HTML tags to enable translation of the content in to the Lucid mobile format. It contains no CSS or additional template files such as JavaScript or images. Please note: The Lucid Mobile application doesn't support within the fact sheet complex objects such as image, videos or tables. Any associated media with the fact sheet are output separately and associated with the entities in the corresponding Lucid key via the Media List export file.</Description>
    <URL>http://www.lucidcentral.org/fact_sheet_fusion/templates/Lucid_mobile</URL>
    <Settings>
        <Regular_Images>900</Regular_Images>
        <Thumbnail_Images>175</Thumbnail_Images>
        <Video format="webm">450</Video>
        <JavaScript_Entity_Array>false</JavaScript_Entity_Array>
        <MediaList>true</MediaList>
        <Index>false</Index>
        <Glossary>false</Glossary>
        <HTML>true</HTML>
        <PDFs>false</PDFs>
        <XML>false</XML>
    </Settings>
</FSF_Template>
Cascading Style Sheets (CSS) are the rules that define the look and formatting of document written in markup language (E.g. HTML based fact sheets). Style sheets save you from having to apply styles and formatting to every text element during data entry. A template can have one or more style sheets associated with it. They are normally located in the CSS folder and have a .css file extension.
Tip
If you define in-line styles within your Topic text this will override the templates style sheet. This is why the HTML editor within Fact Sheet Fusion limits these options (e.g. Selecting font types or editing options for in-line styles). Pasting content from MS Word is a common example where in-line styles will be copied to maintain the exact look within the Word document, however this isn't recommended as they override the style sheets. See Clean HTML option for further information on dealing with content pasted from MS Office applications.
JavaScripts
JavaScript is the programming language of the Web. JavaScript enables options and functionality not available in regular mark-up languages such as HTML. It is commonly used for interactive content, validation among many other uses. Template JavaScripts are normally located in the js folder and have a file extension of .js.
Template Interface Images
Any images that are used in the template design and layout are normally stored with the fs_images folder. For example, a template may use an image for a banner across the top of the fact sheet. This would normally be located here. If you wish to customize an interface image it is recommended that you make a copy of the template (folder) and customize this new edition to preserve the original template. You should take note of the image dimensions and file name as these are often referenced in the template style sheet.
XSLT Documents
The XSLT documents are where all the hard work of determining how the content of the fact sheet should be output. A Fact Sheet Fusion template may be comprised of one or more XSLT documents. If the template supports the output of an Index and glossary then it will have a minimum of three templates (described below). Fact Sheet Fusion Template documents must be located in the ‘fs_template‘ folder.
template.xsl – This XSLT document is responsible for the Entity fact sheets. It may reference additional XLST documents.
index.xsl – This XSLT document is responsible for the Index page. It may reference additional XLST documents.
glossary.xsl – This XSLT document is responsible for the Glossary page. It may reference additional XLST documents.
The above three XSLT documents must be named as described. Additional referenced XSLT documents can be named as desired. Fact Sheet Fusion XSLT documents also supports additional Script languages such as C# and Visual Basic. For example:
<?xml version='1.0'?> <xsl:stylesheet version='1.0' xmlns:xsl="http://www.w3.org/1999/XSL/Transform" xmlns:msxsl="urn:schemas-microsoft-com:xslt" xmlns:local="urn:local" extension-element-prefixes="msxsl"> <msxsl:script language="CSharp" implements-prefix="local"> public string CopyrightYear() { return DateTime.Now.ToString("yyyy"); } </msxsl:script> <xsl:template name="copyright"> <!-- BEGIN COPYRIGHT --> <div class="copyright"> Copyright © <xsl:value-of select="local:CopyrightYear()" disable-output-escaping="yes"/>. All rights reserved. <div id="button-previousnext"></div> </div> <!-- END COPYRIGHT --> </xsl:template> </xsl:stylesheet>
Testing a Template
If you have created your own template or customized an existing one you can test out the template either by trying to export via the Export dialog or by exporting your content as XML and loading one of the XML pages in Internet Explorer. Any errors in the template should be reported in the browser.
If you export your template via the Export dialog errors maybe reported via a message box (if serious) or logged to the Fact Sheet Fusion log file. Always check the log file if your template is not exporting the expected result. See the Fact Sheet Fusion log file for more information on this topic.