
Applies to Matrix key projects
The Lucid Builder can be used to produce natural language descriptions of the Entities in the key, as well as descriptive tables and listings of Features.
Natural language is handled using the Descriptions panel, accessed by clicking on its tab located on the left hand side of the Builder window.
The Descriptions panel has four sections:
Wording Section is used to specify the wording of features and states to be used when generating natural language descriptions.
Score Modifiers are used to enter text modifiers for scores, to be inserted before or after the appropriate score string in the natural language description.
Description displays a chunk of a natural language description, relevant to the currently selected feature.
Export is used to export full natural language descriptions to an output file, and to transform the output using predefined template files.
The following topics describe the operations of each element of the Descriptions panel in more detail.
Specifying wording to be used in Natural Language Descriptions
It will often be the case that the best wording for a feature or state in the context of the list of features and states in the key is not the best wording in the context of a natural language description. For example, a key to fungi may have the following feature:

It is clear from the context of the feature Translucent striations that it refers to the margin of the pileus. However, a description string for this feature would read:
“Translucent striations absent”
This may be adequate in some circumstances, but not in others. The Wording panel allows you to modify this description string so it would read instead:
“Pileus margin not translucent-striate”
To do this, select the state absent, and set the wording for the feature and state as follows:
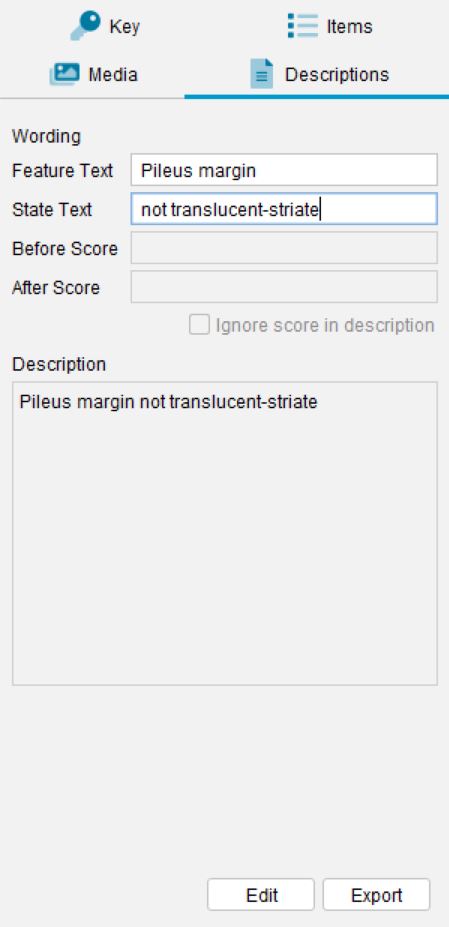
How it works: the wording “Pileus margin” is used for the description of this feature in place
of “Translucent striations”; the wording “not translucent-striate” is used in place of “absent”.
Similarly, setting the wording for the state “present” to “translucent-striate” will result in a description string (for an entity scored as present) that reads “Pileus margin translucent-striate”.
Modifying a score using text modifiers
Sometimes it is useful to modify an individual score in a natural language description. Lucid already supports two important modifiers – rare and misinterpreted – in its scoring, and these are handled in descriptions automatically. For example, the following scoring for an entity will produce the accompanying description.
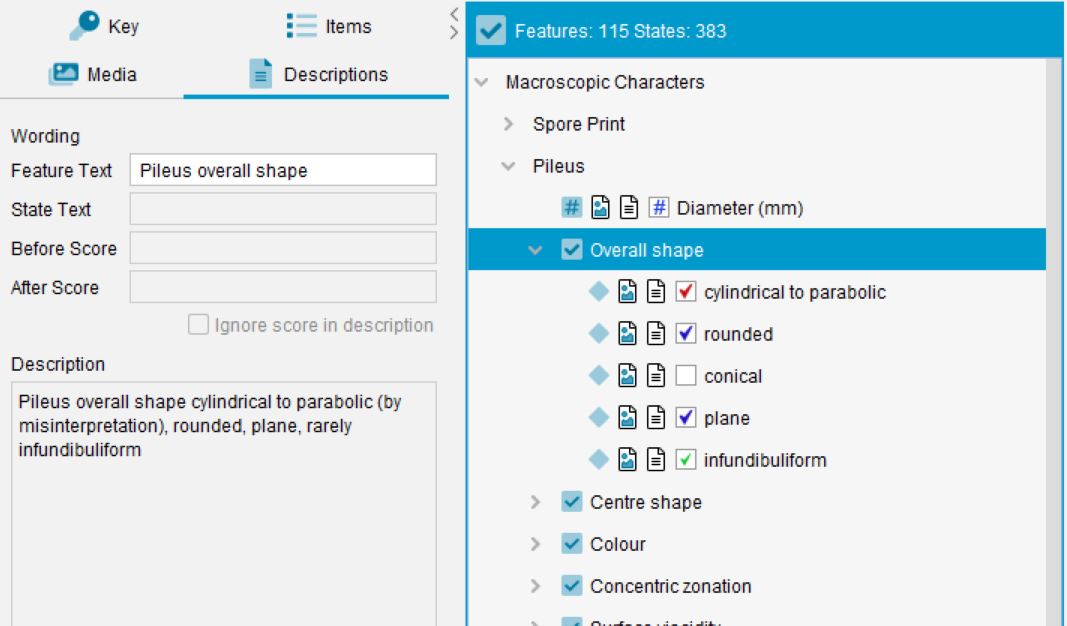
How it works: the wording “Pileus overall shape” is used for the description of this feature in place of “Overall shape”. Since the state “cylindrical to parabolic” is scored using the “By Misinterpretation score”, the string “by misinterpretation” in parentheses is added after the score; since the state “infundibuliform” is scores using the Rarely Present score, the string “rarely” in parentheses is added after the score.
If other modifiers are needed in a description, use the Modifiers panel on the Descriptions tab. A modifier can be inserted before or after the state string in the description. For example, the following scoring and modifiers will produce the accompanying description.
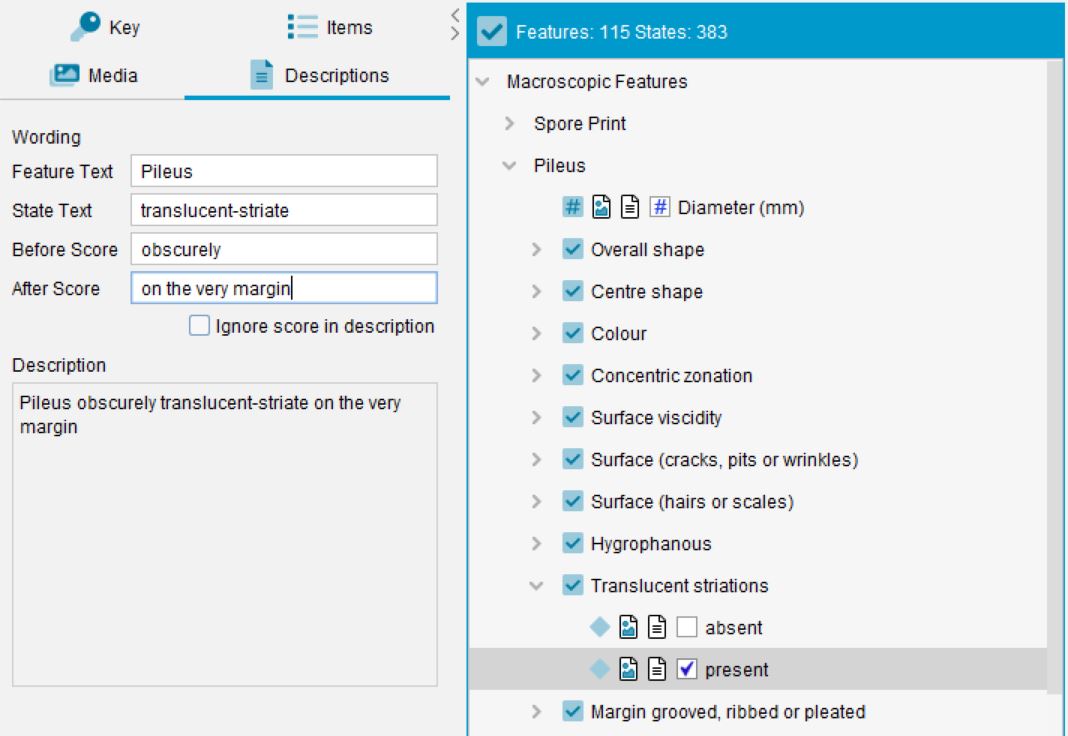
How it works: the wording “Pileus” is used for the description of this feature in place of “Translucent striations”; the wording “translucent-striate” is used for the state instead of “present”. The modifier “obscurely” is inserted before “translucent-striate”, and the modifier “on the very margin” is inserted after.
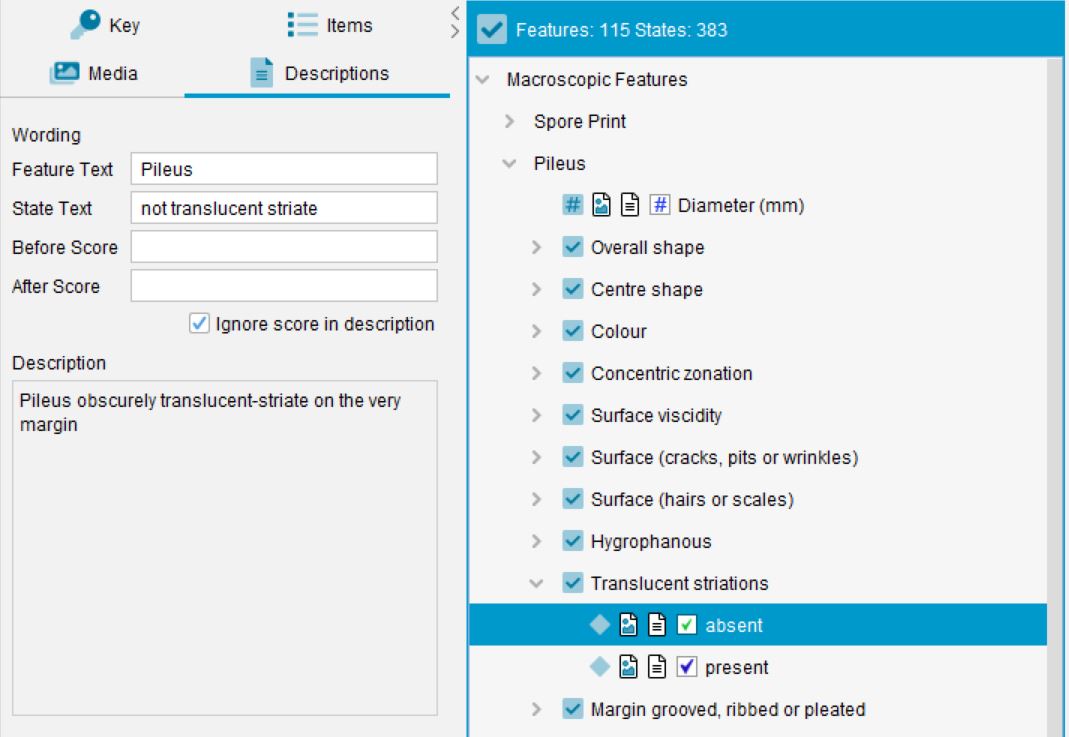 How it works: the wording “Pileus” is used for the description of this feature in place of “Translucent striations”; the wording “not translucent striate” is used for the state “absent”, while the wording “translucent striate” is used for the state of “present; since Ignore score in description is checked for the state “Absent”, the feature description is “Pileus translucent-striate” instead of “Pileus not translucent-striate (by misinterpretation) or translucent-striate”.
 Text Features
New to version 4, a Text Feature is a special Feature that is used to help generate descriptions, rather than being output as a part of the identification or diagnostic key.
A Text Feature is indicated by the 
Exporting Natural Language Descriptions
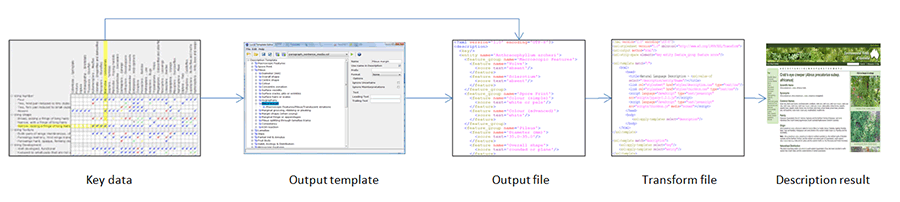
The following diagram shows the process of description creation in Lucid: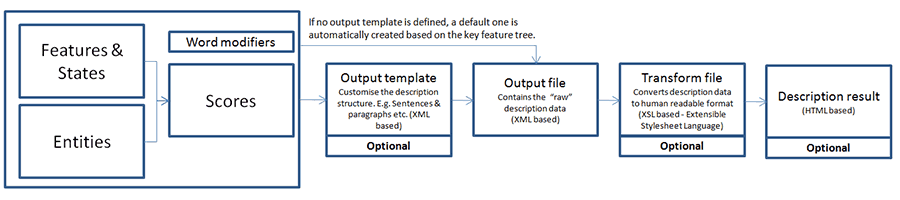
Exporting xml output files without an Output Template or Transform File
On the Descriptions Panel, click the Export button. An export dialog will appear, select or enter the name of a new Output File. Once the Output File has been defined click dialogs save button. Next, select to either export just the selected Entities or descriptions for all Entities within the key.Using Output Templates to customise descriptions
An Output Template is an XML file that provides customisation options for descriptions. Using an Output Template allows features to be included or excluded from descriptions, rearranged, grouped into sentences, paragraphs and table columns, and formatted using italics, bold etc.
Since Lucid 3.5 we have included an Output Template Editor that allows the easy creation of Output Templates, which previously had to be built “by hand” in version 3.4.
The Output Template Editor

To access the Output Template Editor click the Edit button within the Descriptions panel.
If no Output Template has been associated with the key previously then the Output Template Editor will offer to automatically build a default template based on the current open keys structure. An automatically generated template will reflect the current feature tree as closely as possible within the Feature Group, Feature and Feature Item structure of the editor.
Template Editor Features
Menus
File Menu

 New Template (Ctrl+n /⌘+n)
Creates a new empty template. Prior to a new template being created, if an existing template is in use, you will be asked to save and close the current template or cancel the creation of the new template.
 Open (Ctrl +n/ ⌘+n)
Opens an existing template file from the folder system.
 Save (Ctrl+s/ ⌘+s)
Saves the current open template. If the template is new and has not been saved before then the Save function will ask you to select a folder and filename for the template. Otherwise the save function will save to the current template file, overwriting any previous data.
 Save As
Saves the current template in use but allows you to specify a new filename and location for the template. If you select to save over an existing template file a warning dialog will be displayed and confirmation asked before this action is performed.
 Preview (ctrl+p/ ⌘+p)
The preview function will take the current template, key data, generate an Output file, and then apply a Transform file. The Sentence Transform is applied by default, if none is selected. It then creates a description for preview. This preview file will then be loaded into the Lucid Browser window: for OSX and Linux users this will be your default web browser.
Before rendering the preview the option to either view descriptions for all Entities or for only those currently selected within the Builder will be given.
The Output file and Description Preview file will be created in the same folder as the template file and will use the same name. The addition of ‘_preview’ is added to the Description Preview Filename. As the preview file is HTML based the file will have ‘.html’ file extension, while the Output file will have an ‘.xml’ file extension.
 Exit
Exit
Closes the Template Editor window. If required, the ‘Save/Save As’ function will be offered on exit.
Edit Menu
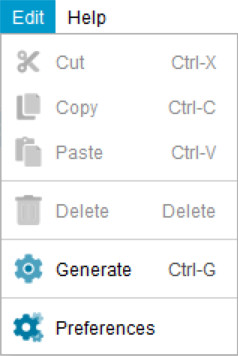
 Cut (ctrl+x/ ⌘+x)
The cut operation allows either a Feature Group, Feature, Feature Item or text elements to be cut from the Description Template. The cut item is then available within the Paste clipboard. See the Paste function for further details on pasting cut or copied items.
 Copy (ctrl+c/ ⌘+c)
The copy operation allows the copying of various element types within the Template Editor such as Feature Group, Feature, Feature Item or text element. The copied item then becomes available to the Paste Clipboard. See the Paste function for further details on pasting cut or copied items.
 Paste (ctrl+v/ ⌘+v)
The Paste operation takes the current item from the Paste clipboard and transfers it to the selected location within the Template Editor. Depending on what has been cut or copied causes the template editor to enforce rules on the Paste operation that prevent illogical operations from occurring. For instance, the Paste option will become unavailable if you copied a Feature Item and tried to paste it at the same level as a Feature group.
 Delete (Delete key)
The Delete operation will remove a selected item from the Description Template tree or in text boxes found in the Description property area. The delete option will only become available where it is valid to delete a selected item.
 Generate (ctrl+g/ ⌘+g)
The generate operation will automatically create a template based on the current key structure. An automatically generated template will reflect the current key’s Feature tree as closely as possible within the Feature Group, Feature, Feature Item structure of the editor. This automatically generated template can then be further developed and customised, if desired. See Manually Building a Template for further information on this.
 Preferences
The Preferences option opens the Description Options dialog. These same preference options can be also set via the Key Options..Descriptions tab found in the Builder. The two description settings allow you to set a default Output template and Transform file for the key. Once set, these defaults will be used when the key is opened. This removes the need for the Output Template and Transform File to be reselected each time you wish to generate your descriptions.
Template Editor Tool Bar

New Template (Ctrl+n /⌘+n)
Creates a new empty template. Prior to a new template being created, if an existing template is in use, you will be asked to save and close the template or cancel the creation of the new template.
Open Template (ctrl +n/ ⌘+n)
Opens an existing template file from the folder system. Template file extensions are ‘.xml’.
Save Template (ctrl+s/ ⌘+s)
Saves the current open template. If the template is new and has not been saved before then the Save function will ask you to select a folder and filename for the template. Otherwise the save function will save to the current template file, overwriting any previous data.
 Expand Template Tree
This function will expand all nodes within the Template tree.
 Collapse Template Tree
This function will collapse all nodes within the Template tree to the Feature Group level.
Transformation Template Selection Dropdown
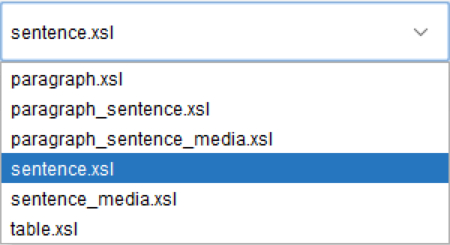
This dropdown box allows the quick selection of available transformation templates. Available Transform Templates are located in the \resource\transform\ folder.
Preview Template
The Preview Template button (Green arrow) generates a preview copy of the description and automatically opens the description within the Lucid Browser window (Window’s Users), or within your default web browser (OSX & Linux users). Selecting to preview your description will trigger the save function if the template has been modified since the last save operation. Additionally an option will be offered to preview the selected entity or entities within the key or to preview the descriptions for all entities.
 Help
Help
Opens this help file describing the Template Editor functions.
Manually Building a Template
While the Template Builder’s automatic generation of a Template is quick and convenient, there will be times where it is desirable to manually build a Template or adjust an automatically generated one.
To start the process of constructing a Template right click on the default “Description Template” root node. A context pop-up menu will appear.

Additional options can be set on the Feature Group node. See Template Editor Options Panel – Feature Group Selection for information on these.
Next, right click on the Feature Group node. The context pop-up menu will appear again, though this time it will contain more options
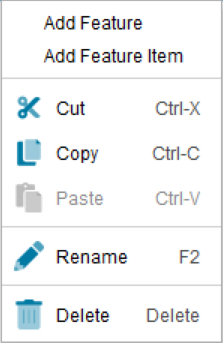
In particular, to either add another Feature Group node or to add a Feature. In this instance select to add a Feature. A new node below the Feature Group node will appear. It also will be called ‘undefined’ by default.
Select the undefined Feature node. The option panel to the right will then update to reflect the options available for the Feature node type. Enter a name for the Feature. E.g. shape.
Additional options can be set on the Feature node. See Template Editor Options Panel – Feature Selection for information on these.
Next, we need to add a Feature Item. Feature Items provide the mapping back to the desired Feature within the key. It is this mapped key’s scored Feature States for a given Entity that is used to build the description text. Mapping the Feature Item to the desired keys Feature can be done in two ways;
- Right click on the Feature Item, from the pop-up menu select the ‘Select Feature’ option.
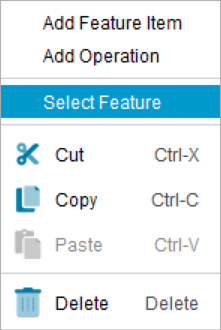
- From the Options panel click within the Path text box.

Template Editor Options Panel
The Template Editor Option panel allows you to adjust a number of parameters that effect the output of the description text. The options presented can change depending on the selection within the Description Template tree. Each of these options are outlined below.
Description Template – Selection of the root node
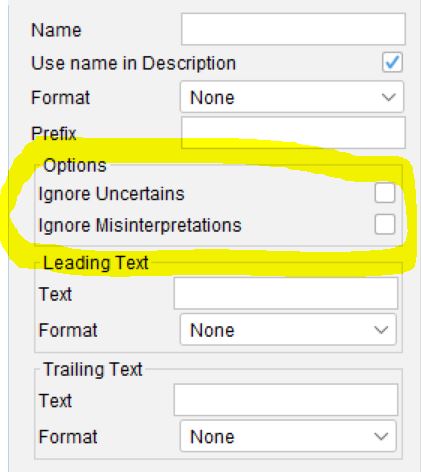
Options
Ignore Uncertains
Checking this option will remove all Features from the description where they have been scored as uncertain.
Ignore Misinterpretations
Checking this option will remove all Features from the description where they have been scored as either “Common and Misinterpreted” or “Rare and Misinterpreted”.
Feature Group Selection
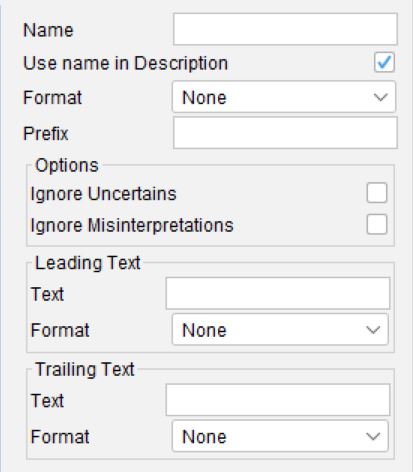
Name
The Name textbox allows you to change the Feature Group label text. The Feature Group label forms part of the description text, unless it is turned off (see Use Name in Description below).
Use Name in Description
Checking this option will remove the Feature Group text label from the description.
Format
Allows simple formatting options to be applied to the Feature Group label such as bold, italics and underline.
Options – Ignore Uncertains
Checking this option will remove the Feature Group label and all children items from the description where the entity was scored as uncertain for the Feature Group.
Options – Ignore Misinterpretations
Checking this option will remove the Feature Group label and all children items from the description where the entity has been scored as either “Common and Misinterpreted” or “Rare and Misinterpreted”.
Tip: To remove all misinterpreted features completely from a description select the Description Template root note and select this option.
Leading Text
Text
Additional text can be added to the description prior to the Feature label.
For example, without leading text the description would be written:
<Feature Group Name text> <Feature Name text>
With leading text it would be:
<Feature Group Name text> <Leading Text> <Feature Name text>
Format
Allows simple formatting options to be applied to the Leading Text label such as bold, italics and underline.
Trailing Text
Text
Additional text can be appended to the Feature label text within the description.
For example, without trailing text the description would be written:
<Feature Group Name text> <Feature Name text>
With trailing text it would be:
<Feature Group Name text> <Feature Name text> <Trailing Text>
Format
Allows simple formatting options to be applied to the Trailing Text label such as bold, italics, underline.
Feature Selection
Name
The Name textbox allows you to change the Feature label text. The Feature label forms part of the description text, unless it is turned off (see Use Name in Description below).
Use Name in Description
Checking this option will remove the Feature text label from the description.
Format
Allows simple formatting options to be applied to the Feature label such as bold, italics and underline.
Prefix
When a Feature Group has multiple Features each Feature within the description will be separated with a comma by default. The Prefix option allows you to override this separator.
Leading Text
Text
Additional text can be added to the description prior to the Feature text.
For example, without leading text the description would be written:
<Feature Group Name text> <Feature Name text> <Feature State(s) text>
With leading text it would be:
<Feature Group Name text> <Feature Name text> <Leading Text> <Feature State(s) text>
Format
Allows simple formatting options to be applied to the Leading Text label such as bold, italics and underline.
Trailing Text
Text
Additional text can be appended to the Feature text within the description.
For example, without trailing text the description would be written:
<Feature Group Name text> <Feature Name text> <Feature State(s) text>
With trailing text it would be:
<Feature Group Name text> <Feature Name text> <Feature State(s) text> <Trailing Text>
Format
Allows simple formatting options to be applied to the Trailing Text label such as bold, italics and underline.
Feature Item Selection
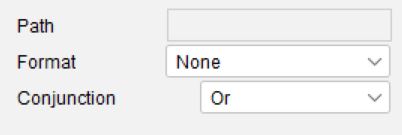
Path
The Path is the mapping location to the Feature within the key. Clicking on the path text within the options panel will open the Feature Path Selection dialog, which will allow you to map to a feature within the key. The scored state(s) of this Feature will be output in the description.
Format
Allows simple formatting options to be applied to the Feature state text label such as bold, italics and underline.
Conjunction
Where multiple States of a Feature have been scored the state text will be joined by a comma the conjunction between the second last and last state is where the conjunction is applied. The default conjunction is “or”.
For example using the default “Or” option,
<Feature Group Name text> <Feature Name text> <Feature State>, <Feature State> or <Feature State>.
Using the “And” conjunction would give:
<Feature Group Name text> <Feature Name text> <Feature State>, <Feature State> and <Feature State>.