Time to save your key
Now that you have entered some data into your key it's time to save. Click the Save ![]() icon on the main toolbar or the Save (ctrl + s) option from the main menu. The first time you save your key the Lucid Builder will ask you to specify a folder where to save the key and its name. After this has been provided you can save your key at anytime. We recommend saving often to avoid losing work. Lucid also has a rolling back-up that occurs each time you save.
icon on the main toolbar or the Save (ctrl + s) option from the main menu. The first time you save your key the Lucid Builder will ask you to specify a folder where to save the key and its name. After this has been provided you can save your key at anytime. We recommend saving often to avoid losing work. Lucid also has a rolling back-up that occurs each time you save.
Features and States
Entering Features and States is very similar to the Entity data entry process.
- Give focus to the Features Panel by clicking anywhere within it or by the click the Features panel title bar. Focus can be confirmed by the Feature panel title bar turning from grey to blue.
- Right click within the Features Panel. This will trigger the context menu to appear. Since there are currently no existing Features the context menu will only have the ‘Add…Add Feature’ option available to use. Select this and a new Feature node will appear in the Features Panel. The new Feature text will be highlighted and is ready for typing over. Start typing ‘Cap’. Once finished press Enter. ‘Cap’ will become a Grouping Feature. That is a Feature that will hold other Features, it won’t directly hold any States as children.
- Now enter the four Features of ‘Cap’, ‘shape’, ‘dominant color’, ‘surface texture’, and ‘surface viscidity’.
- The next step is to enter States for ‘shape’. Select ‘shape’ and right click on it. From the context menu select the ‘Add…Add State’ option. Enter ‘convex to hemispherical’. Repeat the process to add ‘conical’, ‘umbonate’ etc. Finish entering the remaining Features and States.
- When you insert the secondary Features and States for ‘Spores – shape, contents, length range, dimorphism’ – note that the secondary Feature of ‘Spore length range’ will be a numeric state and therefore it has no dependent states. To convert this Feature into a Numeric State, first select it and then in the properties panel (which is to the left of the Features panel) select the Items tab. Towards the bottom of the Items tab is Feature Type option, change the selection from a Grouping Feature to a Numeric Feature. Ignore the data loss warning, select ‘OK’ and continue. The icon associated with this Feature will change to indicate that it is of a numeric type
 . You can return this Feature to a Grouping Feature by selecting it and changing the Feature type back to a Grouping Feature. You can convert Numeric and Grouping Features to States when no other Numeric or Grouping Features are at the same or at a lower level within the hierarchy.
The video vignette below shows some of the Features and States of the tutorial key being entered, including the Numeric Feature State.
Rearranging Entities and Features and States
The arrangement of Entities, Features or States may be altered at any time using a ‘drag and drop’ method. This has two modes of operation.
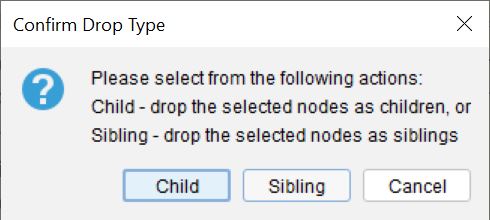
- A simple ‘drag and drop’ using the mouse key only will place the moved item as a Child or a Sibling of the item at the new location – this can be noted by the cursor changing its shape to an icon, although the Builder will also request confirmation to make the moved item a Child or Sibling of the item at the selected location.
Where the ‘drag and drop’ operation is disallowed an ![]() icon will be shown.
icon will be shown.
Reordering siblings is achieved by the same ‘drag and drop’ method. For example, dragging an Entity that sits above it’s siblings to one below it will reposition it below the Entity the drop operation ends on.
2. Merge ‘drag and drop’ – If the Control key is depressed during the drag operation this will trigger the Merge mode for the move operation. Rather than moving the selected nodes to the destination, they will be merged to it. That is they will not be copied to the destination, after the merge process they are removed (deleted) from their original location.
The Merge mode applies when moving a Feature (and any of its Features and/or States) or States. When merging one Feature to a destination Feature the merging process will combine the Features and/or States, including their underlying scores. The destination Feature label will be replaced by the selected Feature’s label. If you merge one State to another State, the selected States score will be merged to the destination State and the destination label retained. The selected State (that was moved for the merge) will be removed (deleted) after the merge process has completed.
Importing Entities and Features
For the purpose of learning how to import data start with a new key ![]() , via the main toolbar or via the File menu option. Save your current key first, if you wish to keep what you have been working on.
, via the main toolbar or via the File menu option. Save your current key first, if you wish to keep what you have been working on.
As with the manual process for adding Entities or Features, you specify the type of data you are wanting to import by first giving either the Entities or Features panel focus by clicking anywhere within the panel or its title bar. The panel that has focus will have a blue title bar while the panel without focus will have a grey title bar.
Entities
Select the Entities Panel, then from the Tools menu (found on the main top toolbar) select the ‘Import Entities’ option. The Import Entities dialog will open. Within the dialog you can either type or paste one or more Entities. To structure the Entities into a hierarchy each Entity should be entered on its own line and tabs used to specify the hierarchy. For some users typing in Entities via the Import Entities dialog will be faster than using the Entities Panel context menu. For example, type the following:
Camarophyllopsis
darwinensis
kearneyi
The second and third lines should start with a single tab. Leave the ‘Append to tree’ option selected in the dialog and click the ‘Add’ button. You will then see the three Entities imported into the Entities Panel with ‘Camarophyllopsis‘ as a root Entity with ‘darwinensis‘ and ‘kearneyi‘ as children.
Try the same process except this time let’s get the Entities from an existing text file. To do this, first start a new key to see the process without worrying about existing data and then, open the tutorial Entities text file (found in the ‘tutorial’ folder of the Lucid Builder installation folder) in your favourite text editor (e.g. Notepad++) and selected all the text (normally Ctrl + a is the select all shortcut) and copy it (Ctrl + c). Notice how the Entities are structured into a hierarchy using tabs?
Once the Entities are copied to your clipboard open the Import Entities dialog, via the Tools menu (ensure you have the Entities Panel selected first, otherwise the Import option may be for Features). Paste the Entities (currently held in the clipboard) using Ctrl + v shortcut.
You should now see the Entities within the Import Entities dialog. Click the Add button, leaving the ‘Add to tree’ option selected. After the dialog closes you should see all the pasted Entities now present in the Entities Panel and structured in the same way as the tab representation.
Features
Select the Features panel, then from the Tools menu select the Import Features option. The Import Features will open. Within the dialog text area you can type or paste Features and States. As with Entities the structuring of these is important as it tells the Lucid Builder what the entered item is (i.e. A Grouping Feature, Multistate Feature or a State etc). Each Feature or State should be entered on its own line and tabs used to “position” it in the desired hierarchy.
Type the following features to see how the Lucid Builder will treat the elements when imported:
Cap
shape
convex to hemispherical
conical
umbonate
plane
dominant color
white
red
pink
orange
Gills
attachment to stem
free
just reaching the stem
attached to stem (broadly or narrowly)
Spores
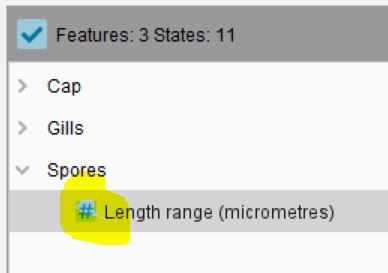
Length range (micrometres)
Remember to use tabs to indent the Features and States. From the above structure we can see ‘Cap’, ‘Gills’ and ‘Spores’ will be Grouping Features, while ‘shape’, ‘dominant color’, ‘attachment to stem’ will be Multistate Features since they have one or more end points at the same level (‘leaves’ of the tree). Add the typed Features and States to the Builder.
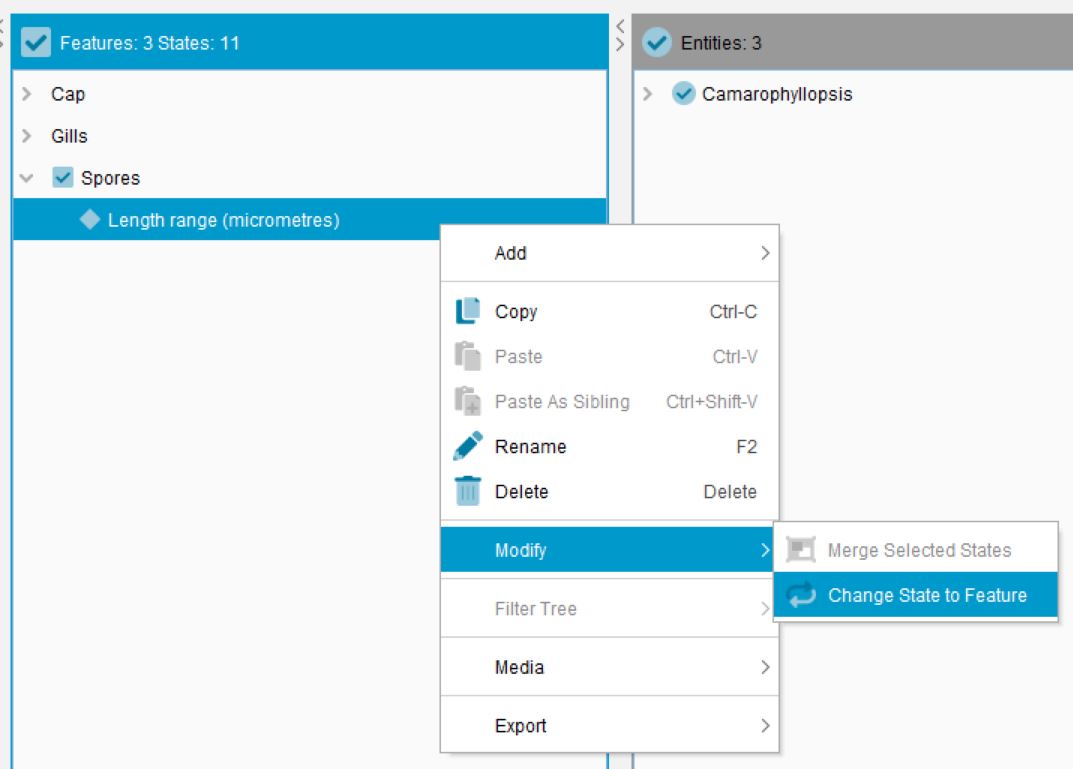
The ‘Length range (micrometres)’ will also be treated as a State of ‘Spores’, since the Lucid Builder doesn’t ‘know’ we want this to be a Numeric Feature. Fortunately after the import Lucid Builder will allow us to change this from a State to a Numeric Feature. To do this right click on the ‘Length range (micrometres)’ State and select from the context menu Modify…Change State to Feature.
Once the State has been made a Feature we can tell the Builder it now needs to be a Numeric Feature. This done by making sure the ‘Length range (micrometres)’ is selected, then via the left properties panel select the Items tab. Towards the bottom of the Items tab panel you will see a Feature Type dropdown box.
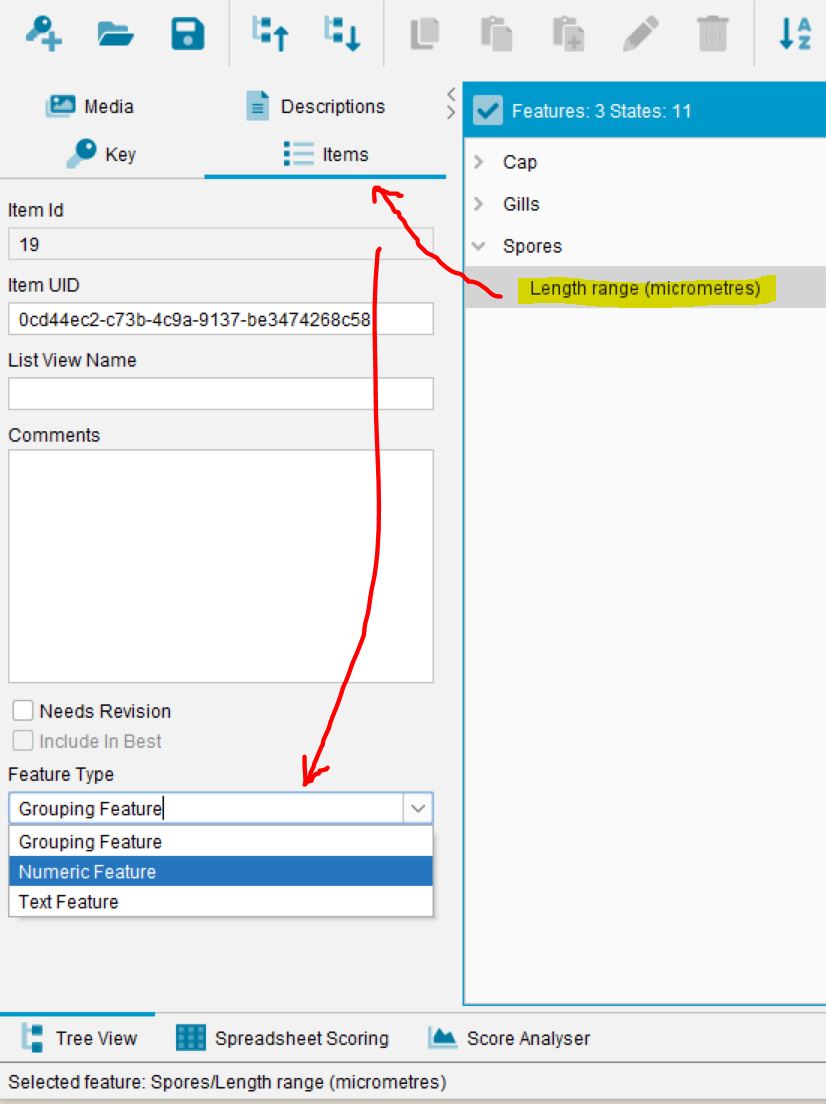
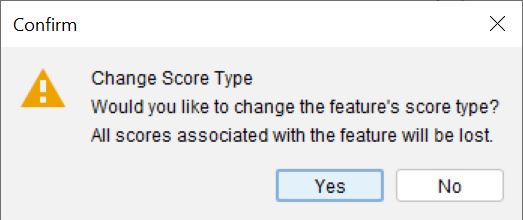
From the dropdown select the Numeric Feature option. The Builder will warn if any scoring exists for the feature it will be lost. Select ‘Yes’, since we don’t need to worry about any scores.
You should now see the ‘Length range (micrometres)’ receive the Numeric Feature icon ![]() indicating it is indeed now a Numeric Feature.
indicating it is indeed now a Numeric Feature.