To produce a key that can be used outside the Lucid Builder it is necessary to deploy the key. A key can be deployed with the Lucid Player or to the Lucid Mobile Platform.
Deploying a key to the Lucid Mobile Platform requires the key to be submitted to the Lucid Team for packaging due to the nature of publishing mobile apps through the Google and Apple App Stores. See the Lucid Mobile Platform information page on Lucidcentral.org for additional details on this deployment method.
Deploying your key with the ‘regular’ Lucid Player, that is able to run off a USB, CD, Hard Drive or the Internet, can be done directly via the Lucid Builder. Once your key is ready for testing or release use the Key Deploy option found via the main menu Key…Key Deploy option.
Only a very minimal set of options are needed to be set before a key can be deployed. This tutorial will go through the most common deployment options. We highly recommend that you explore the numerous options that are available to set how your key is output and what features and options are set for the Player interface.
Deploying a key only requires you to enter a key title (if you haven’t already set this via the Key Properties Panel tab and to set a destination folder for the deployed key to be output.
Lucid Builder Key Deployment dialog example
Click the Deploy button to start the deployment process.
The deployment process comprises several tasks:
Compiling a copy of your key data into a ready-only format and the score data into an encrypted form.
Copies the media associated with the key to the destination.
Packages the Lucid Player and help files to the destination.
Creates a hosting web page that loads the Lucid Player and sets the correct connections and settings to the key data.
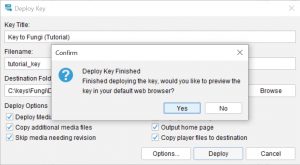
Once the deployment has completed the Lucid Builder will ask you if you wish to open the key in your preferred browser. If you select ‘Yes’, then your default browser should open with your key loaded in the Lucid Player ready for use, or if set, a key home page that enables you to start the key.
Lucid Builder Deploy dialog Preview key on completion.
Take a minute to review the Deployment Options:
Deploy Media files
If selected, will copy all directly attached media items as a part of the deployment process. You may wish to uncheck this option if, for example you have only made non-media related changes to the key and the media associated with the key is very large, this would speed up the deployment process by avoiding recopying the media.
Copy additional media files
If selected, will copy all media contained within the Media folder, that is not directly attached to the key. For example, support CSS, JavaScripts, images and other files that comprise the fact sheets and other materials.
For example, you may not want to output these files each time, especially if there are a large quantity that may not have changed.
Skip media needing revision
If selected, excludes any directly attached media item that has been marked as needing revision.
Deploy filtered key
New to Lucid v4, the Lucid Builder allows you to filter your key using Subsets while constructing it. You can use the filtered state (currently selected subsets) to output as a 'sub key'. If no Subset is currently selected and the 'Deployed filtered key' is checked, then the whole key would still be output as a part of the deployment process.
Output home page
The Lucid Builder will output a templated home page that contains your key title, key description and key author details (set via the Key Properties panel) along with a link to open the page containing the Lucid Player and key. This is optional for displaying this additional information. The key loading page can be used directly without the need of a home page, if desired.
Copy player files to destination
If selected, outputs all the Lucid Player files needed to play your key. You may wish to uncheck this option if you have customised the Lucid Player and don't wish the customizations to be overwritten by the default Lucid Player files.
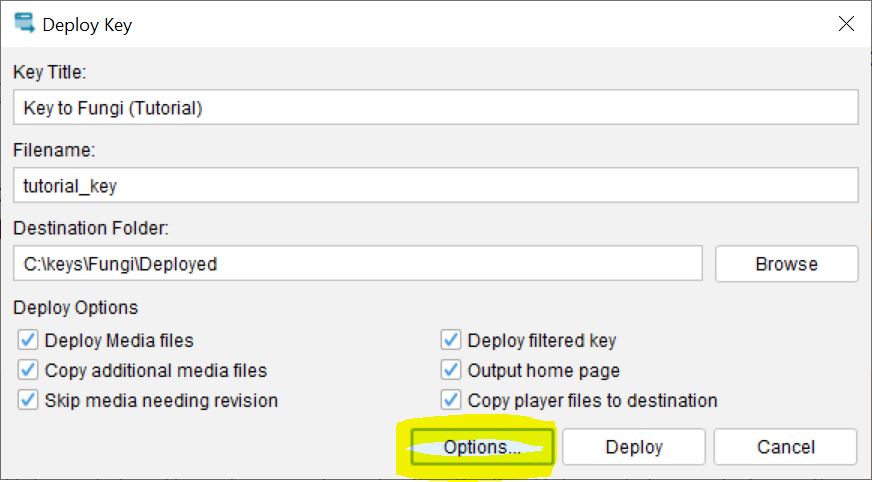
The Options button on the Deploy dialog opens the Key Options dialog. The options contained within the Key Options dialog control everything regarding how your key will function and look in the Lucid Player. For example, Filtered or Ranked Entities, Tree view vs List view of Entities, the display of thumbnails to the language used in the Player.
Lucid Builder Key Deploy dialog Options button.
Tip
It is recommended that you choose an empty (newly created) folder when first deploying your key. This way you can easily see all files that have been output from the deployment process, making it much easier to copy them to a USB, or to your web server etc.
Tutorial Media FilesPre-made media files (images and HTML) can be found in the Lucid installation folder on your computer under the 'Tutorial' folder.
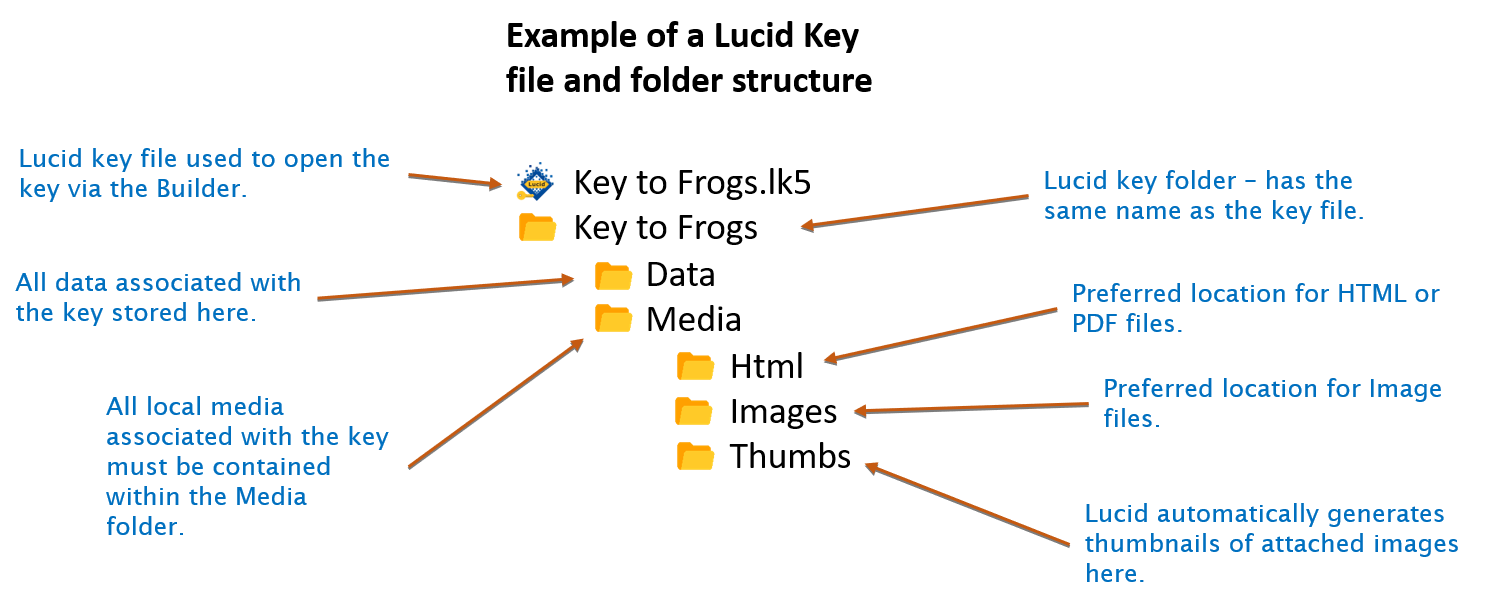
Lucid Builder supports the direct attachment of images (JPG, GIF & PNG), PDFs and HTML (local files and URLs). It is important to understand how Lucid handles media, particularly HTML content due to its nature of referencing supporting files (E.g. CSS, JavaScripts and Images etc).
Lucid Builder Key file and folder structure.Lucid Key backup reminder.
The reason all media files must be within the keys Media folder is to make the key deployment process a seamless single step process, without the need to remember to copy or deal with other supporting files. It also makes copying and backing up your key data much easier.
Lucid allows the attachment of media at all levels within the Feature and Entity trees. How much media you add, if any, is entirely up to you the key author. Media items can be manually attached or imported (and automatically attached).
Fact Sheet Fusion a companion application, often used by Lucid key authors, can dramatically speed up key media development and supports the import file format the Lucid Builder uses. It also supports exporting media suitable for the Lucid Mobile Platform.
For the purpose of this tutorial the HTML fact sheets for the Entities have already been created for you. You can locate these HTML files in the ‘Tutorial\Media\Html’ folder of the Lucid install folder on your computer. Copy the content of this tutorial Media folder, including the sub folders, to your key’s Media folder location.
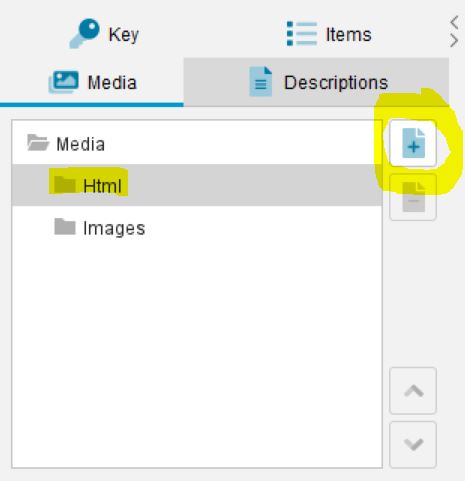
To attach an HTML file to an item, such as a Feature or Entity, select that Feature or Entity with the mouse and then click the Media tab in the Properties Panel on the left hand side of the Builder interface.
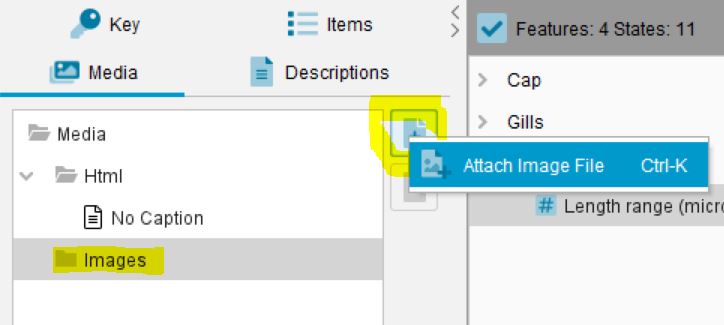
For example, select darwinensis which appears under Camarophyllopsis. Next, select the HTML folder within the Media panel. The Attach Media button should then become available as shown below.
Lucid Builder Media Panel Add Media button enabled.
To attach an HTML file to darwinensis, click the Attach Media button . The add HTML options menu should now appear as shown below.
Lucid Builder Media Panel Add Html pop-out menu.
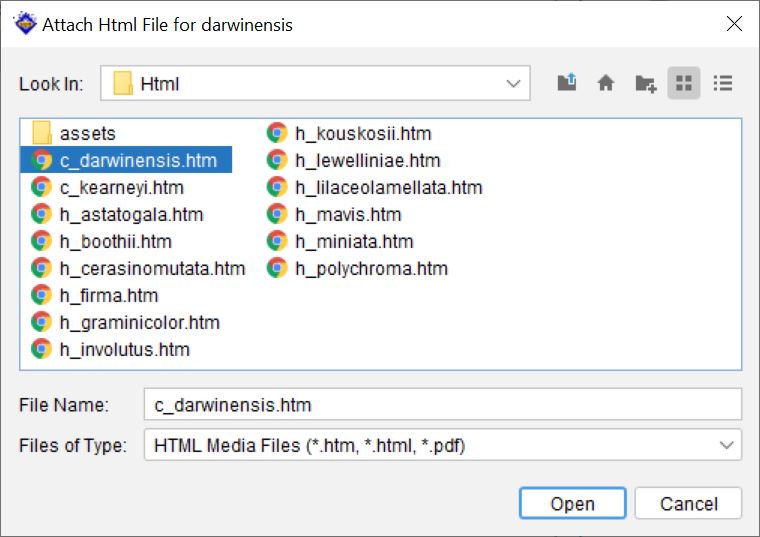
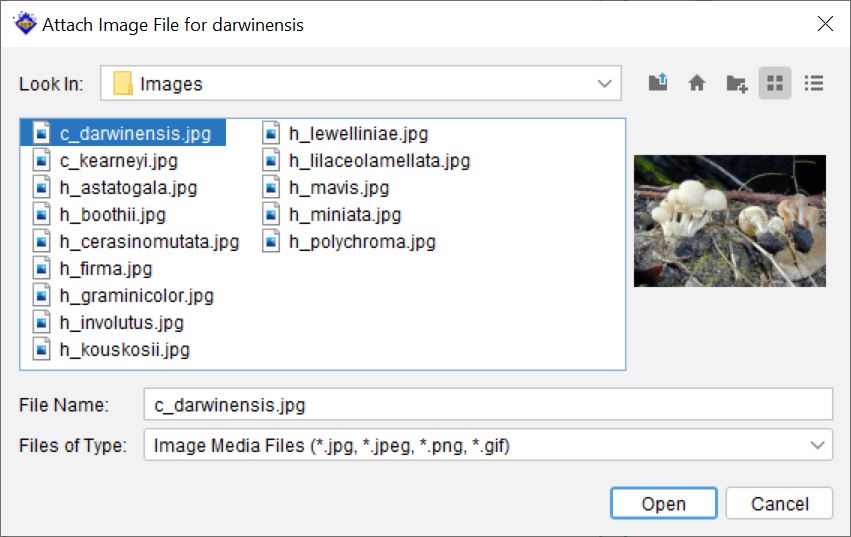
Select the first option ‘Attach HTML File’. The Attach HTML file browse dialog should now appear as shown below.
Lucid Builder Attach HTML file browser dialog.
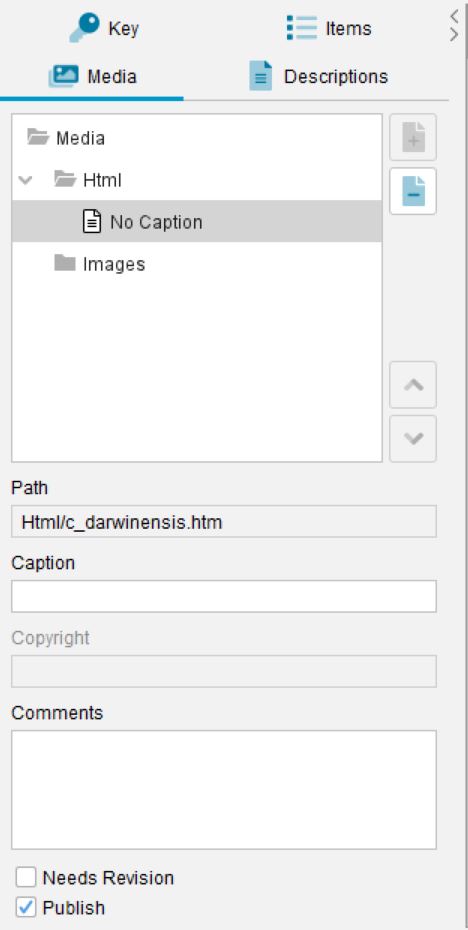
You should now see the prepared tutorial HTML files listed (assuming you have copied them to your keys Media folder). Select the ‘c_darwinensis.htm’ file and click Open. The HTML Attach dialog should now disappear and the selected HTML file ‘c_darwinensis.htm’ will now be listed under the Path information, indicating it is attached to Entity darwinensis (see below).
Lucid Builder Media Panel attached HTML file example.
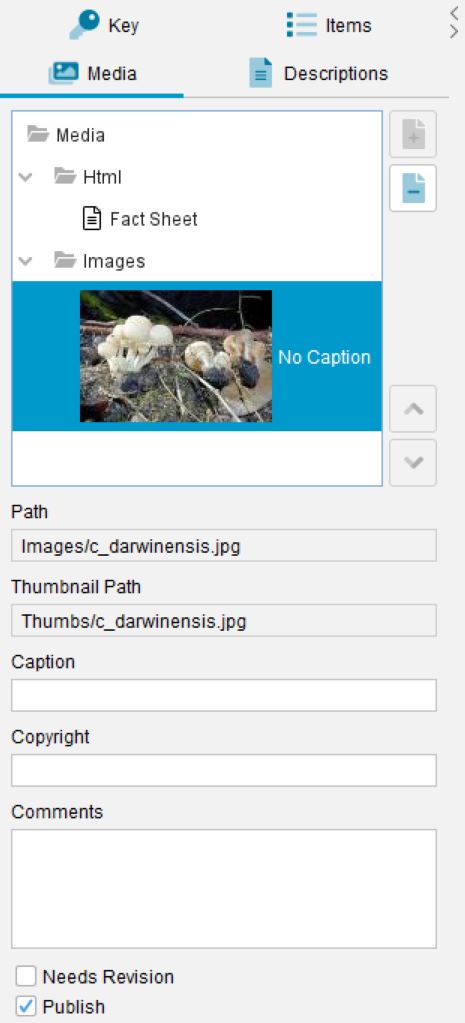
By default the Builder will assign ‘No Caption’ to the fact sheet. You can update this via the Caption field. For example, this could be ‘Fact Sheet’ or ‘Camarophyllopsis darwinensis’.
Tip
You can set the default caption text for HTML and Image attachments via the Key Options dialog (Media Tab).
Attaching an image works in the same way as the HTML file attachment. Select the ‘Images’ folder within the Media Panel, and then select the Attach Media button .
Lucid Builder Media Panel Attach Image example.
Images however can be browsed anywhere accessible to your computer. If an image is selected from outside your keys Media folder it will be automatically copied to the keys Media\Images folder. When the image is attached, regardless if it was attached within or outside the keys Media folder, it will be automatically thumbnailed. A copy of that thumbnail will be stored in the ‘Media\Thumbs’ folder. The thumbnails storage location within the ‘Thumbs’ folder will reflect the ‘Images’ folder. That is if an image was selected from a sub folder of the ‘Images’ folder, the thumbnail will be stored within the same sub folder structure within the ‘Thumbnail’ folder.
Lucid Builder Media Panel attach image browse dialog.
Once attached the thumbnail image will be shown within the Media Panel.
Lucid Builder Media Panel attached image example.
Tip
You can select more than one image or HTML file at time, via the Attach Media browse dialog, to attach to the Entity or Feature. Use the Control (Ctrl) to individually select multiple files or the Shift keys to select contiguous (i.e. next to each other) files.
By default the first attached image becomes the default thumbnail shown for the selected Feature or Entity. If you attach multiple images you can reorder the images using the Media Ordering buttons located at the bottom right of the media display within the Media Panel as shown below.
Lucid Builder Media Panel reorder media buttons.
The order HTML files and attachments are presented to the user within the Player can also be controlled by the same Media Ordering buttons.
Tip
By default Lucid Builder thumbnails attached images to 128px (longest side - the aspect ration of the image is retained when thumbnailed). You can set your preferred thumbnail size via the Key Options dialog (Media tab). If the size is adjusted the Lucid Builder will ask if you wish to regenerate all the keys thumbnails. If you wish to do this at a later time you can do so via the main menu option Key...Media...Update Thumbnails.
Note
As a reminder, save your key on a regular basis and back up your key often to avoid data loss from unforeseen circumstances.
Before starting to score the key, it is useful to have the species information (Appendix 1) on hand to assist scoring the key. It’s also assumed that you have either completed Tutorial 1 and have entered Features and Entities for the key. Or open the unscored edition of the key found in the tutorial file pack.
There are essential three ways to ‘score’ your key (enter score data).
Scoring Entities by Features.
Scoring Features by Entities.
Scoring via the Spreadsheet view.
The scoring method your choose is entirely a personal preference. The scores entered by any of the methods results in the same set of data, they are just different views of the score data.
Start by opening your tutorial key or the pre-made unscored tutorial key in the Lucid Builder. To make viewing the score options within the Features and Entities start by expanding all levels of the hierarchy for both Features and Entities. Do this by setting focus on the Features Panel and click the expand tree option on the main toolbar. Once expanded do the same by setting focus on the Entities Panel and clicking the expand tree option again in the main toolbar.
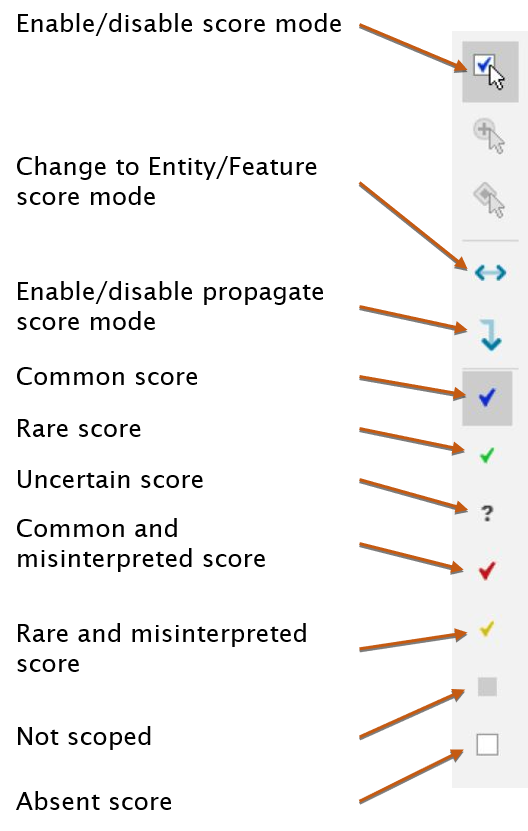
Next, enable Score Mode by clicking on the ‘Enable Score Mode’ button located on the scoring panel to the right of the Entities panel. When Score Mode is enabled, the various score buttons and options will be shown.
Lucid Builder Score toolbar options.
Notes on Scoring
Multiple scores for states frequently occur; for example, some fungal species have more than one colour present and so all relevant colour states should be ticked (scored).
In at least some cases, misinterpretations of states can exist. For example, in a number of species, a cursory glance may suggest that the substrates of moss and humus are common. This is not usually the case and a closer inspection will show that the species are growing on soil amongst litter, humus or moss. These situations can be dealt with by using the 'Common Misinterpreted Score'. I.e. Tick soil as present and moss/humus as Misinterpreted.
A blank (Absent) score indicates that a particular state does not occur for that taxon. Where there is uncertainty, you should use the uncertain score "?".
Since Lucid allows you to set up a hierarchy of Entities - such as Family, Genus, species - you can propagate scores to children under a specific parent by pressing Control (ctrl) key when you click to score in the score box for the parent. For more information on score propagation see the Lucid Builder score help.
To commence scoring make sure that the first species ‘darwinensis‘ is selected in the Entities window and then use the description for Camarophyllopsis darwinensis to fill in the tick boxes. The entry data for Camarophyllopsis darwinensis is given below with a suggested score in brackets beside each selected state.
Tip
By default, the large blue tick of Common Score will be active and can be left at this setting unless a different score is indicated.
Cap
Shape – convex to hemispherical (common)
Dominant color – pink and brown with pinkish tints (both scored as common); (This is not a good match, but suffices for the example.)
Surface texture – smooth (common)
Surface viscidity – dry (common)
Gills
Attachment to stem – bow-shaped or running down the stem (common)
Color – pink (common) Glutinous margin – absent (common)
Stem
Dominant colour – white to pale cream (common)
Surface texture – smooth to powdery (both these scores are common); sometimes hairy (rare)
Surface viscidity – dry (common)
Spores
Shape – sub-globose to globose (common)
Contents – hyaline (common)
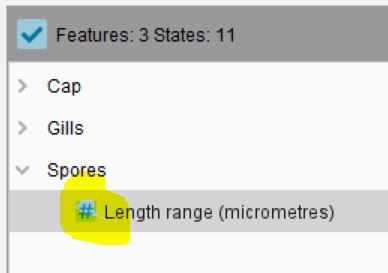
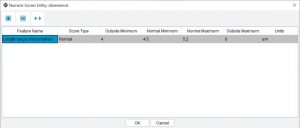
Length range (micrometres) – (4.0-) 4.5-5.2-6.0 (use Numeric Scores, see further below for more details on this.)
Dimorphism – absent (common)
Ecology and Distribution
Habitat – monsoon forest or sclerophyll forest (both scored as common)
Growth habit – gregarious or caespitose (both scored as common)
Substrate – soil (common)
State distribution – NT Qld (both scored as common)
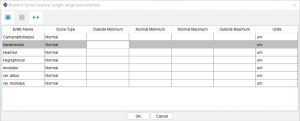
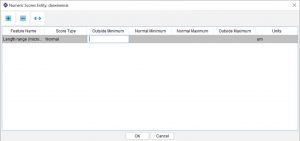
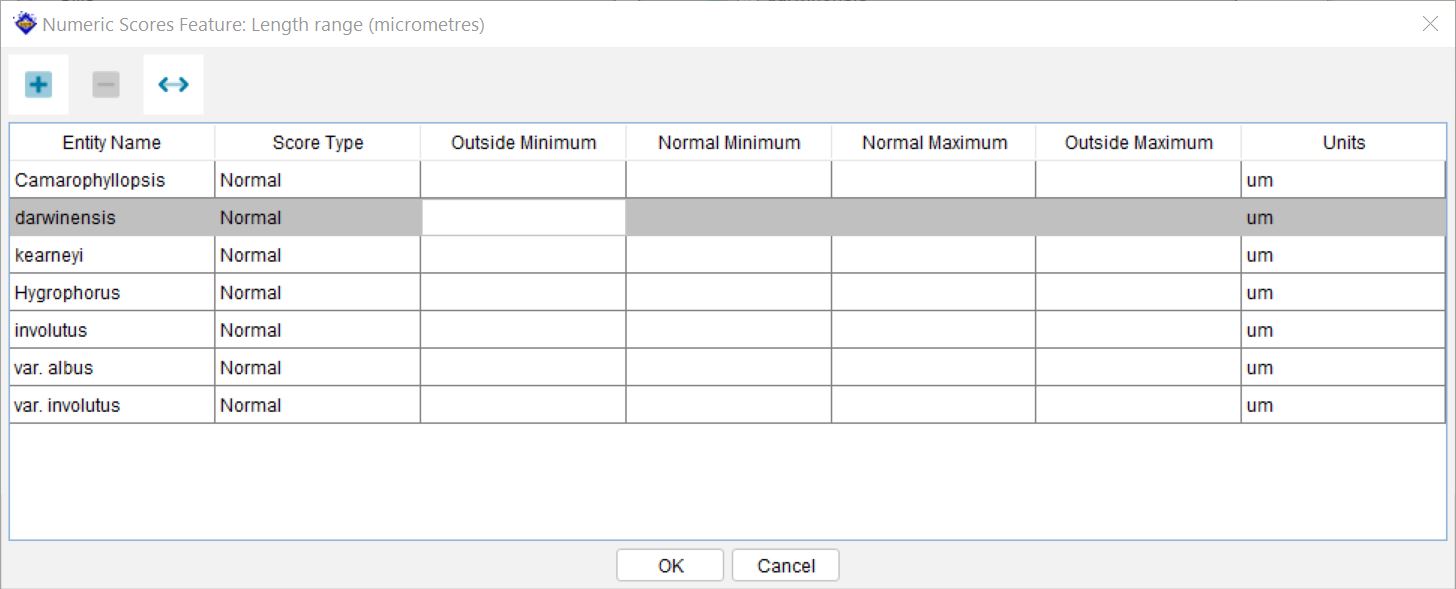
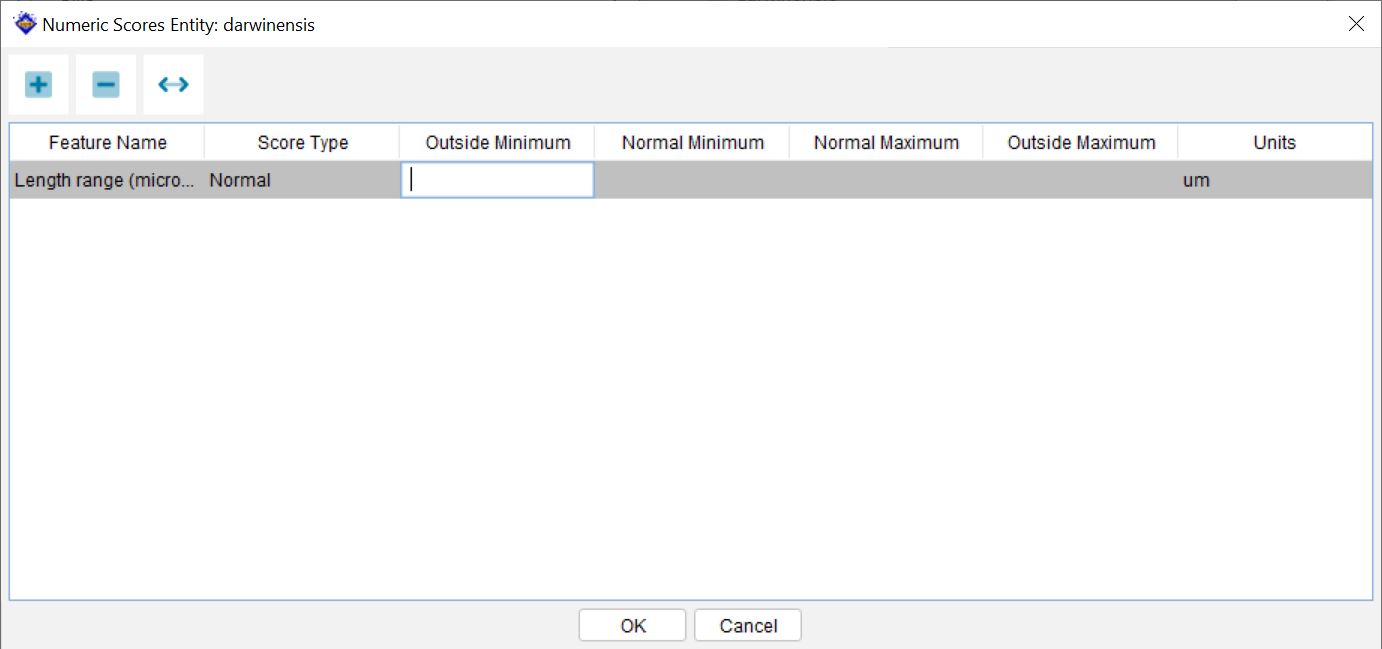
To insert the Spore Length Range, select its scores box. Any Numeric Score state can always be identified by the presence of a hash mark within the score box. A text entry window will appear with a row ready for insertion of the range of values.
Depending on which score view you are using (scoring Features for a selected Entity vs scoring Entities for a Feature) the Numeric Score dialog will list the Feature for scoring for the selected Entity, or it will list all the Entities for the selected Feature, with the selected Entity highlighted ready for data entry. Examples of the two scoring views regarding the Numeric Score dialog are shown below.
Lucid Builder Numeric Score dialog scoring by a Feature example.Lucid Builder Numeric Score dialog scoring by Entity example.
Insert the values as given into the text entry boxes. The Builder automatically ensures that the correct sequential values for a range are entered so that each new entry is either equal to or greater than the previously entered value. Finally, enter the units of measurement – micrometers – and press Enter. Lucid’s Numeric scores also support misinterpretation and uncertainty. The Numeric Score Type can be selected by clicking on the score type text for the Numeric Feature where a drop down list will appear. For more information on misinterpreted and uncertain numeric scores, see Builder Help.
The completed entry for Camarophyllopsis darwinensis are shown below.
Lucid Builder Numeric Score dialog showing score values for Camarophyllopsis darwinensis.
After saving the key, complete scoring the State entries for the remainder of the species and then re-save the key. This now has a completely scored key which is ready for later insertion of species data such as text and images, etc.
Tip
At any time, the key can be tested using the built in Player launch function. To access the function, select the Preview Key button on the main toolbar.
This will start a copy of the Lucid Player with the key automatically loaded and ready for use in your preferred web browser. Any aspect of the key can then be checked for its operation. For more information about the Lucid Player, see the Lucid Player Help.
Entities and Features can be entered in the Builder several ways. How you decide which method will suit you depends if you have existing data that can be imported, or if you need to start entering new data. This tutorial will take you through entering new data and importing data.
Entering new data
Entities
Open the Lucid Builder. By default, the Features panel will be active, indicated by it’s blue title bar. Make the Entities panel active by selecting anywhere in the Entities panel or on its title bar. The Entities panel will show it has focus by the title bar changing its color from grey to blue. The Features panels loss of focus will turn its title grey.
Right click any where within the Entities panel. This will trigger the context pop-up menu to appear. Since there are currently no Entities within the Entities panel the context menu options will all be disabled other than the ‘Add…Add Entity’ option. Select the ‘Add…Add Entity’ option and type in Camarophyllopsis and press the Enter key to confirm the entry.
Right click on the newly entered Camarophyllopsis Entity. This time the context menu will have additional options available. From the Add menu again, you can choose to either enter another root level Entity by choosing ‘Add Entity’ again, or you can choose to add a new Entity as a Child (‘Add Entity as Child’). Choose the ‘Add Entity as Child’ option. A new Entity node will be created as a ‘child’ below the Camarophyllopsis Entity. Now type in the species name of ‘darwinensis‘ and press Enter.
To add a sibling of ‘darwinensis‘, right click on ‘darwinensis‘ and select the ‘Add…Add Entity’ and type ‘kearneyi‘ and press Enter.
As you can see by right clicking on an Entity and choosing the add ‘level’ (parent, sibling or child) of interest you can quickly create a hierarchy of Entities. See the video vignette below that shows the start of creating the Entity hierarchy for the tutorial key.
Tip
Use the shortcut key: F2 to rename an Entity or Feature. Alternatively the right click context menu will also have the rename option.
Time to save your key
Now that you have entered some data into your key it's time to save. Click the Save icon on the main toolbar or the Save (ctrl + s) option from the main menu. The first time you save your key the Lucid Builder will ask you to specify a folder where to save the key and its name. After this has been provided you can save your key at anytime. We recommend saving often to avoid losing work. Lucid also has a rolling back-up that occurs each time you save.
Features and States
Entering Features and States is very similar to the Entity data entry process.
Give focus to the Features Panel by clicking anywhere within it or by the click the Features panel title bar. Focus can be confirmed by the Feature panel title bar turning from grey to blue.
Right click within the Features Panel. This will trigger the context menu to appear. Since there are currently no existing Features the context menu will only have the ‘Add…Add Feature’ option available to use. Select this and a new Feature node will appear in the Features Panel. The new Feature text will be highlighted and is ready for typing over. Start typing ‘Cap’. Once finished press Enter. ‘Cap’ will become a Grouping Feature. That is a Feature that will hold other Features, it won’t directly hold any States as children.
Now enter the four Features of ‘Cap’, ‘shape’, ‘dominant color’, ‘surface texture’, and ‘surface viscidity’.
The next step is to enter States for ‘shape’. Select ‘shape’ and right click on it. From the context menu select the ‘Add…Add State’ option. Enter ‘convex to hemispherical’. Repeat the process to add ‘conical’, ‘umbonate’ etc. Finish entering the remaining Features and States.
When you insert the secondary Features and States for ‘Spores – shape, contents, length range, dimorphism’ – note that the secondary Feature of ‘Spore length range’ will be a numeric state and therefore it has no dependent states. To convert this Feature into a Numeric State, first select it and then in the properties panel (which is to the left of the Features panel) select the Items tab. Towards the bottom of the Items tab is Feature Type option, change the selection from a Grouping Feature to a Numeric Feature. Ignore the data loss warning, select ‘OK’ and continue. The icon associated with this Feature will change to indicate that it is of a numeric type . You can return this Feature to a Grouping Feature by selecting it and changing the Feature type back to a Grouping Feature. You can convert Numeric and Grouping Features to States when no other Numeric or Grouping Features are at the same or at a lower level within the hierarchy.
The video vignette below shows some of the Features and States of the tutorial key being entered, including the Numeric Feature State.
Rearranging Entities and Features and States
The arrangement of Entities, Features or States may be altered at any time using a ‘drag and drop’ method. This has two modes of operation.
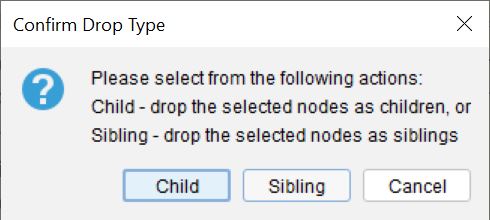
A simple ‘drag and drop’ using the mouse key only will place the moved item as a Child or a Sibling of the item at the new location – this can be noted by the cursor changing its shape to an icon, although the Builder will also request confirmation to make the moved item a Child or Sibling of the item at the selected location.
Lucid Builder Confirm Drop Type dialog.
Where the ‘drag and drop’ operation is disallowed an icon will be shown.
Reordering siblings is achieved by the same ‘drag and drop’ method. For example, dragging an Entity that sits above it’s siblings to one below it will reposition it below the Entity the drop operation ends on.
2. Merge ‘drag and drop’ – If the Control key is depressed during the drag operation this will trigger the Merge mode for the move operation. Rather than moving the selected nodes to the destination, they will be merged to it. That is they will not be copied to the destination, after the merge process they are removed (deleted) from their original location.
The Merge mode applies when moving a Feature (and any of its Features and/or States) or States. When merging one Feature to a destination Feature the merging process will combine the Features and/or States, including their underlying scores. The destination Feature label will be replaced by the selected Feature’s label. If you merge one State to another State, the selected States score will be merged to the destination State and the destination label retained. The selected State (that was moved for the merge) will be removed (deleted) after the merge process has completed.
Warning
Merging Features, States and scores cannot be undone.
Tip
You can sort Features, States and Entities alphabetically via the Sort option on the main toolbar, or via the Edit menu. The sort function will ask if you are interested in sorting just the siblings at the selected node or if you want the whole tree sorted. It's more common to sort the entire entity tree, rather than the Features tree, since Features are often structured for the end user showing the easiest Features to answer to the hardest.
Importing Entities and Features
For the purpose of learning how to import data start with a new key , via the main toolbar or via the File menu option. Save your current key first, if you wish to keep what you have been working on.
As with the manual process for adding Entities or Features, you specify the type of data you are wanting to import by first giving either the Entities or Features panel focus by clicking anywhere within the panel or its title bar. The panel that has focus will have a blue title bar while the panel without focus will have a grey title bar.
Entities
Select the Entities Panel, then from the Tools menu (found on the main top toolbar) select the ‘Import Entities’ option. The Import Entities dialog will open. Within the dialog you can either type or paste one or more Entities. To structure the Entities into a hierarchy each Entity should be entered on its own line and tabs used to specify the hierarchy. For some users typing in Entities via the Import Entities dialog will be faster than using the Entities Panel context menu. For example, type the following:
Camarophyllopsis darwinensis kearneyi
The second and third lines should start with a single tab. Leave the ‘Append to tree’ option selected in the dialog and click the ‘Add’ button. You will then see the three Entities imported into the Entities Panel with ‘Camarophyllopsis‘ as a root Entity with ‘darwinensis‘ and ‘kearneyi‘ as children.
Try the same process except this time let’s get the Entities from an existing text file. To do this, first start a new key to see the process without worrying about existing data and then, open the tutorial Entities text file (found in the ‘tutorial’ folder of the Lucid Builder installation folder) in your favourite text editor (e.g. Notepad++) and selected all the text (normally Ctrl + a is the select all shortcut) and copy it (Ctrl + c). Notice how the Entities are structured into a hierarchy using tabs?
Once the Entities are copied to your clipboard open the Import Entities dialog, via the Tools menu (ensure you have the Entities Panel selected first, otherwise the Import option may be for Features). Paste the Entities (currently held in the clipboard) using Ctrl + v shortcut.
You should now see the Entities within the Import Entities dialog. Click the Add button, leaving the ‘Add to tree’ option selected. After the dialog closes you should see all the pasted Entities now present in the Entities Panel and structured in the same way as the tab representation.
Tip
Entities entered via the Entities Import dialog should always be placed on separate lines, regardless if you want to create a hierarchy or not.
Features
Select the Features panel, then from the Tools menu select the Import Features option. The Import Features will open. Within the dialog text area you can type or paste Features and States. As with Entities the structuring of these is important as it tells the Lucid Builder what the entered item is (i.e. A Grouping Feature, Multistate Feature or a State etc). Each Feature or State should be entered on its own line and tabs used to “position” it in the desired hierarchy.
Type the following features to see how the Lucid Builder will treat the elements when imported:
Cap shape convex to hemispherical conical umbonate plane dominant color white red pink orange Gills attachment to stem free just reaching the stem attached to stem (broadly or narrowly) Spores Length range (micrometres)
Remember to use tabs to indent the Features and States. From the above structure we can see ‘Cap’, ‘Gills’ and ‘Spores’ will be Grouping Features, while ‘shape’, ‘dominant color’, ‘attachment to stem’ will be Multistate Features since they have one or more end points at the same level (‘leaves’ of the tree). Add the typed Features and States to the Builder.
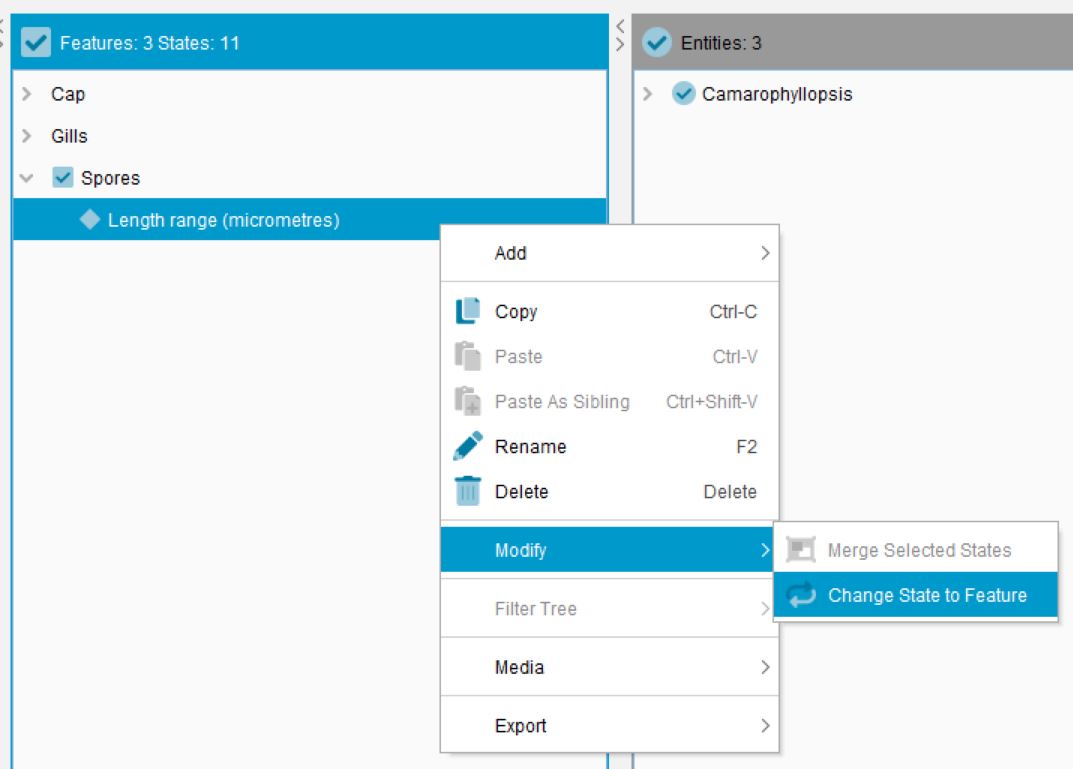
The ‘Length range (micrometres)’ will also be treated as a State of ‘Spores’, since the Lucid Builder doesn’t ‘know’ we want this to be a Numeric Feature. Fortunately after the import Lucid Builder will allow us to change this from a State to a Numeric Feature. To do this right click on the ‘Length range (micrometres)’ State and select from the context menu Modify…Change State to Feature.
Lucid Builder Convert State to Feature context menu option.
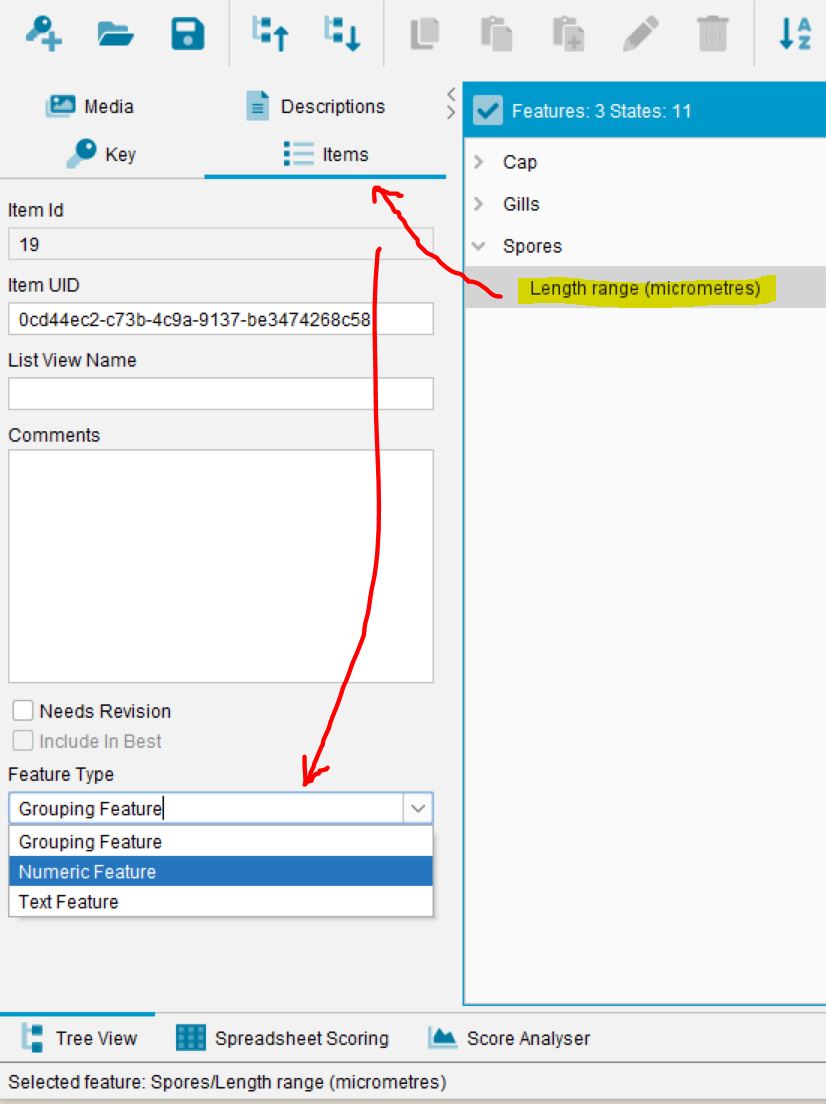
Once the State has been made a Feature we can tell the Builder it now needs to be a Numeric Feature. This done by making sure the ‘Length range (micrometres)’ is selected, then via the left properties panel select the Items tab. Towards the bottom of the Items tab panel you will see a Feature Type dropdown box.
Lucid Builder Convert Feature to Numeric Feature in the Items Properties panel.
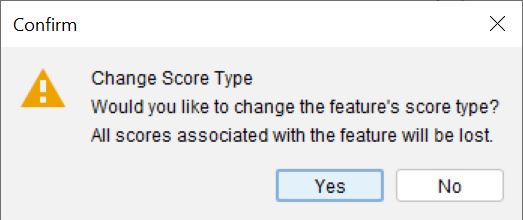
From the dropdown select the Numeric Feature option. The Builder will warn if any scoring exists for the feature it will be lost. Select ‘Yes’, since we don’t need to worry about any scores.
Lucid Builder Feature to Numeric Feature confirmation dialog.
You should now see the ‘Length range (micrometres)’ receive the Numeric Feature icon indicating it is indeed now a Numeric Feature.
The following tutorials guide the user through the construction of a Lucid key using 14 species within the fungal family Hygrophoraceae – a family containing over 150 species of often highly colourful toadstools. Details of these 14 species (completed fact sheets and images) can be found under the ‘Tutorial’ folder of the Lucid Builder installation folder.
The intent of this tutorial key is solely to demonstrate operations of the Builder during simple key construction and as such it has restricted value as a taxonomic aid. Because the technical terms used in describing fungal structure may be unknown to many users, these have been discarded and replaced with currently accepted common names.
Note
You can access further information about the functions in the Lucid Builder by consulting the Builder Help files - which can be found at the Help button on the toolbar. Or via the Lucid help website.
You can stop working on this tutorial at any point – but be sure to save your key before you shut down the Builder. When you restart, open the Builder, select Open Key on the toolbar and then open the Fungal key.lk5 or whatever you saved the key file as.


 on the main toolbar. Once expanded do the same by setting focus on the Entities Panel and clicking the expand tree option again in the main toolbar.
Next, enable Score Mode by clicking on the ‘Enable Score Mode’ button
on the main toolbar. Once expanded do the same by setting focus on the Entities Panel and clicking the expand tree option again in the main toolbar.
Next, enable Score Mode by clicking on the ‘Enable Score Mode’ button  located on the scoring panel to the right of the Entities panel. When Score Mode is enabled, the various score buttons and options will be shown.
 within the score box. A text entry window will appear with a row ready for insertion of the range of values.
Depending on which score view you are using (scoring Features for a selected Entity vs scoring Entities for a Feature) the Numeric Score dialog will list the Feature for scoring for the selected Entity, or it will list all the Entities for the selected Feature, with the selected Entity highlighted ready for data entry. Examples of the two scoring views regarding the Numeric Score dialog are shown below.
within the score box. A text entry window will appear with a row ready for insertion of the range of values.
Depending on which score view you are using (scoring Features for a selected Entity vs scoring Entities for a Feature) the Numeric Score dialog will list the Feature for scoring for the selected Entity, or it will list all the Entities for the selected Feature, with the selected Entity highlighted ready for data entry. Examples of the two scoring views regarding the Numeric Score dialog are shown below.

 . You can return this Feature to a Grouping Feature by selecting it and changing the Feature type back to a Grouping Feature. You can convert Numeric and Grouping Features to States when no other Numeric or Grouping Features are at the same or at a lower level within the hierarchy.