Categories
Lucid Builder Tutorial

Tutorial 1 – Entering Entities and Features

Entities and Features can be entered in the Builder several ways. How you decide which method will suit you depends if you have existing data that can be imported, or if you need to start entering new data. This tutorial will take you through entering new data and importing data.

Entering new data

Entities

  1. Open the Lucid Builder. By default, the Features panel will be active, indicated by it’s blue title bar. Make the Entities panel active by selecting anywhere in the Entities panel or on its title bar. The Entities panel will show it has focus by the title bar changing its color from grey to blue. The Features panels loss of focus will turn its title grey.
  2. Right click any where within the Entities panel. This will trigger the context pop-up menu to appear. Since there are currently no Entities within the Entities panel the context menu options will all be disabled other than the ‘Add…Add Entity’ option. Select the ‘Add…Add Entity’ option and type in Camarophyllopsis and press the Enter key to confirm the entry. 
  3. Right click on the newly entered Camarophyllopsis Entity. This time the context menu will have additional options available. From the Add menu again, you can choose to either enter another root level Entity by choosing ‘Add Entity’ again, or you can choose to add a new Entity as a Child (‘Add Entity as Child’). Choose the ‘Add Entity as Child’ option. A new Entity node will be created as a ‘child’ below the Camarophyllopsis Entity. Now type in the species name of ‘darwinensis‘ and press Enter.
  4. To add a sibling of ‘darwinensis‘, right click on ‘darwinensis‘ and select the ‘Add…Add Entity’ and type ‘kearneyi‘ and press Enter.

As you can see by right clicking on an Entity and choosing the add ‘level’ (parent, sibling or child) of interest you can quickly create a hierarchy of Entities. See the video vignette below that shows the start of creating the Entity hierarchy for the tutorial key.

Tip

Use the shortcut key: F2 to rename an Entity or Feature. Alternatively the right click context menu will also have the rename option.

Time to save your key

Now that you have entered some data into your key it's time to save. Click the Save save icon icon on the main toolbar or the Save (ctrl + s) option from the main menu. The first time you save your key the Lucid Builder will ask you to specify a folder where to save the key and its name. After this has been provided you can save your key at anytime. We recommend saving often to avoid losing work. Lucid also has a rolling back-up that occurs each time you save.

Features and States

Entering Features and States is very similar to the Entity data entry process.

  1. Give focus to the Features Panel by clicking anywhere within it or by the click the Features panel title bar. Focus can be confirmed by the Feature panel title bar turning from grey to blue.
  2. Right click within the Features Panel. This will trigger the context menu to appear. Since there are currently no existing Features the context menu will only have the ‘Add…Add Feature’ option available to use. Select this and a new Feature node will appear in the Features Panel. The new Feature text will be highlighted and is ready for typing over. Start typing ‘Cap’. Once finished press Enter. ‘Cap’ will become a Grouping Feature. That is a Feature that will hold other Features, it won’t directly hold any States as children.
  3. Now enter the four Features of ‘Cap’, ‘shape’, ‘dominant color’, ‘surface texture’, and ‘surface viscidity’.
  4. The next step is to enter States for ‘shape’. Select ‘shape’ and right click on it. From the context menu select the ‘Add…Add State’ option. Enter ‘convex to hemispherical’. Repeat the process to add ‘conical’, ‘umbonate’ etc. Finish entering the remaining Features and States.
  5. When you insert the secondary Features and States for ‘Spores – shape, contents, length range, dimorphism’ – note that the secondary Feature of ‘Spore length range’ will be a numeric state and therefore it has no dependent states. To convert this Feature into a Numeric State, first select it and then in the properties panel (which is to the left of the Features panel) select the Items tab. Towards the bottom of the Items tab is Feature Type option, change the selection from a Grouping Feature to a Numeric Feature. Ignore the data loss warning, select ‘OK’ and continue. The icon associated with this Feature will change to indicate that it is of a numeric type numeric icon. You can return this Feature to a Grouping Feature by selecting it and changing the Feature type back to a Grouping Feature. You can convert Numeric and Grouping Features to States when no other Numeric or Grouping Features are at the same or at a lower level within the hierarchy.

The video vignette below shows some of the Features and States of the tutorial key being entered, including the Numeric Feature State.

Rearranging Entities and Features and States

The arrangement of Entities, Features or States may be altered at any time using a ‘drag and drop’ method. This has two modes of operation.

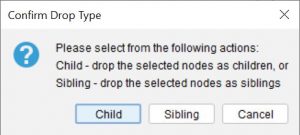
  1. A simple ‘drag and drop’ using the mouse key only will place the moved item as a Child or a Sibling of the item at the new location – this can be noted by the cursor changing its shape to an icon, although the Builder will also request confirmation to make the moved item a Child or Sibling of the item at the selected location.
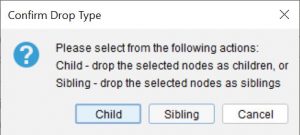
Lucid Builder Confirm Drop Type dialog
Lucid Builder Confirm Drop Type dialog.

Where the ‘drag and drop’ operation is disallowed an ban icon icon will be shown.

Reordering siblings is achieved by the same ‘drag and drop’ method. For example, dragging an Entity that sits above it’s siblings to one below it will reposition it below the Entity the drop operation ends on.

2. Merge ‘drag and drop’ – If the Control key is depressed during the drag operation this will trigger the Merge mode for the move operation. Rather than moving the selected nodes to the destination, they will be merged to it. That is they will not be copied to the destination, after the merge process they are removed (deleted) from their original location.

The Merge mode applies when moving a Feature (and any of its Features and/or States) or States. When merging one Feature to a destination Feature the merging process will combine the Features and/or States, including their underlying scores. The destination Feature label will be replaced by the selected Feature’s label. If you merge one State to another State, the selected States score will be merged to the destination State and the destination label retained. The selected State (that was moved for the merge) will be removed (deleted) after the merge process has completed.

Warning

Merging Features, States and scores cannot be undone.

Tip

You can sort Features, States and Entities alphabetically via the Sort option on the main toolbar, or via the Edit menu. The sort function will ask if you are interested in sorting just the siblings at the selected node or if you want the whole tree sorted. It's more common to sort the entire entity tree, rather than the Features tree, since Features are often structured for the end user showing the easiest Features to answer to the hardest.

Importing Entities and Features

For the purpose of learning how to import data start with a new key , via the main toolbar or via the File menu option. Save your current key first, if you wish to keep what you have been working on.

As with the manual process for adding Entities or Features, you specify the type of data you are wanting to import by first giving either the Entities or Features panel focus by clicking anywhere within the panel or its title bar. The panel that has focus will have a blue title bar while the panel without focus will have a grey title bar.

Entities

Select the Entities Panel, then from the Tools menu (found on the main top toolbar) select the ‘Import Entities’ option. The Import Entities dialog will open. Within the dialog you can either type or paste one or more Entities. To structure the Entities into a hierarchy each Entity should be entered on its own line and tabs used to specify the hierarchy. For some users typing in Entities via the Import Entities dialog will be faster than using the Entities Panel context menu. For example, type the following:

Camarophyllopsis
      darwinensis
      kearneyi

The second and third lines should start with a single tab. Leave the ‘Append to tree’ option selected in the dialog and click the ‘Add’ button. You will then see the three Entities imported into the Entities Panel with ‘Camarophyllopsis‘ as a root Entity with ‘darwinensis‘ and ‘kearneyi‘ as children.

Try the same process except this time let’s get the Entities from an existing text file. To do this, first start a new key to see the process without worrying about existing data and then, open the tutorial Entities text file (found in the ‘tutorial’ folder of the Lucid Builder installation folder) in your favourite text editor (e.g. Notepad++) and selected all the text (normally Ctrl + a is the select all shortcut) and copy it (Ctrl + c). Notice how the Entities are structured into a hierarchy using tabs?

Once the Entities are copied to your clipboard open the Import Entities dialog, via the Tools menu (ensure you have the Entities Panel selected first, otherwise the Import option may be for Features). Paste the Entities (currently held in the clipboard) using Ctrl + v shortcut.

You should now see the Entities within the Import Entities dialog. Click the Add button, leaving the ‘Add to tree’ option selected. After the dialog closes you should see all the pasted Entities now present in the Entities Panel and structured in the same way as the tab representation.

Tip

Entities entered via the Entities Import dialog should always be placed on separate lines, regardless if you want to create a hierarchy or not.

Features

Select the Features panel, then from the Tools menu select the Import Features option. The Import Features will open. Within the dialog text area you can type or paste Features and States. As with Entities the structuring of these is important as it tells the Lucid Builder what the entered item is (i.e. A Grouping Feature, Multistate Feature or a State etc). Each Feature or State should be entered on its own line and tabs used to “position” it in the desired hierarchy.

Type the following features to see how the Lucid Builder will treat the elements when imported:

Cap
      shape
            convex to hemispherical
            conical
            umbonate
            plane
      dominant color
           white
           red
           pink
           orange
Gills
      attachment to stem
            free
            just reaching the stem
            attached to stem (broadly or narrowly)
Spores
      Length range (micrometres)

Remember to use tabs to indent the Features and States. From the above structure we can see ‘Cap’, ‘Gills’ and ‘Spores’ will be Grouping Features, while ‘shape’, ‘dominant color’, ‘attachment to stem’ will be Multistate Features since they have one or more end points at the same level (‘leaves’ of the tree). Add the typed Features and States to the Builder. 

The ‘Length range (micrometres)’ will also be treated as a State of ‘Spores’, since the Lucid Builder doesn’t ‘know’ we want this to be a Numeric Feature. Fortunately after the import Lucid Builder will allow us to change this from a State to a Numeric Feature. To do this right click on the ‘Length range (micrometres)’ State and select from the context menu Modify…Change State to Feature.
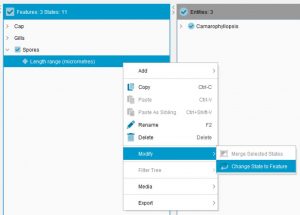
Lucid Builder Convert State to Feature context menu option
Lucid Builder Convert State to Feature context menu option.

Once the State has been made a Feature we can tell the Builder it now needs to be a Numeric Feature. This done by making sure the ‘Length range (micrometres)’ is selected, then via the left properties panel select the Items tab. Towards the bottom of the Items tab panel you will see a Feature Type dropdown box.
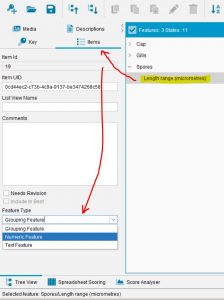
Lucid Builder Convert Feature to Numeric Feature in the Items Properties panel
Lucid Builder Convert Feature to Numeric Feature in the Items Properties panel.

From the dropdown select the Numeric Feature option. The Builder will warn if any scoring exists for the feature it will be lost. Select ‘Yes’, since we don’t need to worry about any scores.
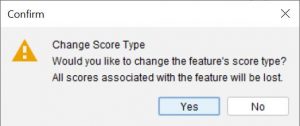
Lucid Builder Feature to Numeric Feature confirmation dialog
Lucid Builder Feature to Numeric Feature confirmation dialog.

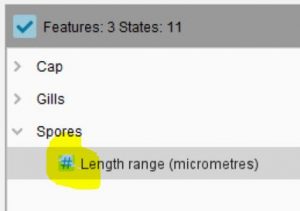
You should now see the ‘Length range (micrometres)’ receive the Numeric Feature icon numeric icon indicating it is indeed now a Numeric Feature.

Lucid Builder Numeric Feature shown by the Numeric icon

Categories
Lucid Player v4

Lucid Player Using Subsets of Features and Entities

Subsets are groups of Features or Entities pre-defined by the author of the key.

For example, Feature Subsets in a key to beetles may allow you to restrict Features Available to display only wing features and head features, or all simple and easily observed features. Entity Subsets may allow you to restrict the Entities panels to display only the beetles in a particular taxonomic subgroup, or only common species.

Subsets are particularly useful for keeping Features Available and the Entities panels free of unnecessary items. For example, if you have a key to plants and your specimen has no fruits, it is useful to remove all fruit features using subsets. Functions such as Best will be more useful if you restrict Features Available to show only Features that it will be possible to address.

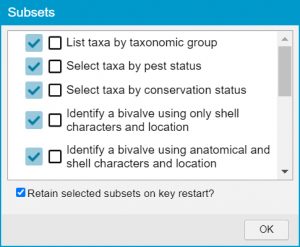
To choose a Subset (if the key’s builder has specified subsets in the key), open the Subsets list by clicking the Subsets button Lucid Player Subsets icon on the toolbar.

Note

You may choose more than one subset.

If you are using subsets and need to keep the same subsets when you restart the key, make sure that the Retain selected subsets on key restart? option is checked. If this item is unchecked, subsets will be set back to show all features and entities when the key is restarted.

Lucid Player Subsets dialog
Lucid Player Subsets dialog.
Categories
Lucid Player v4

Lucid Player Finding Features, States and Entities

To search for a Feature or State, activate one of the Features panels (Features Available or Features Chosen (if visible)) by clicking within it or its header bar, then choose the search option find/search icon on the toolbar.

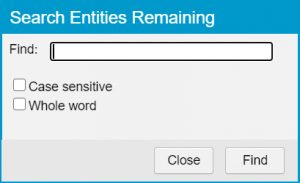
Lucid Player Entities Search Dialog
Lucid Player Entities Search Dialog.
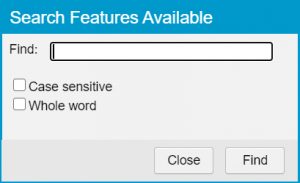
Lucid Player Features Search Dialog
Lucid Player Features Search Dialog.

To search for an entity, activate one of the Entities panels by clicking within it or its header bar, then choose the search option find/search icon. on the toolbar.

Within the Search dialog, type the text to search for in the Find text box. Click the Find button to initiate the search. If Case sensitive option is checked, the search will be case-sensitive (that is, an item called Item will not be found if the search text is item). If the Whole word option is checked, the search will match only whole items (that is, an item called Item One will not be found if the search text is Item or One).

The Find function can also be invoked using the keyboard shortcut Ctrl+F or the Findfind/search icon button on the main toolbar.

Tip

The browser also has a find text within the current web page option. Using this option will find text displayed on the page, however it won't find text within a closed feature or entity nodes as this data has not yet been loaded, where as the search option provided by the Lucid Player will.

Categories
Lucid Player v4

Lucid Player About Entities and Features

Entities in Lucid are the things the key aims to identify. Depending on the scope of the key, the entities may be different kinds of things. For example, in a key to the palms of Brazil, the entities will be species of palms, in a key to the families of flies of the world the entities will be fly families, in a key to minerals the entities will be types of minerals, in a key to disorders of sweet potatoes the entities will be the causes of disorders found in sweet potatoes. In Lucid we use the term entity because it applies to all the possible things that a key may be designed to help identify. Lucid itself doesn’t know whether the entities are species of plants, families of flies, minerals or diseases – they are all simply entities to Lucid, and are all handled in the same way.

Features in Lucid are characteristics of the entities in the key that can be used to describe each entity.

Lucid Player - Simple feature example
Lucid Player – Simple feature example.

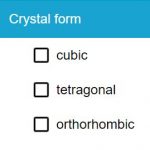
For example, in a key to minerals one feature may be the types of crystalline form shown by the mineral. Amongst the minerals in the key, there will be a number of different crystal forms – cubic, tetragonal etc. The different possibilities for crystal form are called states of the feature. States of a feature are indicated in the Lucid Player by scoring boxes preceding the state names.

In Lucid there are three main types of features.

Lucid Three Types of Features
Lucid – Three Types of Features.

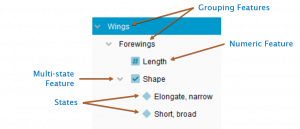
Multi-state features, like those shown for the crystal form of minerals, have two or more alternative states.

Numeric features, by contrast, are ones in which real numbers (integer or decimal) are used to describe the entities.  Numeric features are normally used for lengths, widths, ratios and counts. For example, a key to butterflies may use a numeric feature for the length of the forewing, or for the number of segments in the antennae.

Grouping features are features that contain other features.

Categories
Lucid Builder v4

Lucid Builder Feature Tree – Context Pop-up menu

Applies to Matrix key projects

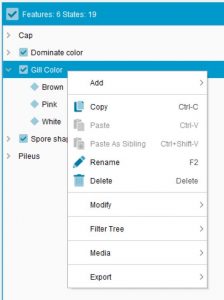
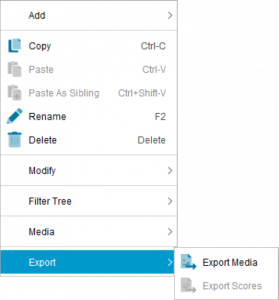
Additional commands available via the context pop-up menu. The context menu can be accessed by right clicking on an item (or an empty section) within the Feature Tree panel.

Lucid Builder Edit Context Pop-up Menu
Lucid Builder Edit Context Pop-up Menu.

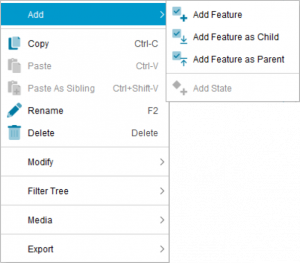
Add sub menu

Lucid Builder Edit Context Pop-up Add Sub Menu
Lucid Builder Edit Context Pop-up Add Sub Menu.

Add Feature icon Add Feature

Adds a new Feature to the the Feature tree.

Add Feature As Child icon Add Feature as Child

Adds a new Feature to an existing Feature as a child node. A Feature can only be added as a child node if it doesn’t contain any states.

Add Feature As Parent icon Add Feature as Parent

Adds a new Feature as the parent of the currently selected Feature.

Add State icon Add State

Adds a new State to the selected Feature. This option is only available where the selected Feature doesn’t already contain a Feature.


copy icon Copy

Copies a selected Feature, State to the system clipboard. A copy of the item may then be pasted elsewhere in the Feature tree.

If a copied item has children, all descendents will be copied along with the selected item. If an item has scores or other properties associated with it (media etc), all scores and properties will remain associated with the copied item and will be pasted with it.

paste icon Paste

Pastes a previously cut or copied item as a child of the selected item.

If a cut or copied item has children, all descendents will be cut or copied and pasted along with the selected item. If an item has scores or other properties associated with it (media etc), all scores and properties will remain associated with the item and will be pasted with it.

Paste As Sibling Paste as sibling

Pastes a previously cut or copied item as a sibling of the selected item.

If a cut or copied item has children, all descendents will be cut or copied and pasted along with the selected item. If an item has scores or other properties associated with it (media etc), all scores and properties will remain associated with the item and will be pasted with it.

Rename iconRename

Renames a selected item in the Features tree. The item will be placed into edit mode for renaming. Rename can also be invoked by pressing the F2 key.

delete icon Delete

Deletes one or more selected Feature or State.

If the Builder Preferences option Prompt for confirmation during tree delete operations is checked, a Confirm Delete dialog will appear to confirm that the operation should go ahead. If Prompt for confirmation during tree delete operations is unchecked, the item will be deleted immediately without confirmation.

The selected item will be permanently deleted from the key. This operation cannot be undone.


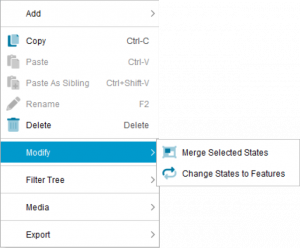
Modify sub menu

Lucid Builder Edit Menu Context Pop-up Modify Sub Menu
Lucid Builder Edit Menu Context Pop-up Modify Sub Menu.

Merge States icon Merge Selected States

This option will take the selected States (two or more) and merge them into one State. It is important to understand the effect this will have on the scoring the merged State will retain from the merging process.

If score data is present on the merging States the following rules will apply as to what score data will be retained for the merged State.

In order, the following score types will take priority and will be applied.

  1. common score icon Present (common)
  2. rare score icon Rare
  3. uncertain score icon Uncertain
  4. not scoped score icon Not Scoped
  5. common misinterpreted score icon Present (common), misinterpreted
  6. rare misinterpreted score icon Rare, misinterpreted
  7. Absent score icon Absent

For example, if Agaricus had scores on the following feature:

Feature icon Spore shape
Lucid Feature State icon globose Absent score icon (Absent)

Lucid Feature State icon subglobose rare score icon (Rare)

Lucid Feature State icon ellipsoid common score icon (Present)

If ‘globose’ and ‘subglobose’ were merged, the merged State would retain the ‘Rare’ score for the Entity ‘Agaricus’.

The selection order of the States is also important. The last selected State is retained for label purposes, but as described above the State score data is derived from the merging rules.

Warning

There is no undo for associated with merging States. Make sure you backup your key prior to performing this action, if you have scored your key.

Change States to Features icon Change States to Features

Converts all selected States of a Feature back to Features. That is the parent Feature is converted from a Mulistate Feature back to a Grouping Feature. All States of the Feature need to be selected before this option becomes available in the sub menu.

Warning

There is no undo for associated with Changing States to Features. The score data associated with the States that are converted to Features will be lost. Ensure you have a back of your key prior to performing this action.


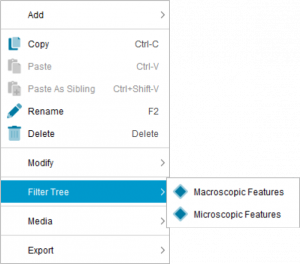
Filter Tree sub menu

Lucid Builder Feature tree context pop-up Filter Tree sub menu
Lucid Builder Feature tree context pop-up Filter Tree sub menu.

The options within the Filter Tree sub menu depend on what Feature Subsets have been created. All Feature Subsets will be listed as menu options. Each available Feature Subset can be toggled on or off by selecting or un-selecting the Subset within the menu. When a Feature Subset is toggled on, the Features scored for that Subset will be displayed, while non-scored Features for that Subset will be hidden. That is only Features that are scored in the selected Subsets will be displayed.

Tip

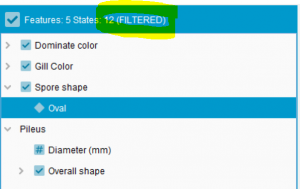
You can see that the Feature tree is filtered in the header section of the Features Panel, where (FILTERED) is added the Feature and State counts.

Lucid Builder Features panel filtered
Lucid Builder Features panel filtered.

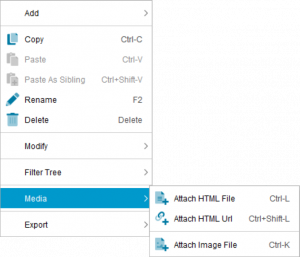
Media sub menu

Lucid Builder Feature Tree context menu - Media Sub Menu.
Lucid Builder Feature Tree Context Menu – Media Sub Menu.

Attach HTML icon Attach HTML File

Allows the attachment of a HTML (or PDF) file present within your keys Media folder to the selected Feature or State.

Attach URL icon Attach HTML Url

Allows the attachment of a Url based resource (E.g. web page) to the selected Feature or State.

Attach Image icon Attach Image File

Allows the attachment of an image(s) to the selected Feature or State. Multiple image files can be attached via the file browse dialog by using Ctrl (individual selection) or the Shift key (block selection).


Export sub menu

Lucid Builder Feature Tree Context Menu - Export Sub Menu
Lucid Builder Feature Tree Context Menu – Export Sub Menu.

Export Media icon Export Media

Creates a Media List file containing references to all media associated with the selected Feature or State. The Media List file will be automatically saved to the same location as the key (I.e. Where the  .lk5 file is located). The file name is automatically generated based on the tree path to the Feature or State and will include the selected items label.

See Media File help topic for more information.

Export scores icon Export Scores

Creates a LIF3 file containing all the score information associated with the selected Feature and its States for all Entities. The Export Scores function can be initiated from the Feature or a State of the Feature. The LIF3 file will be automatically saved to the same location as the key (I.e. Where the  .lk5 file is located). The file name is automatically generated based on the tree path to the Feature or State and will include the selected items label.

See the LIF3 help topic for more information.

Categories
Lucid Builder v4

Lucid Builder Feature Dependencies

About dependencies

Dependencies are logical relationships between Features such that a State of one Feature controls the presence (or absence) of another Feature in Features Available.

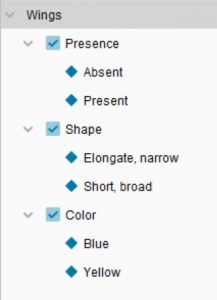
Consider, for example, the following Features:

Lucid Builder Features example

Wing colour and Wing shape only have meaning when wings are present – if wings are absent, they are logically inappropriate in the key.

Lucid provides two ways of accommodating logical dependencies of this kind. In the Lucid Builder, you may set a negative dependency such that, in the Player, if a user chooses the state Wings: absent, then the features Wing Colour and Wing Shape will be removed from Features Available. Alternatively, you may set a positive dependency such that Wing Colour and Wing Shape are initially hidden and only appear if a user chooses the state Wings: present.

Dependencies can help to keep the list of Features Available cleaner and less cluttered, and help make some Features, such as Best, work better.

Tip

If a Feature has been given both a Positive and Negative dependency, the negative dependency will be given preference.

How to set dependencies

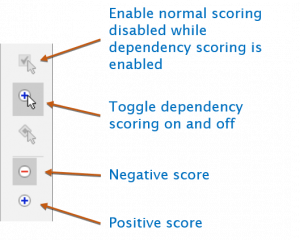
To set dependencies, click the Dependencies score button dependencies scoring icon on the right hand score toolbar.  In dependency scoring mode, two buttons will appear to enable the setting of positive and negative dependencies.

Lucid Builder Dependency Score options

You may set the dependent Features for a given controlling State, or the controlling states for a given dependent Feature.

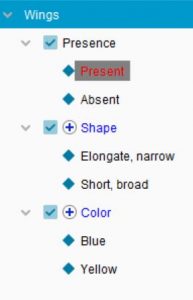
To set dependent Features for a controlling State, first specify the ‘Controlling State’ by selecting the state in the Features tree then using the right-click context menu: the selected State will be highlighted, indicating that dependencies are currently being set for this State. Round dependency score boxes will appear alongside Features that may be controlled by this State.

To score a dependency, select the dependency type (positive or negative) and click the appropriate dependency score boxes.

Lucid Builder Positive Dependency Scoring example

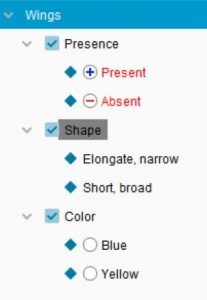
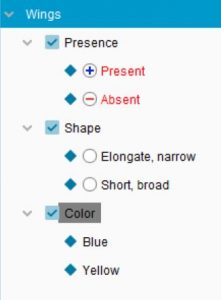
Setting positive dependencies for a State. With Wings: present selected, positive dependencies have been set for Wing colour and Wing Shape. If the user of the key chooses Wings: present, these Features will appear in Features Available.

Lucid Builder Positive Dependency Scoring example
Lucid Builder Negative Dependency Scoring example

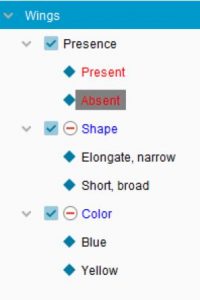
Setting negative dependencies for a State. With Wings: absent selected, negative dependencies have been set for Wing colour and Wing Shape. If the user of the key chooses Wings: absent, these Features will disappear from Features Available.

Lucid Builder Positive Dependency Scoring example
Lucid Builder Feature selection Dependency scoring example one

Setting a positive dependency for a Feature. With Wing shape selected, a positive dependency has been set on the controlling state Wings: present. If the user of the key chooses Wings: present, Wing Shape will appear in Features Available.

Lucid Builder Feature selection Dependency scoring example two

Setting a negative dependency for a Feature. With Wing shape selected, a negative dependency has been set on the controlling State Wings: absent. If the user of the key chooses Wings: absent, Wing Shape will disappear from Features Available.

To set controlling states for a dependent Feature, first select the Feature you wish to control by selecting it in the Features tree and using the right-click context menu: the selected feature will be highlighted, indicating that dependencies are currently being set for this feature. Round dependency score boxes will appear alongside States that may control this feature.

When to use positive and negative dependencies

The choice as to whether to set positive or negative dependencies will depend on the circumstances of the key and the likely key users.

In a key with all negative dependencies, at start-up (or when the key is restarted) all features will be displayed. Features that are logically inappropriate will be progressively removed from the key as the user proceeds. In the example used in the previous topic, a user with a specimen with blue wings would be able to address the Wing colour Feature at the beginning of the key, even before they have addressed the Wing presence Feature. This may be advantageous for your key. The disadvantage is that, at times, there may be many features at start-up that are not relevant to the specimen being identified.

By contrast, in a key with all positive dependencies, many Features will be hidden at start-up. You will effectively be constraining the choices your user may make: to be able to address the Feature Wing Colour they will need to first address the Feature Wing presence. The key will progressively unfold, becoming more applicable as the identification proceeds. This may be advantageous for your key. The disadvantage is that some Features will not be immediately available for use.

Note

It is possible to mix positive and negative dependencies in one key. Be aware, though, that dependencies may clash, or even contradict other dependencies. In all cases of conflict between dependencies, a negative dependency has priority over a positive dependency.

Positive dependencies, feature scopes and unfolding keys

Both positive dependencies and feature scopes may be used to create unfolding keys in which some features are hidden at start-up and are progressively added to Features Available as they become useful for the identification.

For more information on feature scopes, see the topic Not Scoped. For more on positive dependencies see the topic How to set dependencies above.

The difference between an unfolding key built using positive dependencies and one built using feature scopes lies in how the appearance of the hidden features is controlled. A hidden feature controlled using a positive dependency will be added into Features Available when its controlling state has been chosen, no matter what set of entities remains in Entities Remaining. By contrast, a hidden feature controlled using feature scopes will be added into Features Available whenever all entities in Entities Remaining are scored for the feature, no matter what set of states have been chosen from Features Available.

For example, consider an unfolding key to arthropods created using positive dependencies. Some features concerning wings are controlled by a positive dependency on the state Wings: present. These wing features will unfold into the key as soon as Wings: present is chosen, no matter which entities remain in Entities Remaining.

Consider the same key created using feature scopes. Some features concerning wings are scored only for the winged entities (that is, all wingless entities have been given the score Not Scoped for these features, while the winged entities have been given normal scores such as AbsentCommonRare etc). These features will unfold into the key as soon as only winged entities remain in Entities Remaining, no matter which states were chosen to get there.

The choice of whether to use positive dependencies or feature scopes to create an unfolding key depends on personal preference and the likely way in which key users will approach an identification.

Report Dependencies

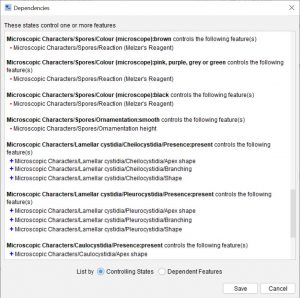
Reports on positive and negative dependencies contained within the key. Within large, complex keys with multiple dependencies set it is sometimes easier to view a report on dependencies, rather than selecting them individually, via the dependency scoring interface, to see what they may affect.

This option can be accessed via the ‘Keys…Scores…View Dependencies’ menu.

Lucid Builder Dependencies Report example

The Dependency Reporter reports positive and negative dependencies in two ways –

  1. By the controlling State and;
  2. By Feature.

By Controlling States

A controlling State is a Feature State that contains a Positive or Negative Dependency that will cause other Features to be added (positive) or removed (negative) upon its selection.

Within the report all controlling states are listed with the Features each controlling state will add or remove if the user selects that state.

By Feature

Lists all Features that have a positive or negative dependency set against it, along with the Features/State controlling that Feature.

Categories
Lucid Builder v4

Lucid Builder Finding features, states and entities

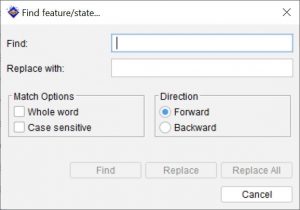
Lucid Builder Find Features or States dialog
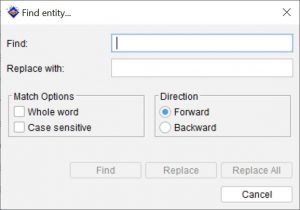
Lucid Builder Find Entities dialog

To search for a feature or state, activate the Features panel by clicking within it, then choose Find feature/state from the main menu.

To search for an entity, activate the Entities panel by clicking within it, then choose Find entity.

In the Find dialog, type the text to search for in the Find text box. Set the direction of the search using the Forward or Backward radio button options to specify a direction to search from the currently selected item.

The Match Options allow for a case sensitive search and/or to only match on whole words.

To replace existing text enter the find text along with the replacement text in the Replace With text box. Then to selectively replace text use the Find button followed by the Replace button. Alternatively use the Replace All button to replace every instance found of the Find What text.

Tip

The Find function can also be invoked using the keyboard shortcut Ctrl+F or the Find button find/search icon on the main button bar.

Categories
Lucid Builder v4

Lucid Builder Deleting Items in the Feature and Entity trees

Items in the Features and Entities trees may be deleted at any stage by selecting the item and pressing the Delete key, using the Delete button delete icon on the toolbar or choosing Delete from the Edit menu.

If the Builder Preferences option Prompt for confirmation during tree delete operations is checked, a Confirm Delete dialog will appear, to confirm that the operation should go ahead.

Lucid Builder Delete Entity confirmation dialog

If Prompt for confirmation during tree delete operations is unchecked, the item will be deleted immediately without confirmation.

The selected item will be deleted from the key.

Tip

This operation can be undone via the undo operation (ctrl + z).

Warning

If an item to be deleted has children, all descendents will be deleted along with the selected item.

You may also delete several items at a time, by selecting multiple items before choosing Delete:

  • To select a contiguous range of items, select the first item then hold down the Shift key and select the last item in the range.
  • To select a non-contiguous range of items, hold down the Control key while selecting each item.
Categories
Lucid Builder v4

Lucid Builder Sorting items in the Feature and Entity trees

Items in the Features and Entities trees may be sorted into alphabetical order. Select an item in either the Features or Entities panel, then click the Sort button or choose Sort tree items from the Edit menu.

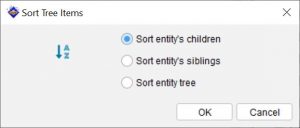
Lucid Builder Sort Entities dialog
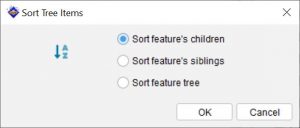
Lucid Builder Sort Features dialog

A dialog box will provide three options.

Choose Sort all descendents to alphabetically sort the descendents of the selected feature;

Choose Sort siblings to alphabetically sort the siblings of the selected item;

Choose Sort entire tree to sort all items in the tree.

Categories
Lucid Builder v4

Lucid Builder Moving items in the Feature and Entity trees

Applies to Matrix key projects

Arranging and managing items within the Features and Entities panel can be achieved by using standard operating system methods of Drag and Drop and Cut, Copy and Paste. The Lucid Builder will automatically prevent any movement of items that don’t match logical groupings or inbuilt rules that maintain data consistency.

Drag and Drop items

Items in the Features and Entities trees may be moved to new positions in the tree by dragging and dropping. An item may be dragged to any position within its tree as long as the following rules are not violated:

  • A feature may not be dropped in a position where it would become the sibling of a state
  • A state may not be dropped in a position where there is a sibling feature already present.
  • Items may not be dropped as siblings of existing items with identical names

The Builder will confirm what you wish to do with the item(s) on the destination you have dropped to, via a confirmation dialog.

Lucid Builder Confirm drop action
Lucid Builder Confirm drag and drop action dialog

You may also drag and drop several items at a time:

  • To select a contiguous range of items, select the first item then hold down the Shift key and select the last item in the range
  • To select a non-contiguous range of items, hold down the Control key while selecting each item.

To drag a selection of items:

  • on Microsoft Windows or Linux, click and drag using the left mouse button.
  • on a Macintosh, hold down the Shift key while dragging.

Tip

You may only drag and drop a multiple selection if all the selected items are siblings.

Merge Drop

Merge Drop allows two items to be merged by dragging the merge item and dropping it onto a recipient item while holding down the Ctrl key.

Merge Drop has an important role to play when importing a key for merging, particularly for resolving conflicts after the import. These conflicts can often be resolved by manually merging items using Merge Drop.

Merge Drop can be used in the following ways:

  • State merging: Dropping a state onto another state will result in scores of the dropped state being merged with the receiving state using the score merging rules defined under Import Merging. The receiving state retains its name and the dropped state is removed from its original position in the tree.
  • Feature merging: Dropping a feature onto another feature will result in its states, and all scores for those states, being merged with the receiving feature. Dropped features must be of the same type as the receiving feature (that is, you may not merge a multistate with a numeric feature). In the case of multistate features, any states present in the dropped feature that are not present in the receiving feature are added to the receiving feature. Any common states have their scores merged using the score merging rules defined under Import Merging. The receiving feature retains its name and the dropped feature is removed from its original position in the tree.
  • Entity merging: Dropping an entity onto another entity will result in the scores for both entities being merged together. The receiving entity retains its name and the dropped entity is removed from its original position in the tree.

Moving items using Cut, Copy and Paste

Items in the Features and Entities trees may be moved to new positions in the tree using the familiar Cut, Copy and Paste operations.

To cut or copy an item, select it by clicking on it with the mouse then either:

Choose Cut cut icon or Copy copy icon from the Edit menu or right click context pop-up menu, or

Click the Cut or Copy buttons on the toolbar (see below), or

Use the keyboard shortcut Ctrl-C (copy) or Ctrl-X (cut)

To paste an item that you have copied or cut, select another item in the tree then either:

  • Choose Paste as child or Paste as sibling from the Edit menu.
  • Click the Paste as child or Paste as sibling buttons on the toolbar, or;
  • Use the keyboard shortcut Ctrl-V.

Note

There are restrictions on where an item can be pasted in the tree. For example, a state cannot logically be pasted as a child of a feature that has other features as children, and a feature cannot be pasted in a position where it would become a sibling of a state. Accordingly, some menu options and buttons will be disabled depending on the positions in the tree where you are attempting the paste.

You may also paste several items at a time, by selecting multiple items before choosing Cut or Copy:

  • To select a contiguous range of items, select the first item then hold down the Shift key and select the last item in the range.
  • To select a non-contiguous range of items, hold down the Control key while selecting each item.

Note

You may only paste a multiple selection if all the selected items are siblings.