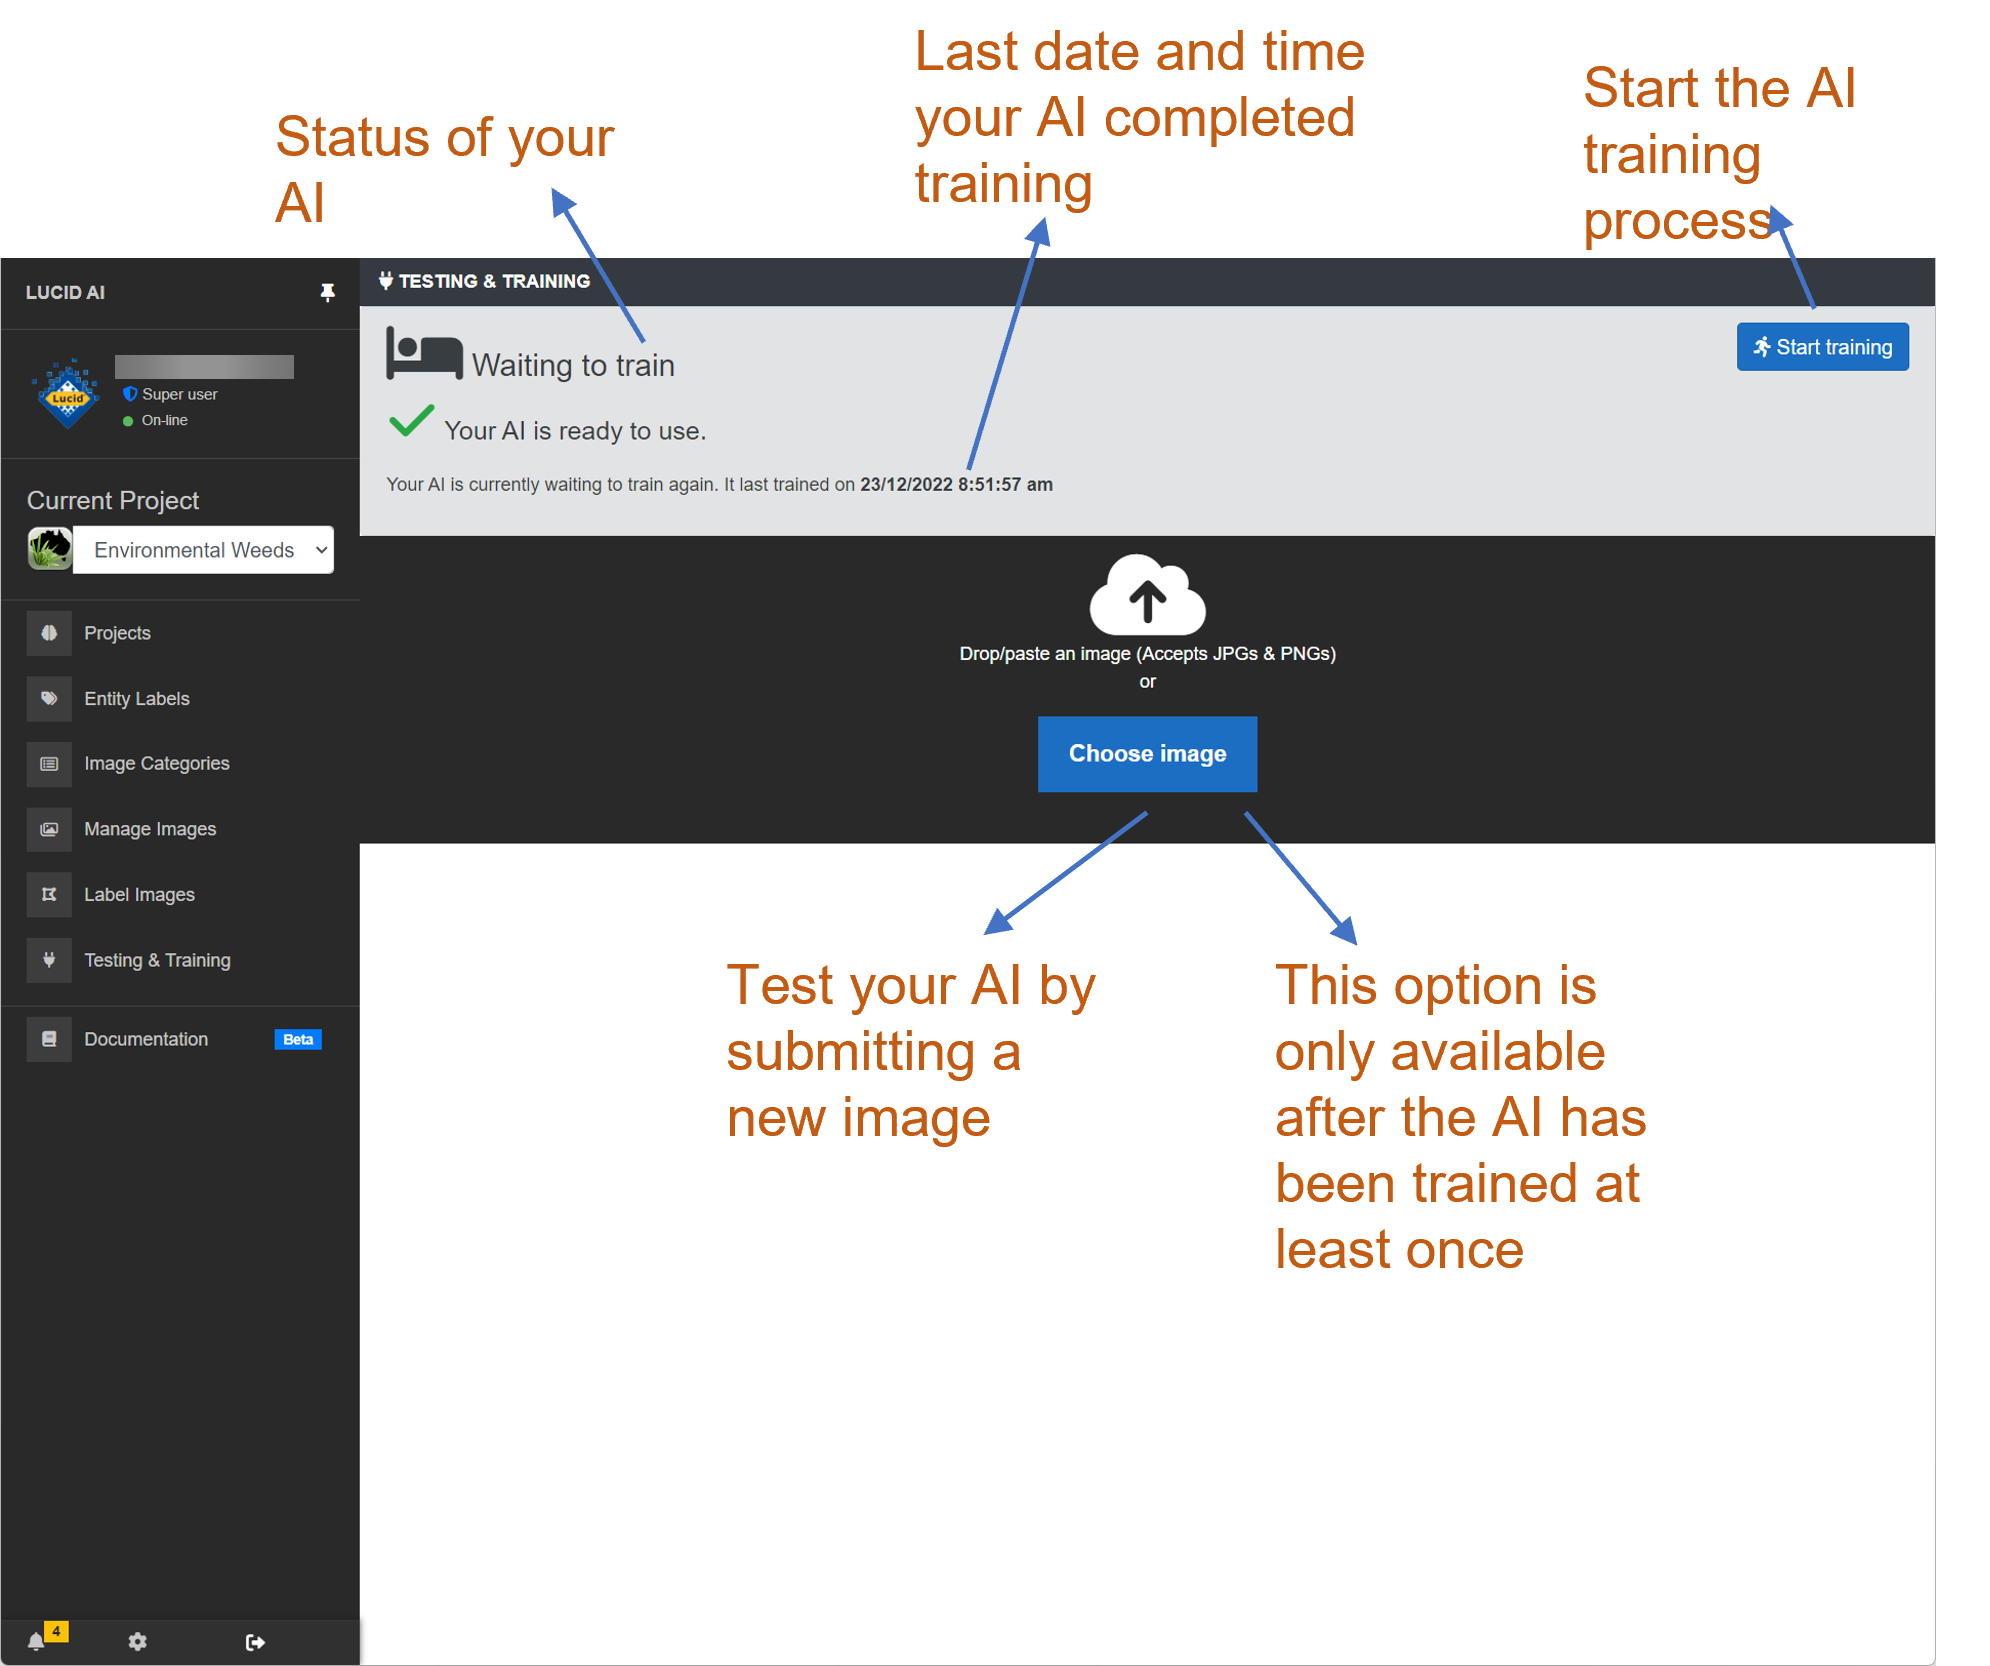
Once the task of annotating images with entity label regions has been completed training the AI can begin. Starting the AI training process is a simple as clicking the ‘Start training’ button. The AI training process is an extremely intensive computing task. Depending on the number of entity label regions defined and level of image augmentation this training process can take anywhere from a few hours to multiple days of computing time. Once the training process has begun it can’t be started again until the current training session has completed. You can continue to manage your AI project such as add images and create further annotations while a training session is underway. Any new additions to the project will not be included until the next training session is started.
It’s important to understand that each time you train your AI it’s not a cumulative process. The training session resets and retrains your AI from scratch. However, the AI from the last training session can still be used while undergoing its next training session. It is also possible to rollback your AI to its previous build, if you are unhappy with the latest trained edition. See the Rolling back your AI help for more information on this topic.
When your AI training session is started the trainer will give you an estimated completion time which is calculated on the amount of training data to be processed. This estimate isn’t a guaranteed time since several other factors can affect the training time, particularly the current computing load. That is how many users are working on the project and accessing the AI during the training session. Since the training process doesn’t have a precise end time and will most likely take longer than a user session (the average length of time working on a project). The user who triggered the training session, along with other project members listed in the project notification settings will be emailed once the training session has completed and the new AI has become available for use.
Due to the amount of time needed to train an AI it is possible on the rare occasions the service is interrupted due to system maintenance and updates. If this does occur you will be automatically notified, via email, of the interruption and you will need to restart the training again when next logged in.
Training analysis
During your AI training it possible to undertake additional analysis of how well the AI is expected to perform. This analysis is optional as it can easily double the training time needed. Analysis is generally recommended when the AI is first trained on an image set or the training image set changes significantly or additional entity labels are introduced. Training analysis is not necessary when small changes to the image set are made. The analysis of your AI will give you a performance percentage for each entity label when using the image data held back during the training process. The closer your entity label performance percentages are to 100% the better your AI is at recognizing image data for that entity label.
It is unlikely the AI training will achieve high 90th percentile range across your entire entity label set. Anything above the mid-75th percentile should achieve very good recognition results, assuming the training data set is a match for the images the AI will encounter. If you are seeing many of your entities with percentile ranges lower than this, then it is likely you either don’t have enough image regions defined for that label or the image regions for the entity label are possibly too dissimilar. For example, training your AI to recognise a plant species based on its flowers and seeds using the one species name label. Flower and seeds are very different looking and would be much better split into their own separate entity labels such as ‘Species name flower’ and ‘Species name seed’.
The training analysis will be emailed to you, if selected, as a part of the training completed notification.
Testing your AI
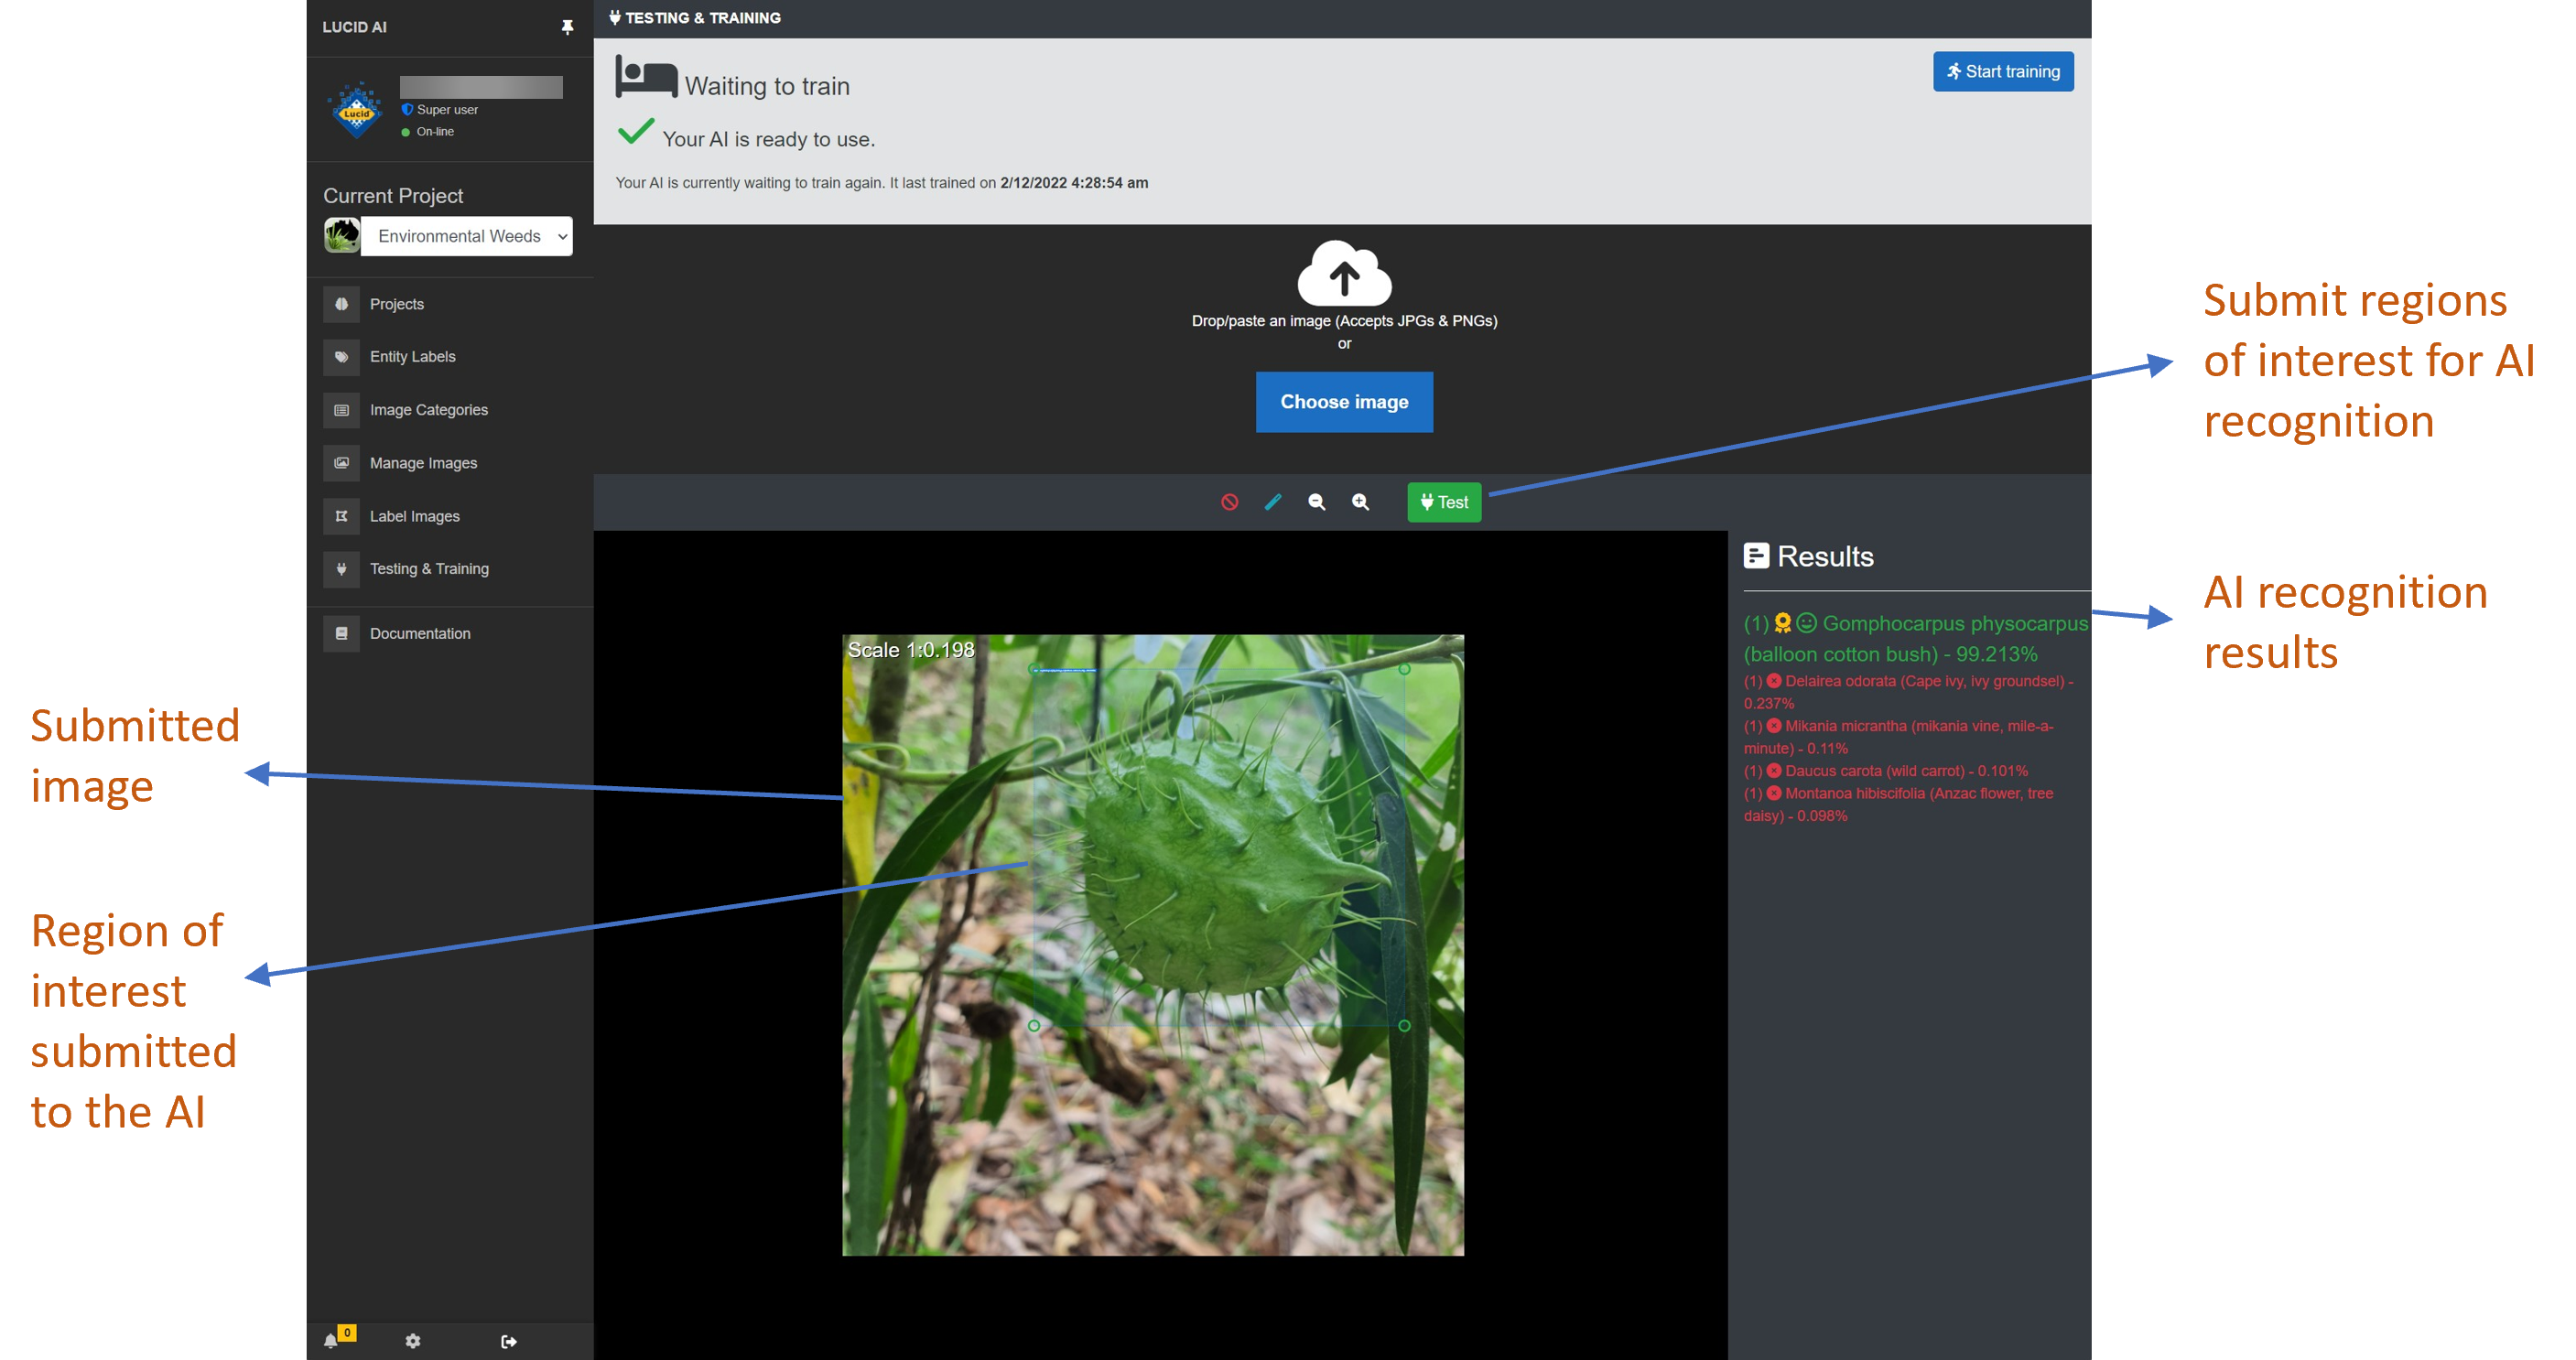
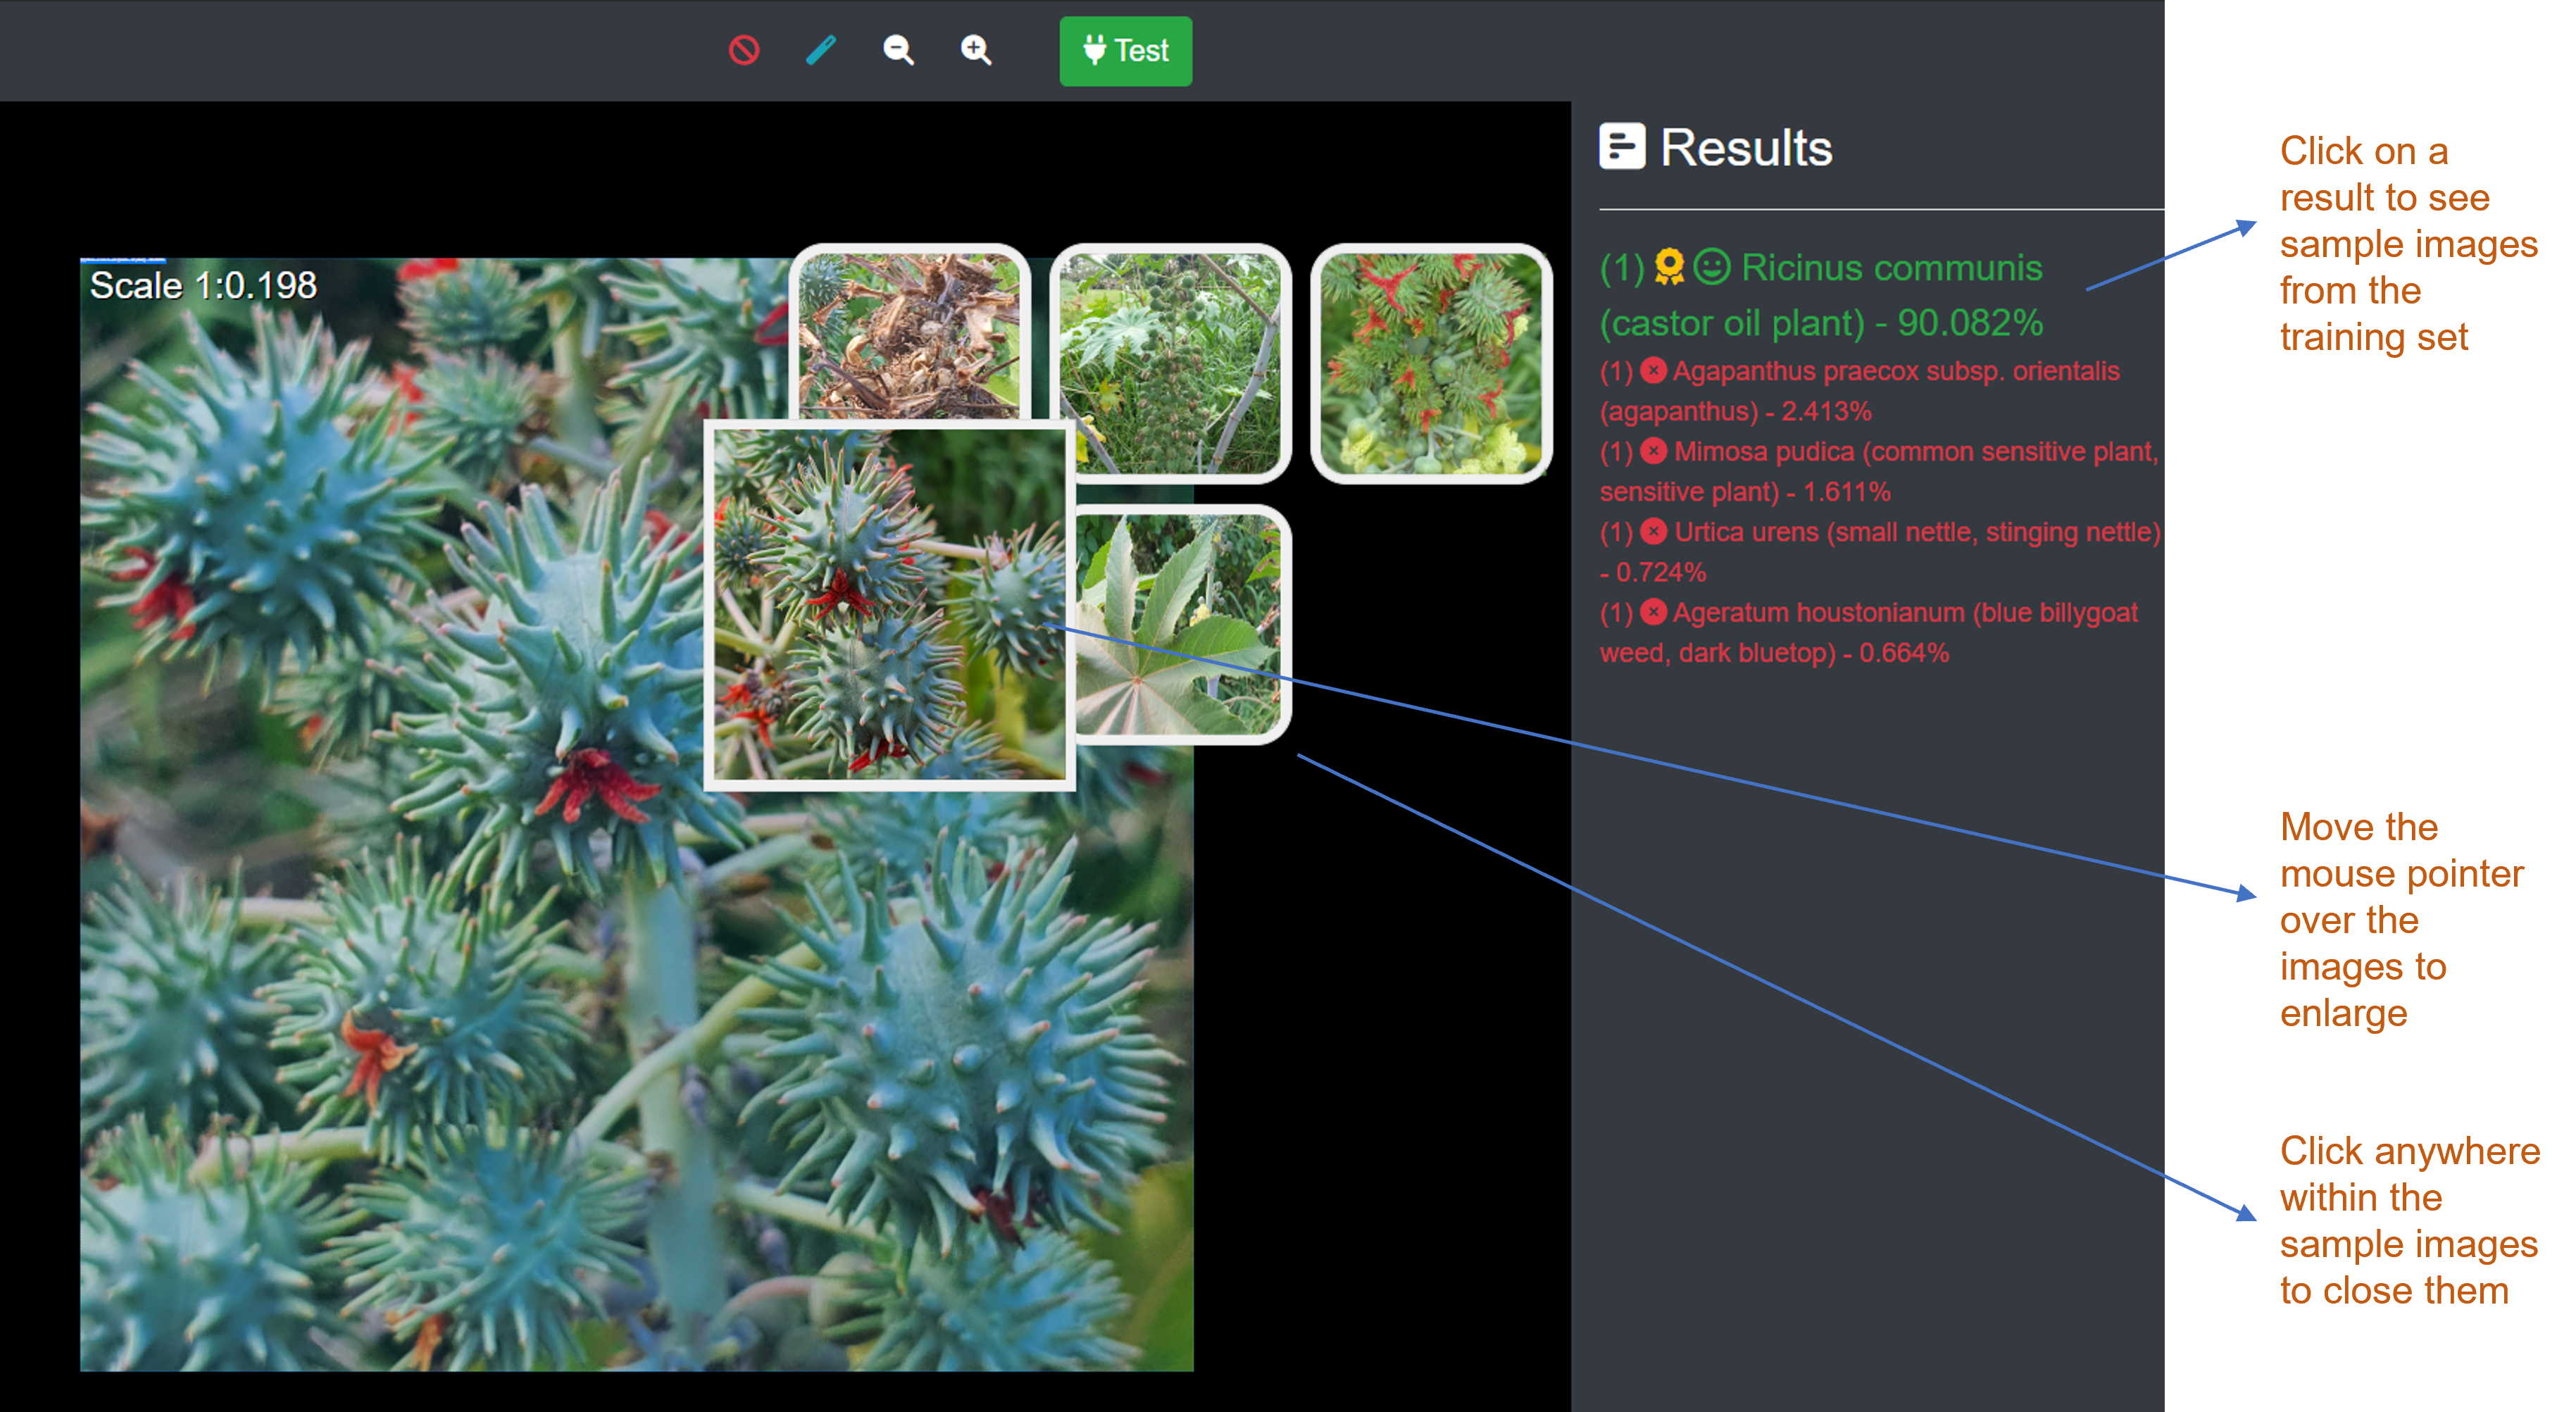
After the AI has been trained it is important to try it out. The testing interface is very similar to how entity label regions are annotated on an image. To begin testing you first must provide an image for testing. For a true test you should provide an image that is not part of the image data set. Once the image has been selected, one or more regions of interest can be applied to the image. As with training data, it’s not always desirable to have the AI try and distinguish between multiple species within the one region or excessive background. Regions waiting testing will be labelled ‘To be determined’. Once the regions have been submitted, the AI will review each of the defined regions and return the top five entity label probabilities for each, ordered from the most likely to the least likely. The highest probable entity labels will be applied to the annotated regions. For convenience, a random selection of images from the training data set will be available, if the result entity label is clicked, as a reminder of what the entity is and the type of images that represent that label.
For faster visual acuity the results of each region are colour coded and a success level icon assigned. For example, when the AI is very sure of its prediction (80% or higher) then the label colour will be green. If the top prediction is 80% or greater than a gold trophy icon will also be displayed.
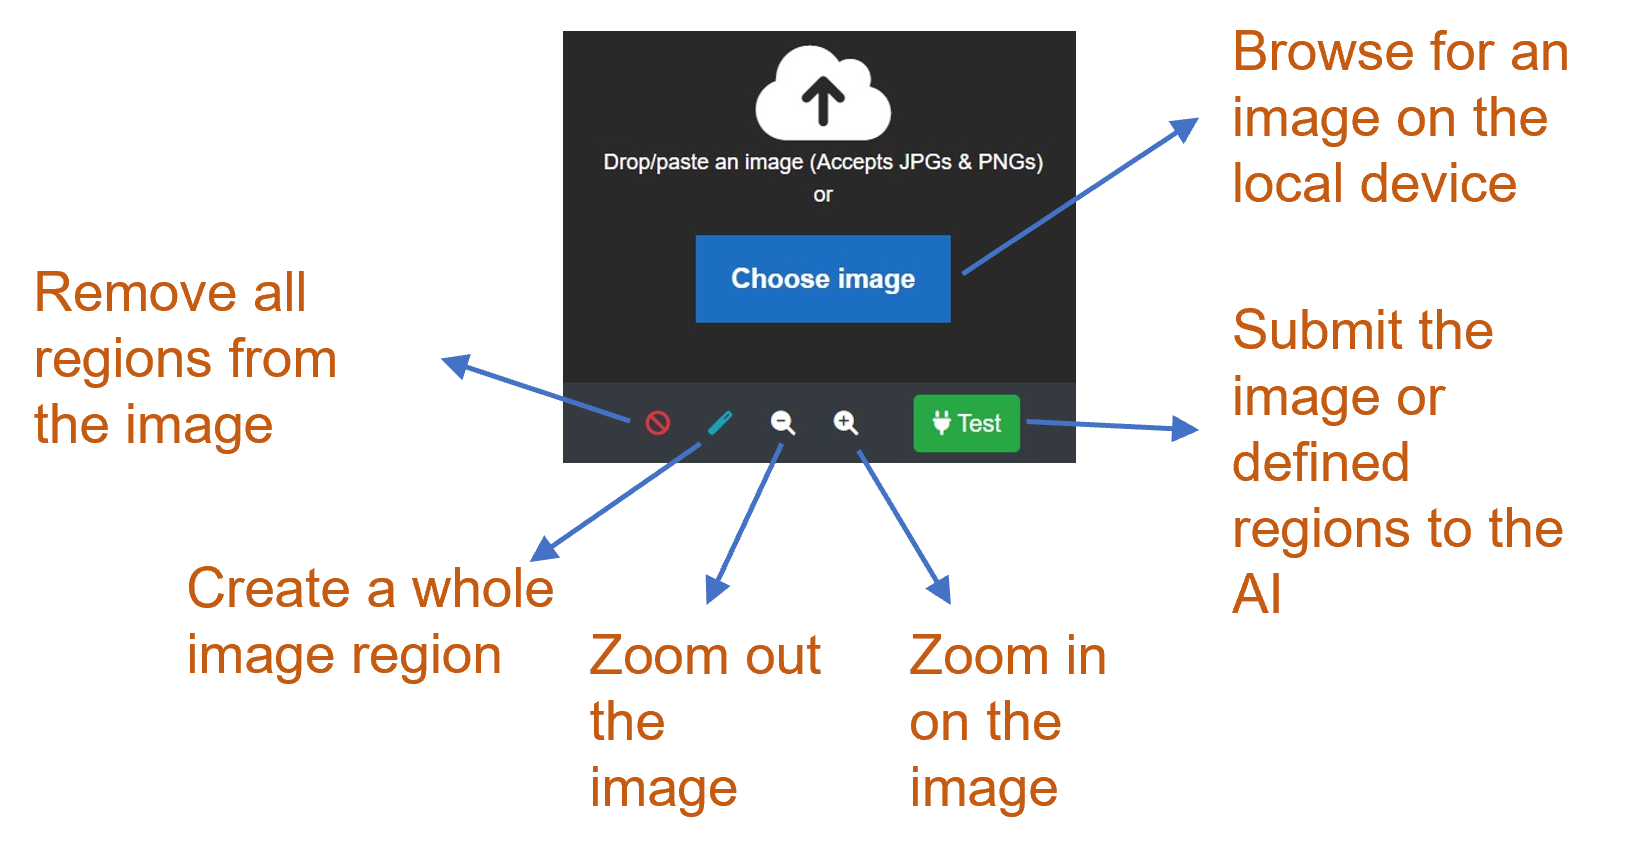
Choose image
An image must be provided for the AI to test against. Either click the ‘Choose image’ button to browse for suitable JPEG or PNG image file on your local device. Or drag and drop one from your file system to the panel that contains the ‘Choose image’ button. Alternatively, you can simply paste a copied image from your system clipboard (E.g., Windows – Ctrl + v or for OSX – Command + v) left click on the panel to give it focus, then paste, if the clipboard image doesn’t update as the selected image.
Clear regions
Clears regions from the selected image.
Create whole image region
Automatically creates a whole image region.
Zoom image
Zoom in or out on the image. Large images may exceed the available space within the interface, zoom out will make it fully visible. The mouse wheel can also be used to zoom.
Adding testing regions
To annotate test regions right click on the image and select either the rectangle or polygon region option from the pop-up context menu. If the polygon region type is selected use the mouse right click pop-up context menu to complete the polygon drawing.
Results
The right-hand side results panel will list each region along with its top five predictions. Each set of results will be numbered, along with the corresponding region label, including the top prediction entity label, to indicate region match result. Clicking on a result will load a random sample of images from the corresponding training set as shown in the screen shot below.