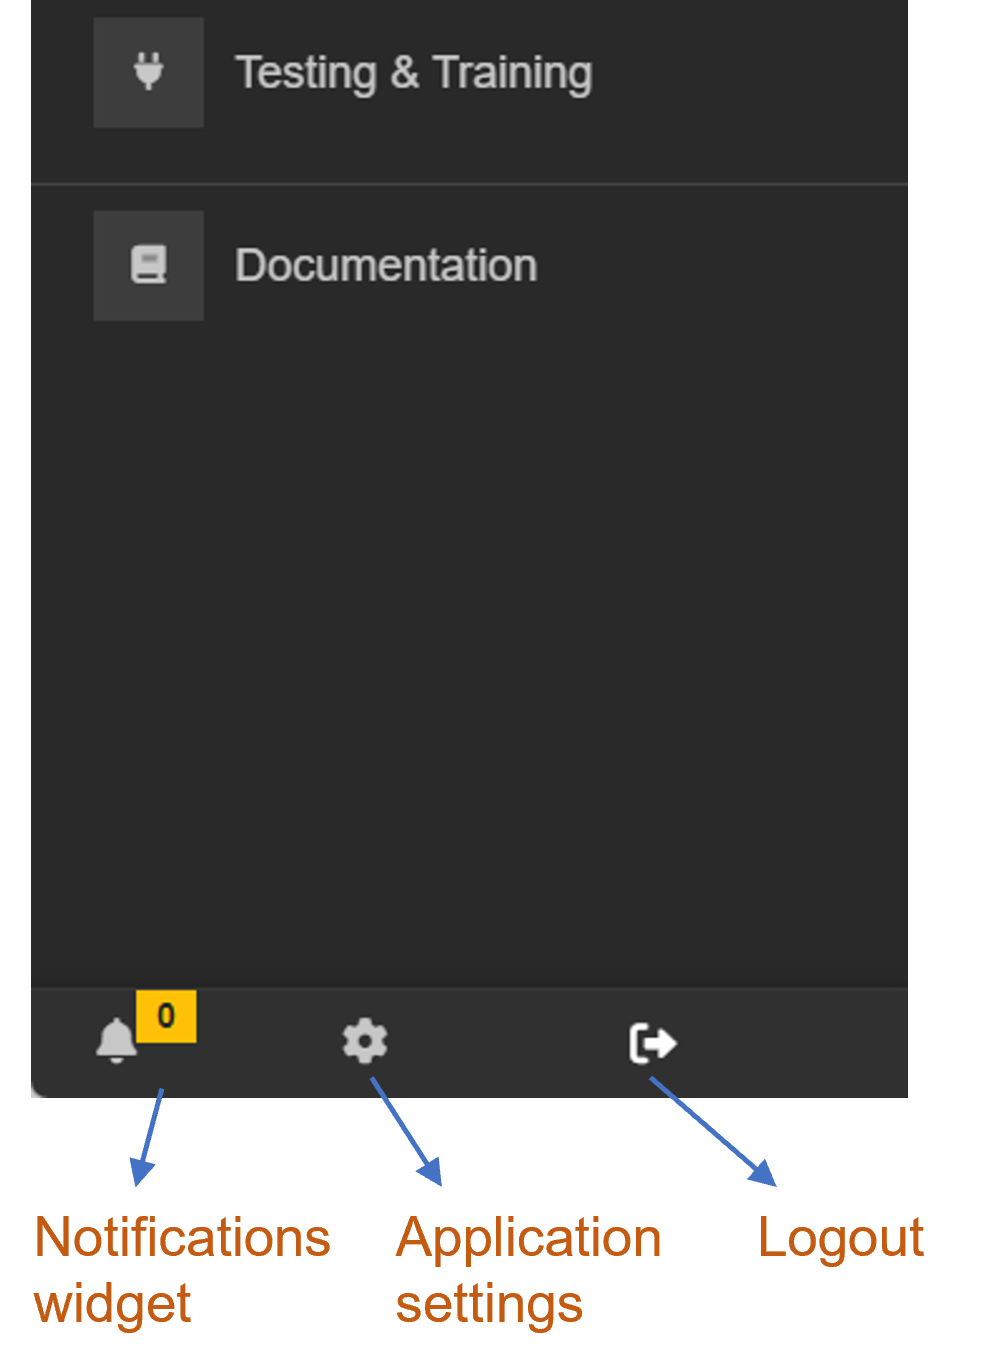
The settings are where you can set defaults for the AI interface or access other modules related to Lucid AI application.
Lucid AI Menu bottom bar options
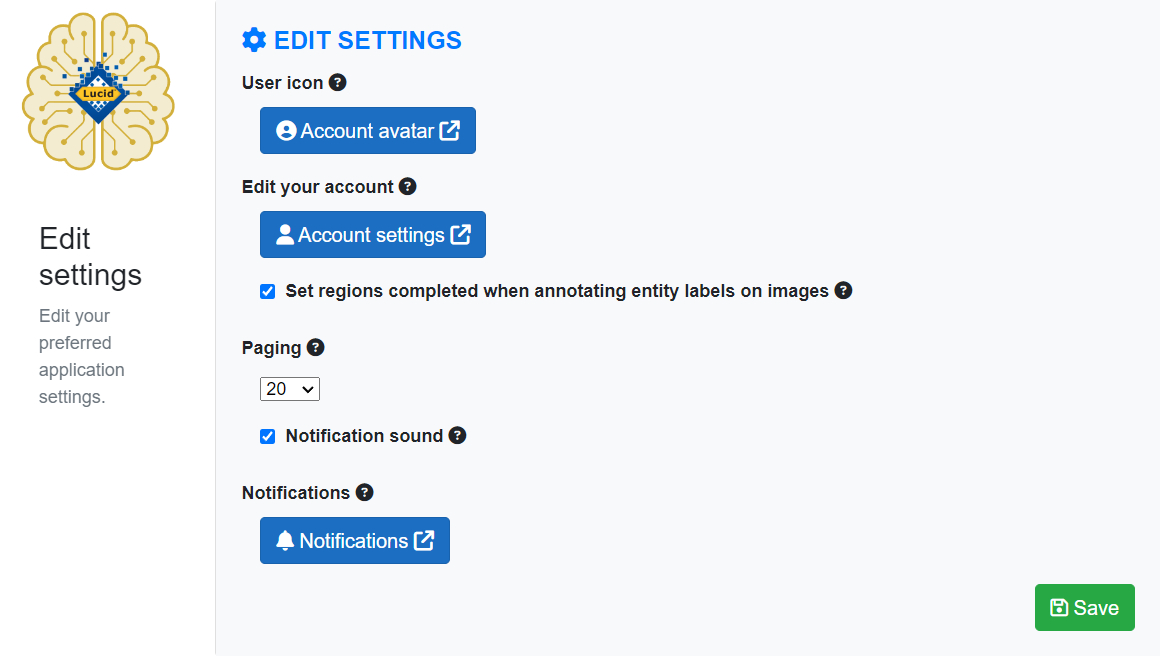
Lucid AI General applications settings screen
User icon
The on-line suite of Lucid based products, such as Lucid AI, use a global user icon service called Gravatar. You can create your own account icon (associated with your email address) via this free service. Millions of other on-line services and applications use this service such as WordPress.
Edit your account
This external link returns you to the Lucid Identity service where you can edit your account settings.
Set regions completed
This option automatically sets the region labeling (annotation) of the image as completed when the regions are saved. The regions complete checkbox within the labeling interface will be automatically set to true. This value will only be updated for the image if the regions of the image are saved.
Paging
Set the default number of records to return when paging occurs. For example, the number of thumbnails shown per page, or the number of labels shown per page.
Notification sound
If enabled the Lucid AI application will play a short notification sound to indicate a new notification has been received.
Notifications
The Lucid AI application shows up to ten (10) of the most recent notifications received while using the application. Other notifications may have been received while you were offline or exceeded ten notifications before you have reviewed them.
The notification button links you to the centralized Lucid notification application. The notification application stores notifications across several related applications such as the Lucid AI application. You can access all notifications, including those that have been dismissed within the Lucid AI application. For more information on the notifications please see the notification and messages help.
Due to the intensive nature of dealing with large quantities of images and training an AI, many operations within Lucid AI can take longer than a few seconds. In these cases, the long running operations are performed in the background and a notification sent on their completion.
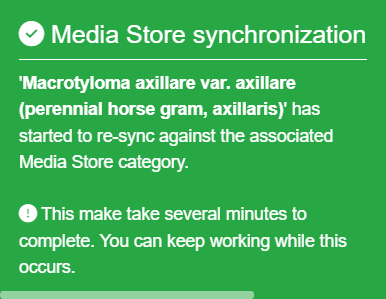
The Lucid AI application will provide immediate feedback on general operations such as saving, deleting, or starting long running operations, via pop-up messages, that will appear towards the top right of the screen. These pop-up messages will automatically disappear after a short period of time.
Lucid AI pop-up message example
Longer running operations that complete in minutes or even hours after starting generate a notification message. Notifications differ from pop-up messages in that they don’t disappear and don’t require you to be logged into the application to be generated. Some special notifications can also be sent as an email.
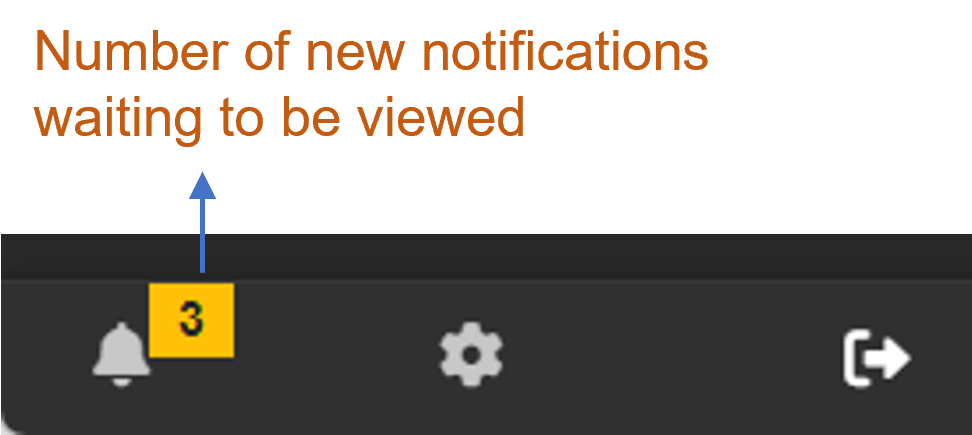
If you are logged in at the time a notification is sent it will appear within the notification widget located at the very bottom of the left main menu.
Lucid AI Notifications waiting to viewed example
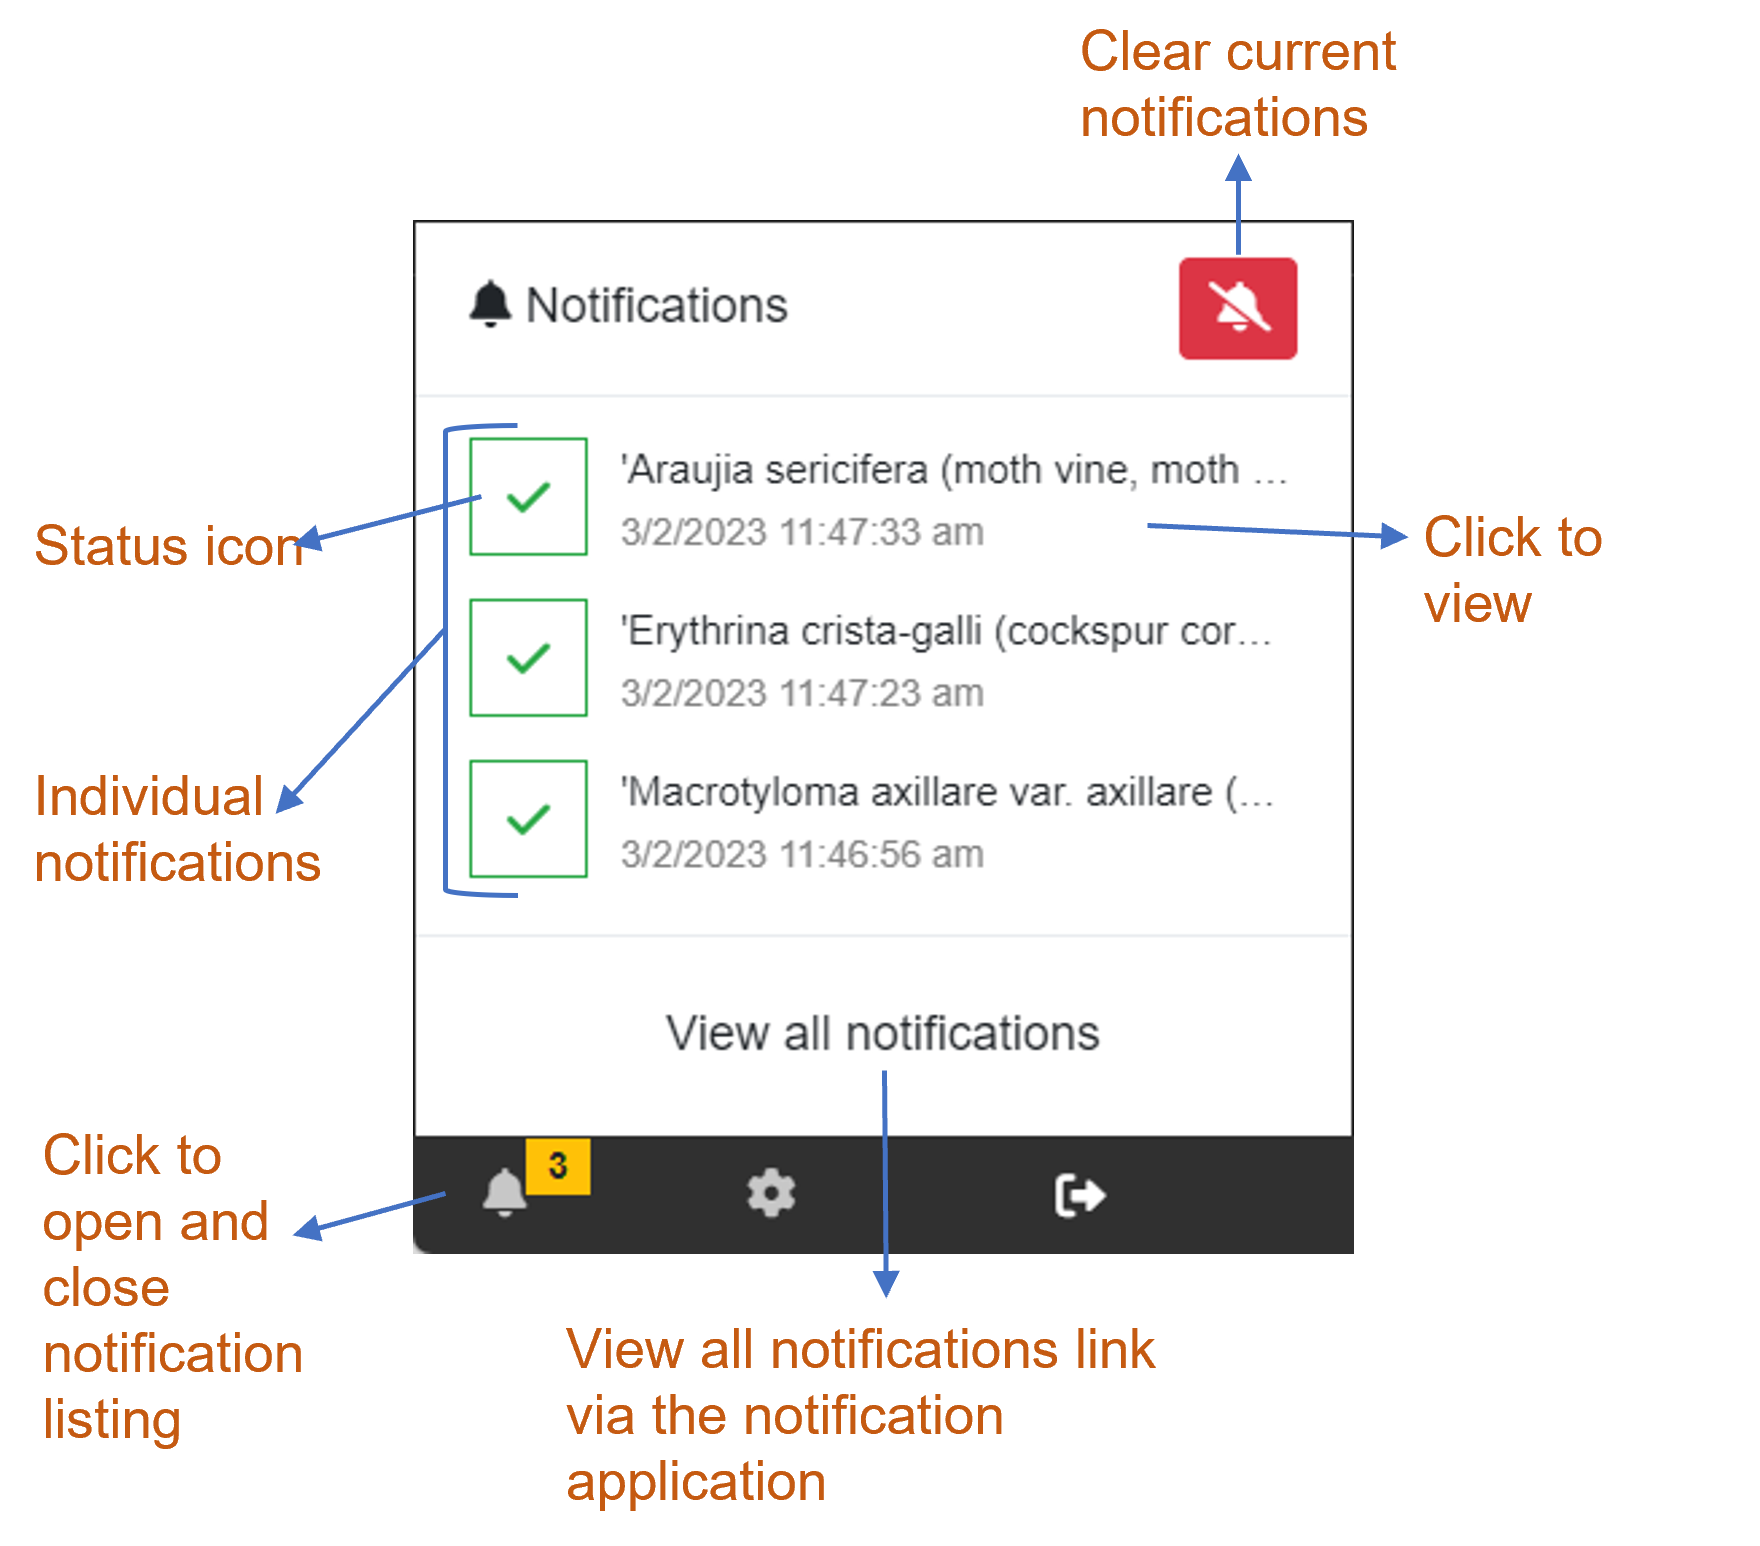
Notification widget
Lucid AI Notification widget overview
The notification widget holds the ten (10) latest notifications received while logged into the Lucid AI application. These notifications can be viewed and cleared from the widget. If you receive more than ten notifications the oldest notifications are removed from the queue.
Lucid AI example notification message when viewed via the notification widget
Tip
Clearing notifications from the notification widget does not delete them. Notifications can be deleted via the notification’s application. See the notification application topic below for further details.
Tip
You can enable or disable the notification chime sound via the Lucid AI settings.
To view all notifications such as those sent outside of an active session or notifications older than the current ten held in the widget, click on the ‘View all notifications’ link within the notification widget. This will load the notification application in a new tab of your browser.
The notification application
The notification application holds all your notifications generated by Lucid AI. This application allows you to review, filter, sort and delete notifications. The notification application is a central hub for notifications generated by all Lucid related services (Media Store, Lucid Builder, key services etc).
For more information on using the notification please refer to its help documentation.
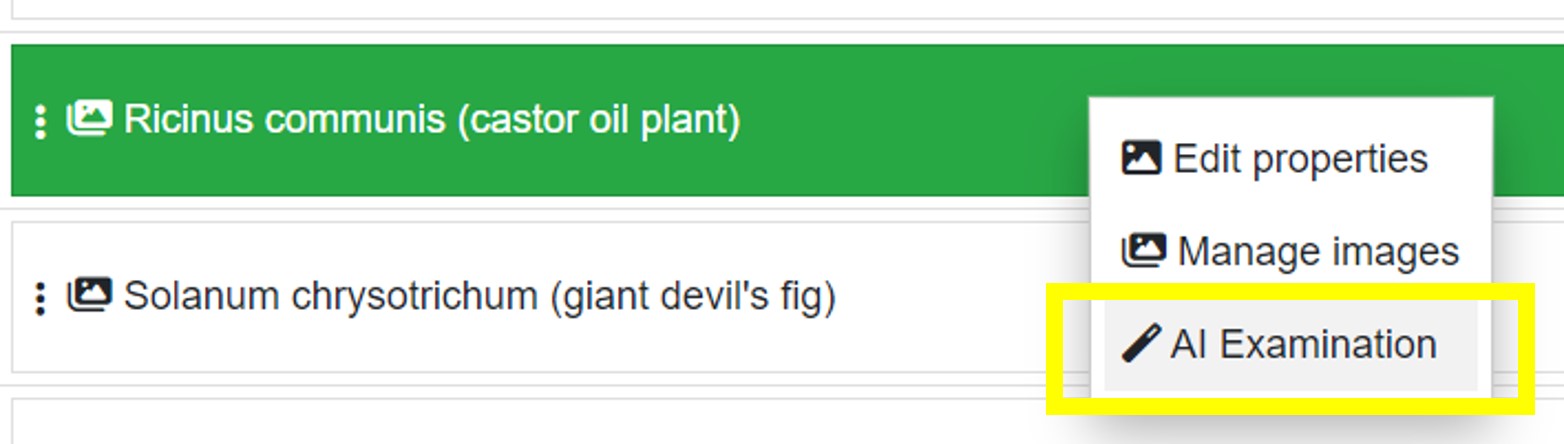
After you have trained your AI, you may be interested in determining how it’s performing and what images within your data set it might be having problems identifying. To do this you can use the ‘AI Examination’ option, available via right clicking a label within ‘Label images’ screen.
Lucid AI Right click popup menu option for label examination by the AI
The ‘AI Examination’ will be available on the pop-up context menu. After selecting this option, the AI will go through your training set and report on each region. Once the AI has examined all the regions a notification will be sent to let you know it can be reviewed.
Lucid AI notification example of completed AI examination of a label
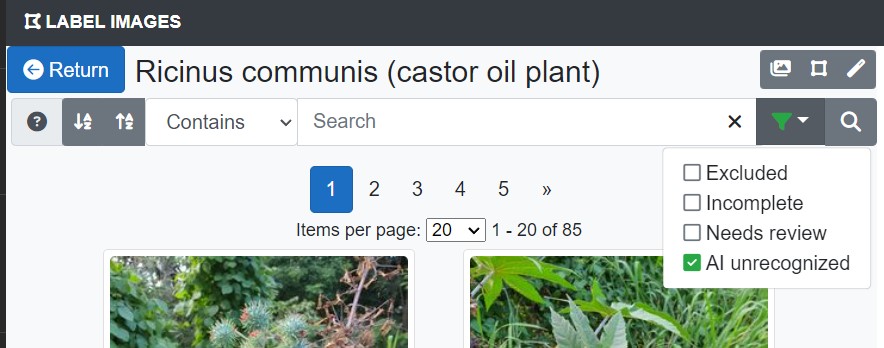
To review the images the AI is having difficulties with use the search bar filter option ‘AI Unrecognized’. The search will then return all the images the AI doesn’t recognize for its defined region labels.
Lucid AI filter images containing unrecognized region labels
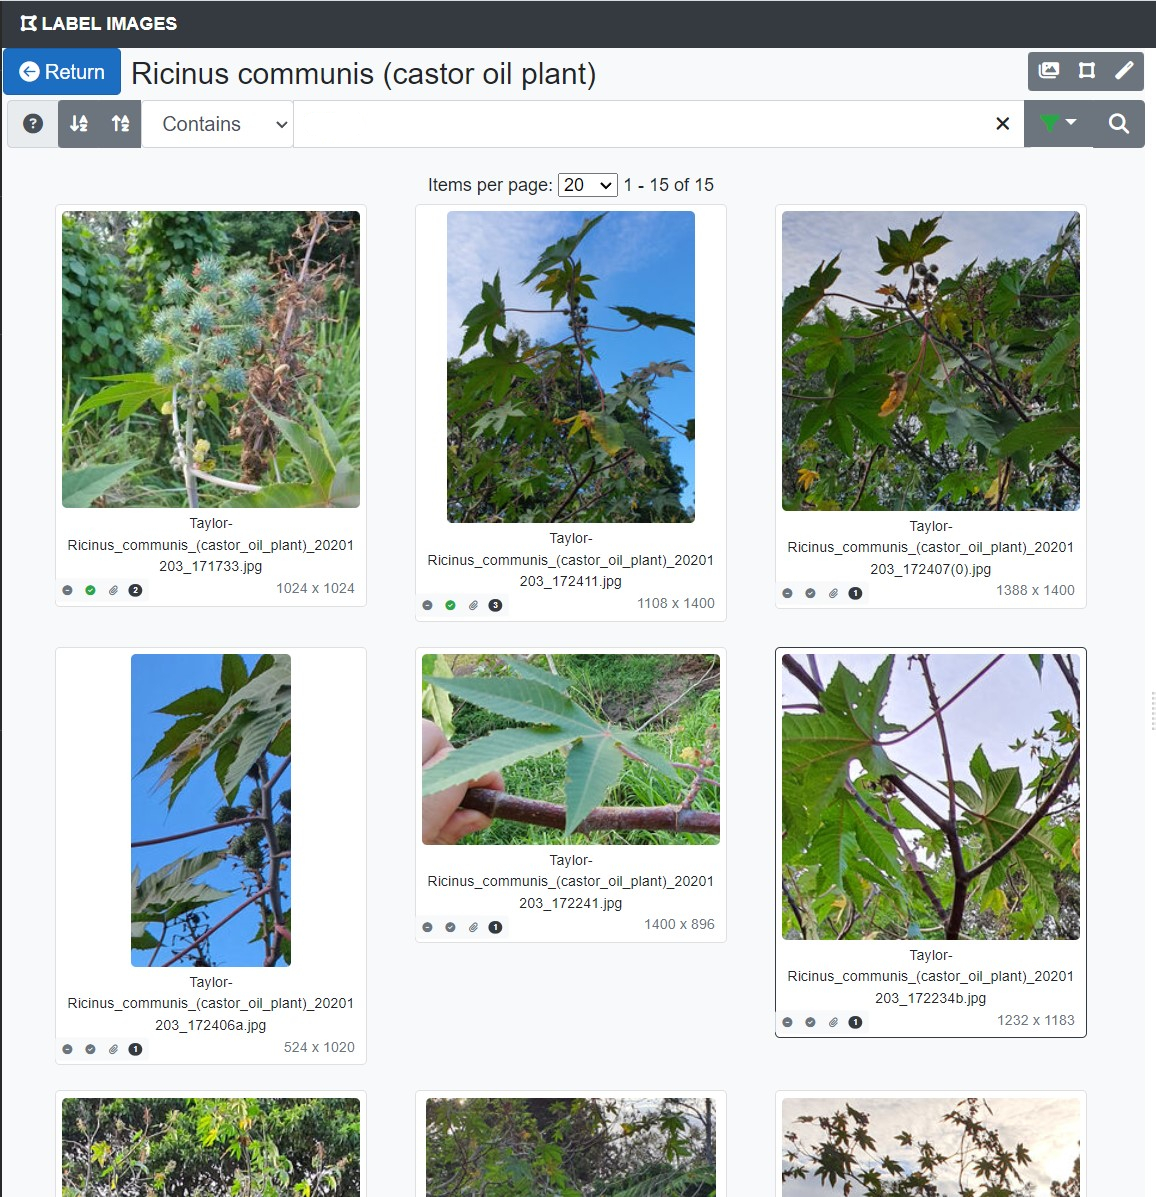
Lucid AI Examination results filtered to those images containing regions that weren’t recognized. In this example, 15 regions were unrecognized out of 309.
Click on an image (as shown above) and then a region (as shown below once the image has loaded). The identification statistics are then displayed. The statistics label will show the top entity label recognized along with the percentage match for the defined label (what is should have recognized it as).
Lucid AI Example of a poorly recognized whole image region label. In this particular case the image is blurry and the region captures too much unwanted background.
From this data you may see a trend that tells you don’t have enough images/regions of a particular state and so the AI is regularly failing to recognize them. For example, you may only have a few regions defined for the seed pod for the plant in question. The AI may consistently identify other parts of the plant such as leaves and flowers, but not the pods. Therefore, to improve the recognition of the plant you need to add more images/regions of the pods. Or as in the example above, your image may be of poor quality and/or the region label is not capturing the most appropriate part(s) of the image.
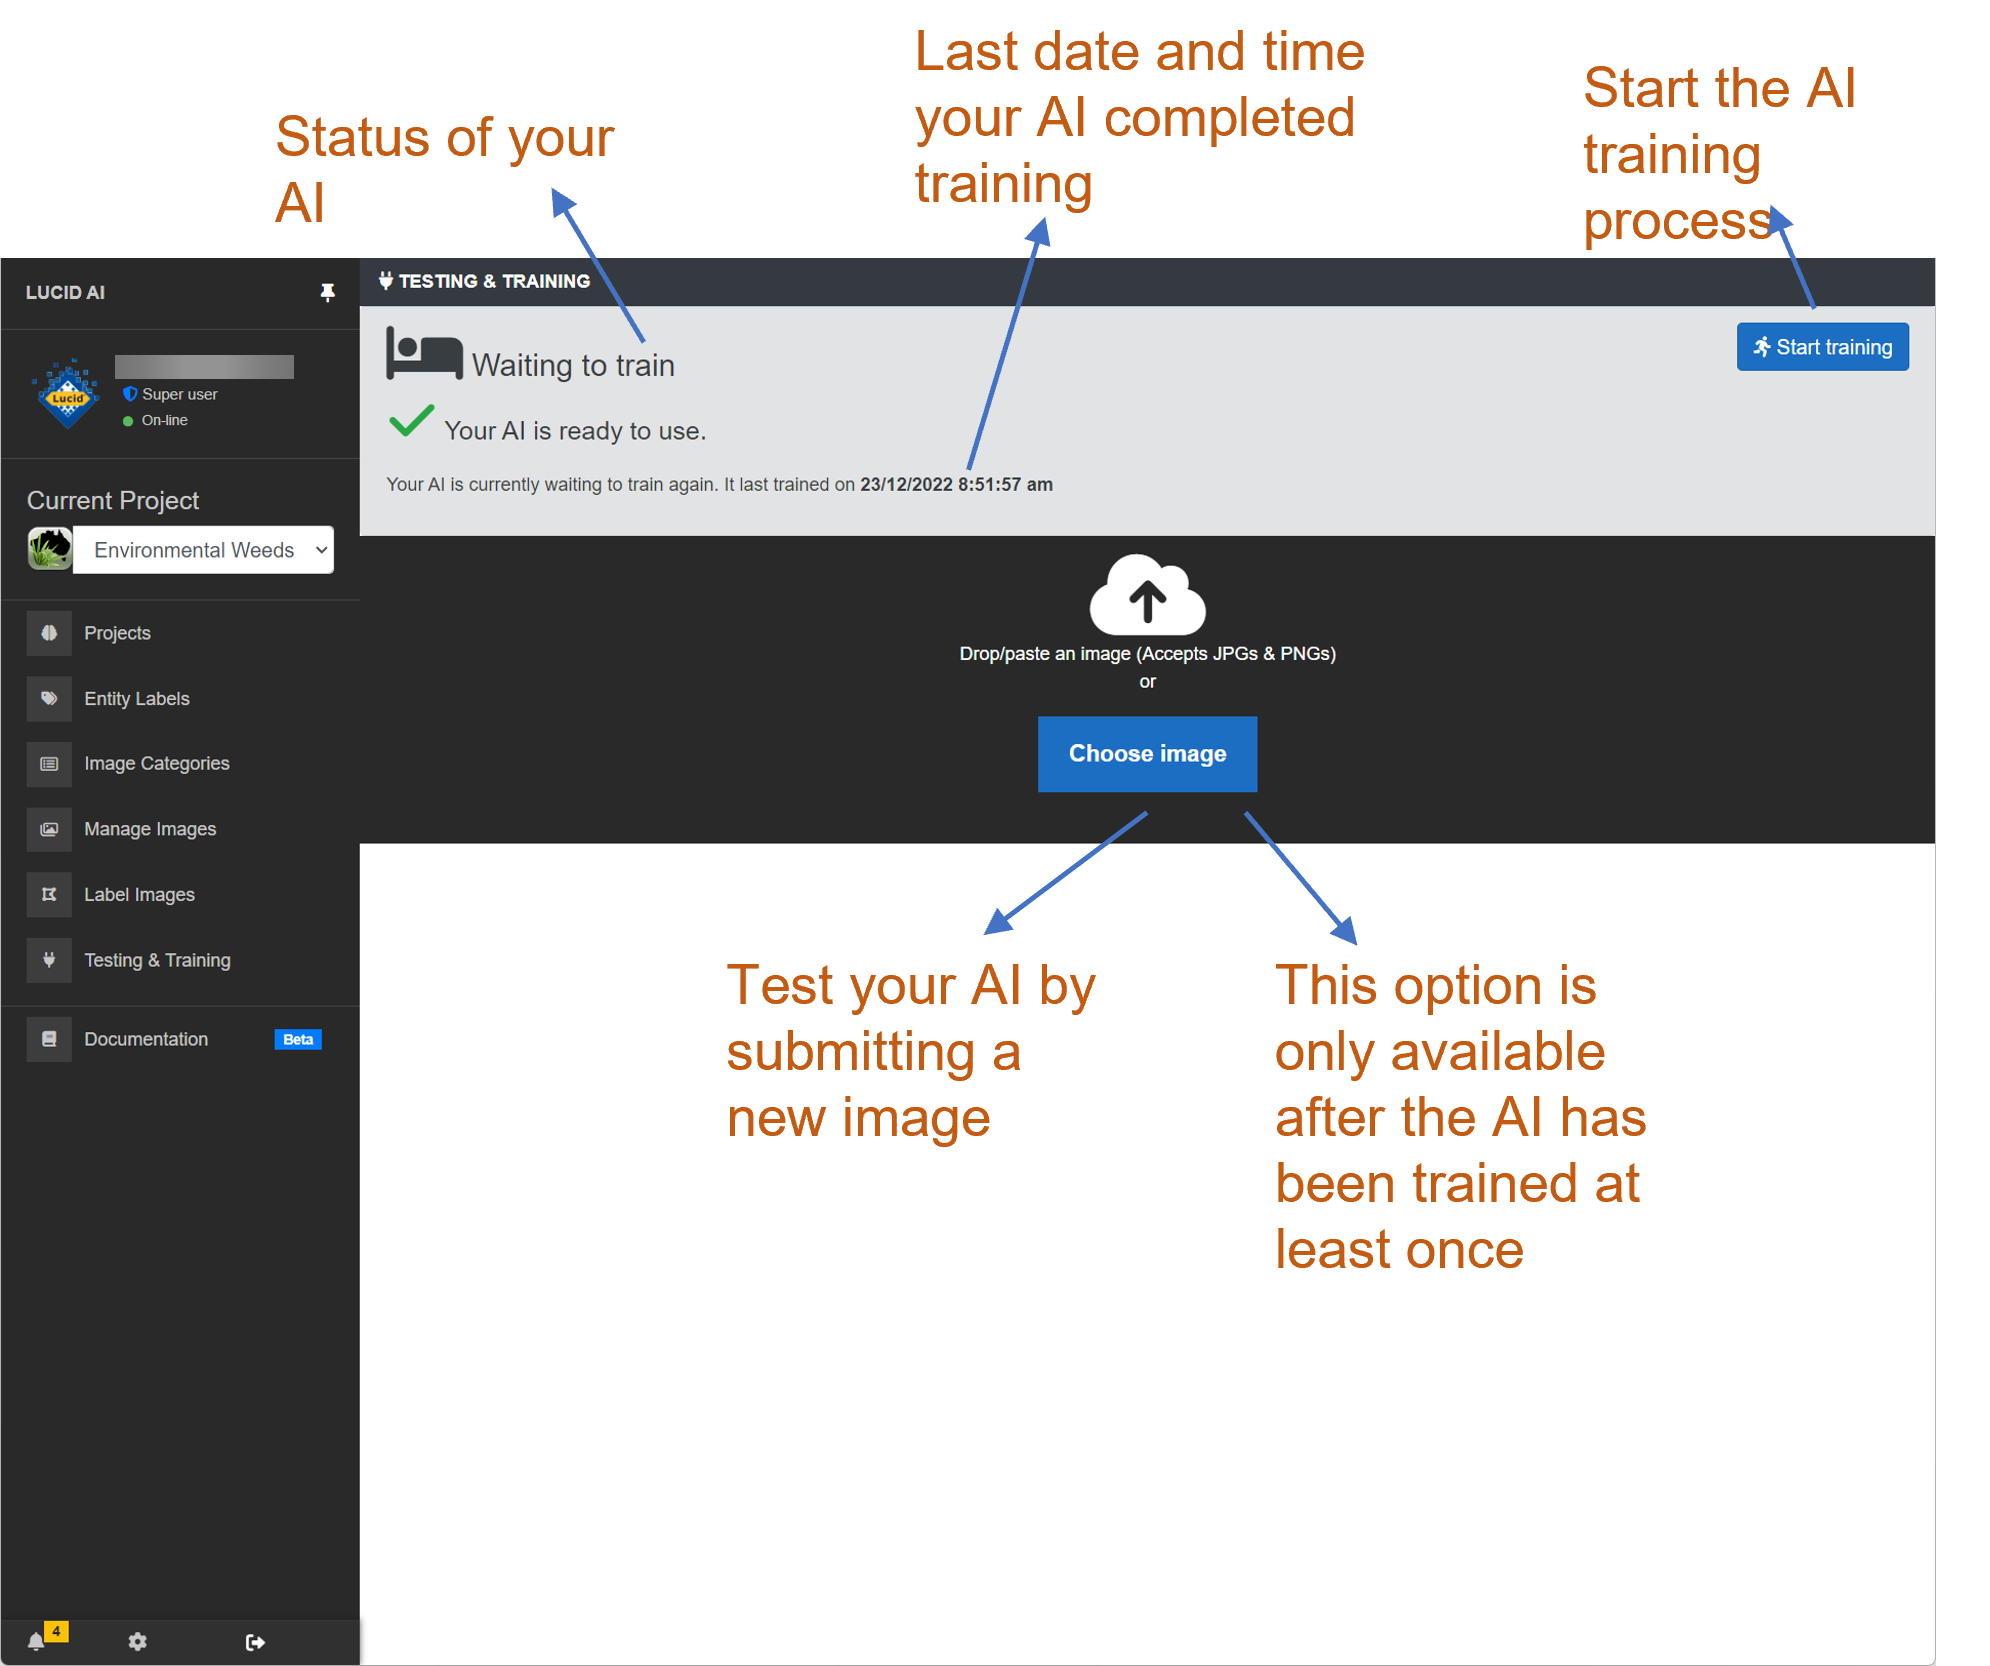
Once the task of annotating images with entity label regions has been completed training the AI can begin. Starting the AI training process is a simple as clicking the ‘Start training’ button. The AI training process is an extremely intensive computing task. Depending on the number of entity label regions defined and level of image augmentation this training process can take anywhere from a few hours to multiple days of computing time. Once the training process has begun it can’t be started again until the current training session has completed. You can continue to manage your AI project such as add images and create further annotations while a training session is underway. Any new additions to the project will not be included until the next training session is started.
It’s important to understand that each time you train your AI it’s not a cumulative process. The training session resets and retrains your AI from scratch. However, the AI from the last training session can still be used while undergoing its next training session. It is also possible to rollback your AI to its previous build, if you are unhappy with the latest trained edition. See the Rolling back your AI help for more information on this topic.
When your AI training session is started the trainer will give you an estimated completion time which is calculated on the amount of training data to be processed. This estimate isn’t a guaranteed time since several other factors can affect the training time, particularly the current computing load. That is how many users are working on the project and accessing the AI during the training session. Since the training process doesn’t have a precise end time and will most likely take longer than a user session (the average length of time working on a project). The user who triggered the training session, along with other project members listed in the project notification settings will be emailed once the training session has completed and the new AI has become available for use.
Due to the amount of time needed to train an AI it is possible on the rare occasions the service is interrupted due to system maintenance and updates. If this does occur you will be automatically notified, via email, of the interruption and you will need to restart the training again when next logged in.
Training analysis
During your AI training it possible to undertake additional analysis of how well the AI is expected to perform. This analysis is optional as it can easily double the training time needed. Analysis is generally recommended when the AI is first trained on an image set or the training image set changes significantly or additional entity labels are introduced. Training analysis is not necessary when small changes to the image set are made. The analysis of your AI will give you a performance percentage for each entity label when using the image data held back during the training process. The closer your entity label performance percentages are to 100% the better your AI is at recognizing image data for that entity label.
It is unlikely the AI training will achieve high 90th percentile range across your entire entity label set. Anything above the mid-75th percentile should achieve very good recognition results, assuming the training data set is a match for the images the AI will encounter. If you are seeing many of your entities with percentile ranges lower than this, then it is likely you either don’t have enough image regions defined for that label or the image regions for the entity label are possibly too dissimilar. For example, training your AI to recognise a plant species based on its flowers and seeds using the one species name label. Flower and seeds are very different looking and would be much better split into their own separate entity labels such as ‘Species name flower’ and ‘Species name seed’.
The training analysis will be emailed to you, if selected, as a part of the training completed notification.
Testing your AI
Lucid AI Testing the AI example
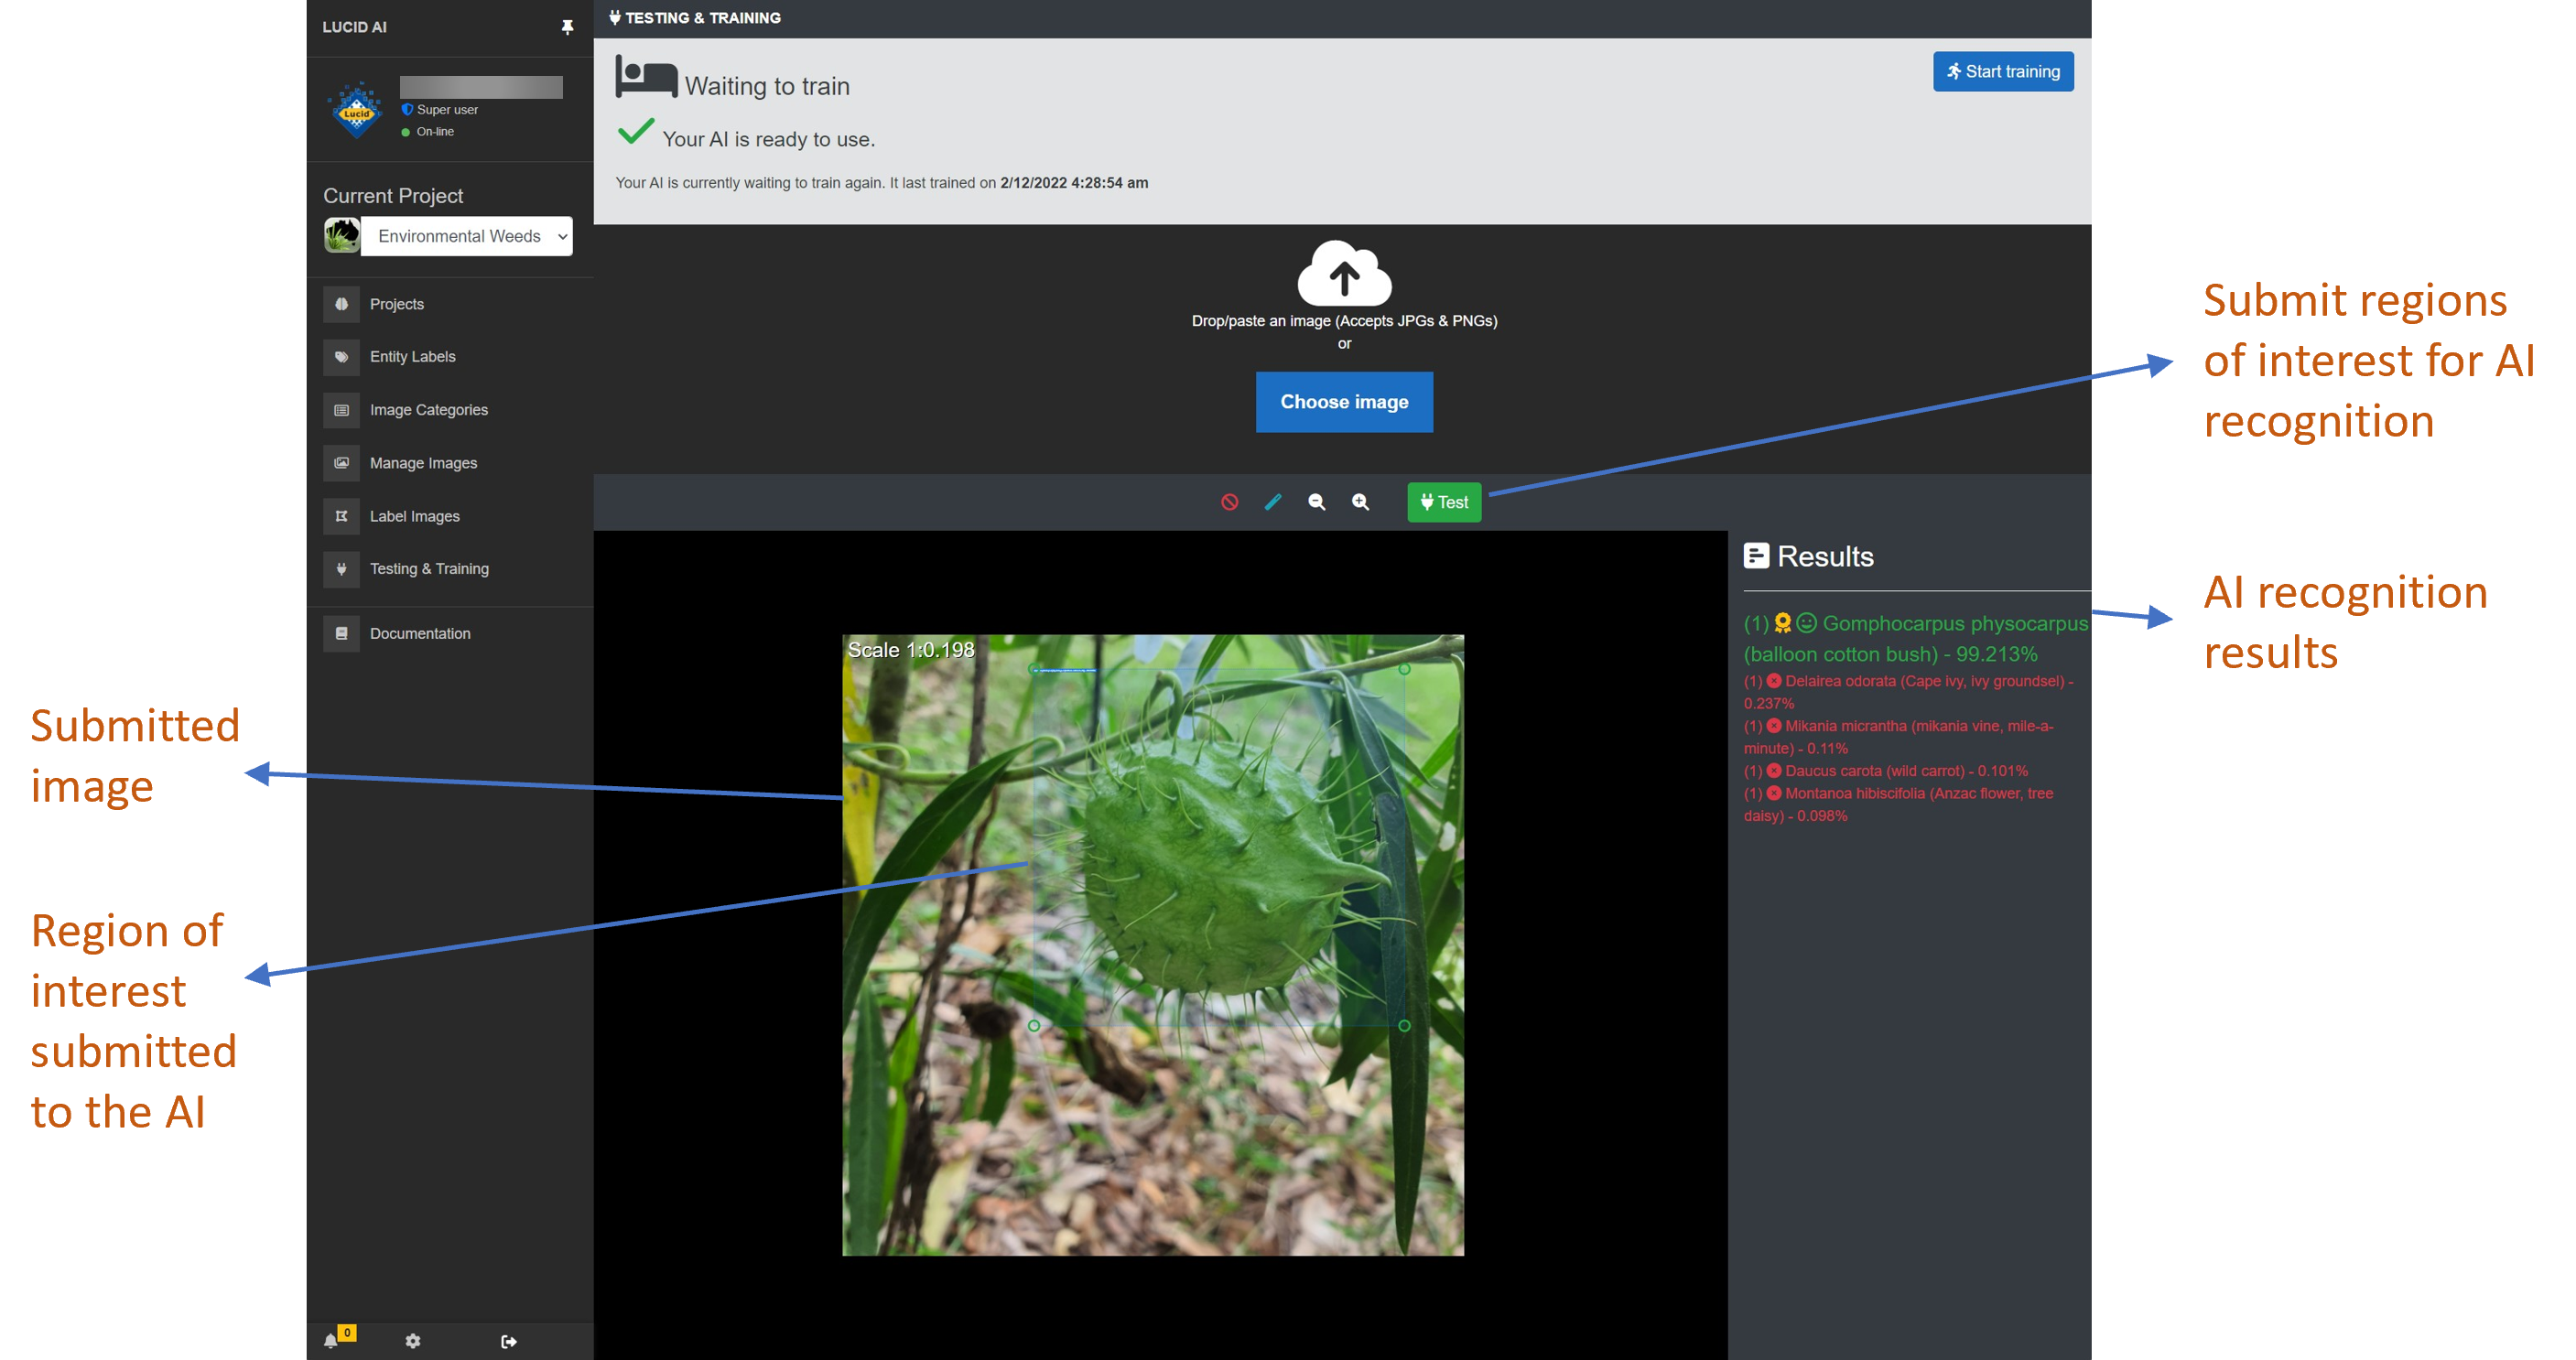
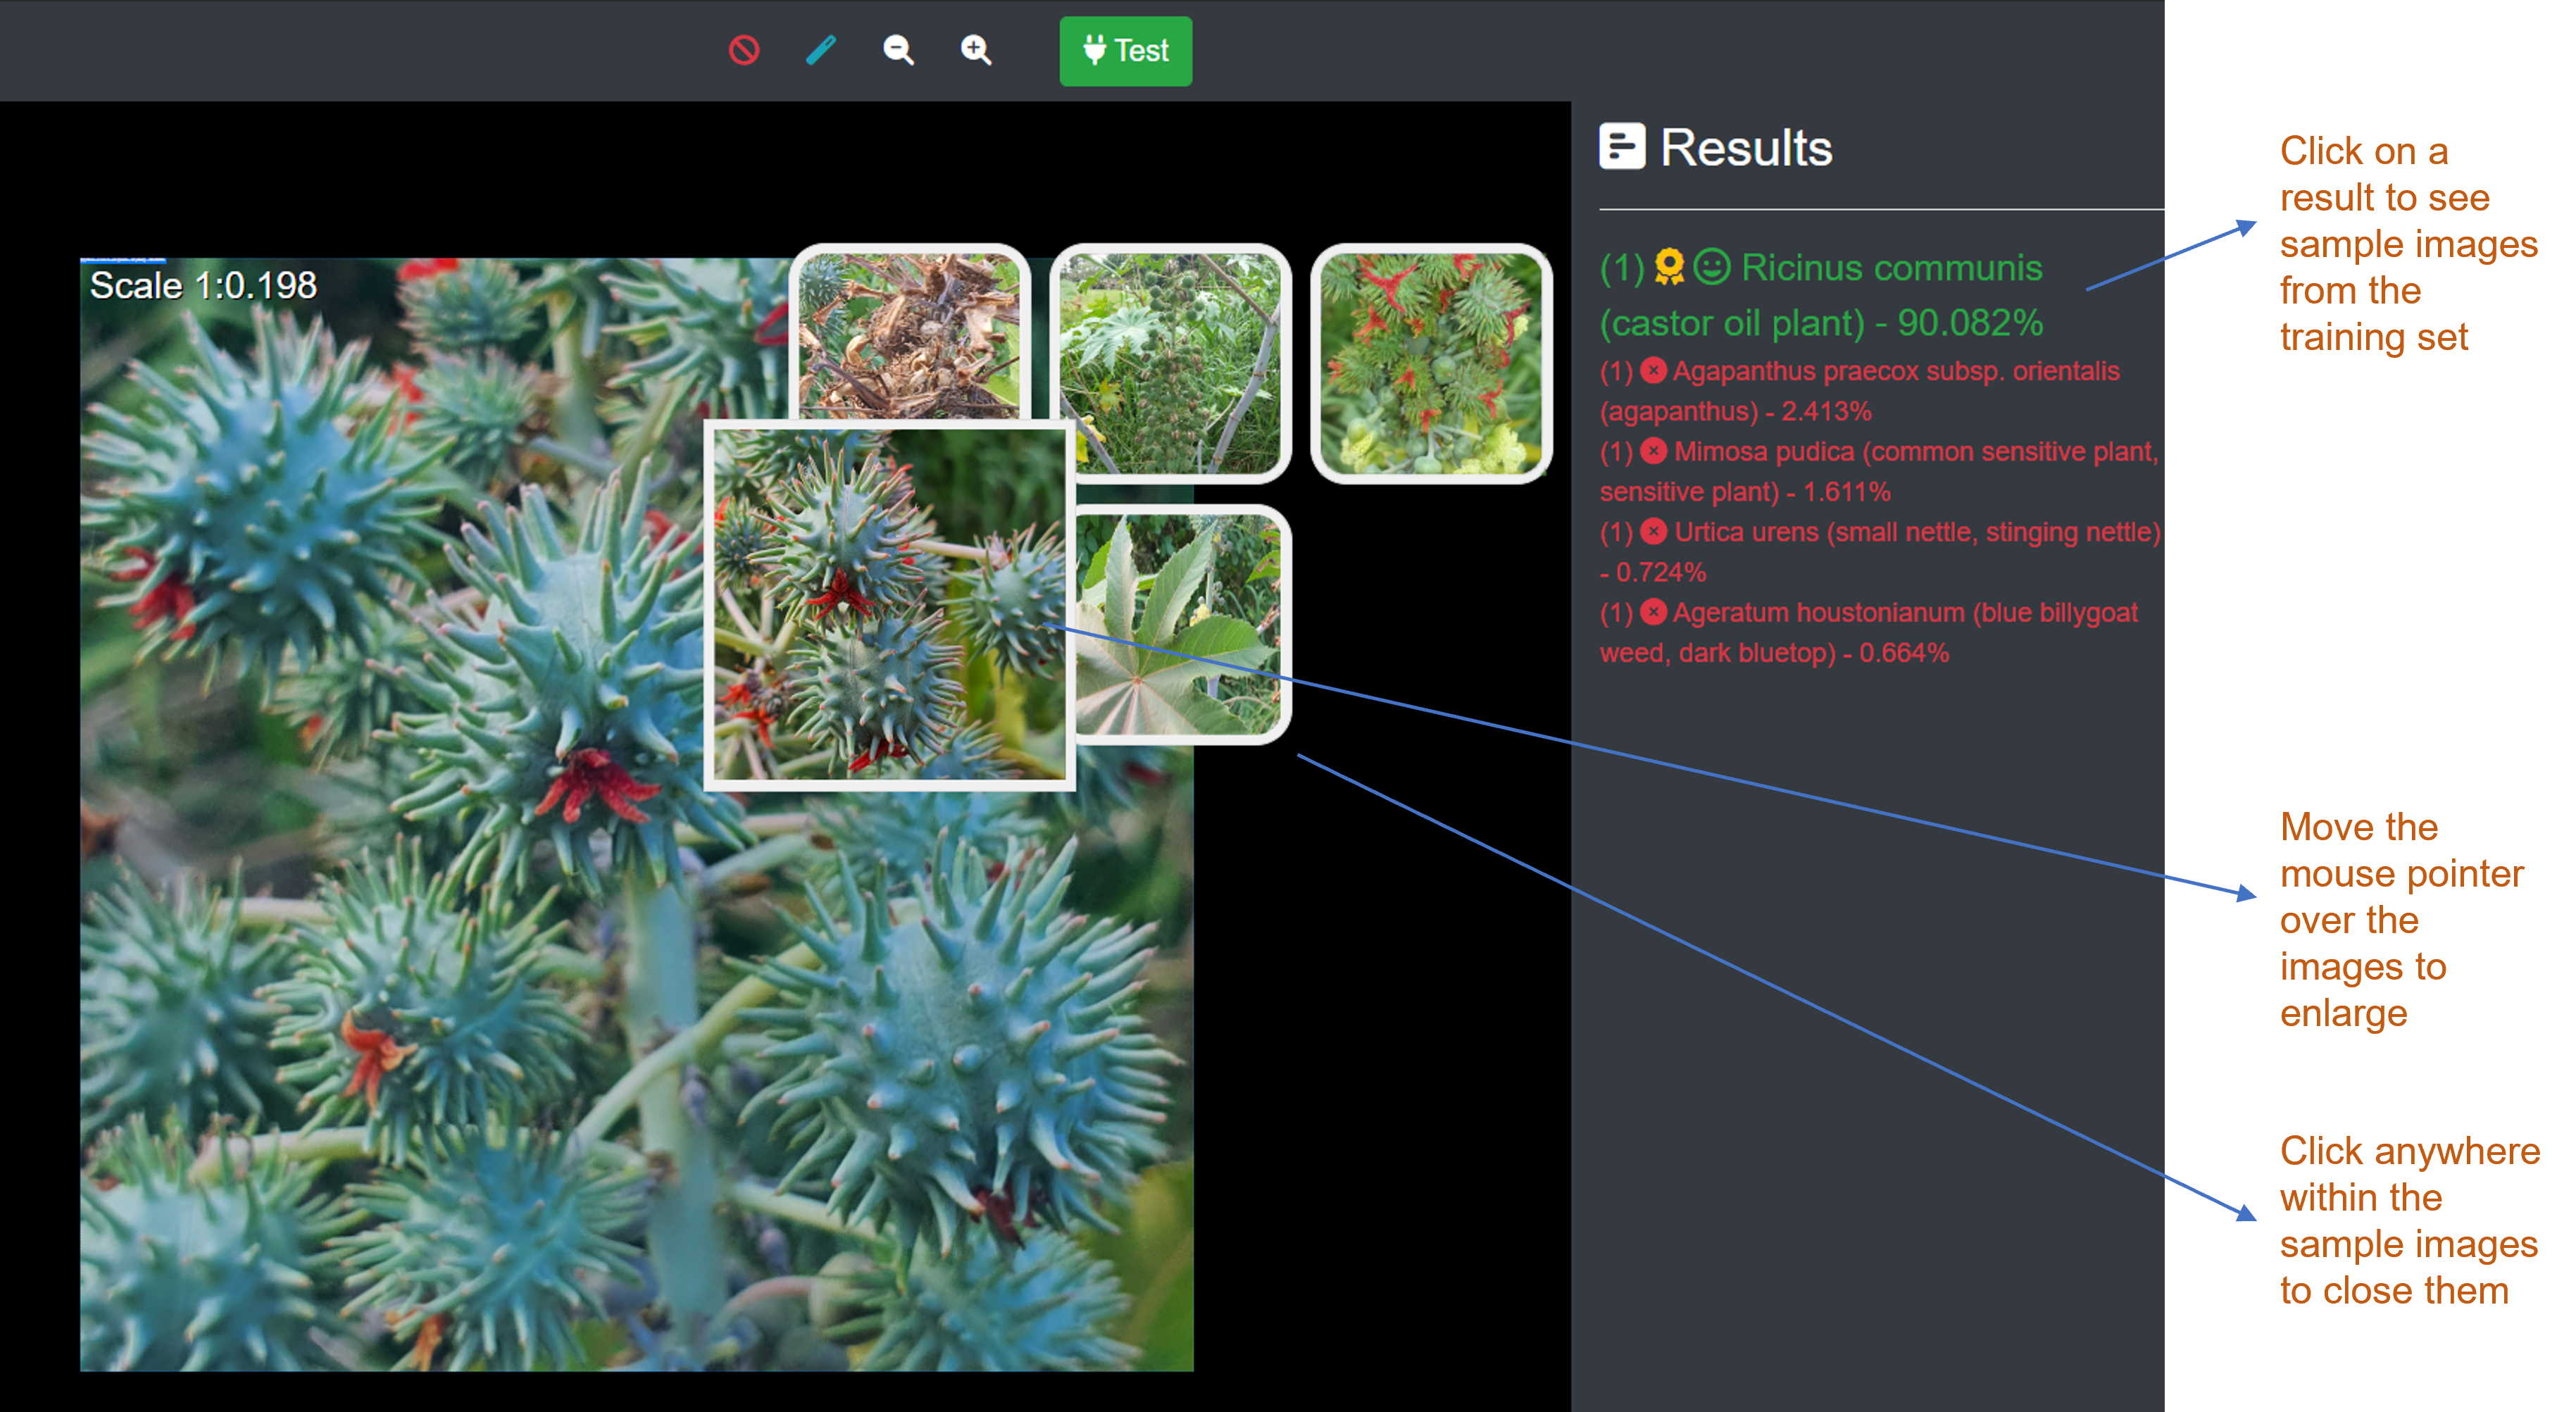
After the AI has been trained it is important to try it out. The testing interface is very similar to how entity label regions are annotated on an image. To begin testing you first must provide an image for testing. For a true test you should provide an image that is not part of the image data set. Once the image has been selected, one or more regions of interest can be applied to the image. As with training data, it’s not always desirable to have the AI try and distinguish between multiple species within the one region or excessive background. Regions waiting testing will be labelled ‘To be determined’. Once the regions have been submitted, the AI will review each of the defined regions and return the top five entity label probabilities for each, ordered from the most likely to the least likely. The highest probable entity labels will be applied to the annotated regions. For convenience, a random selection of images from the training data set will be available, if the result entity label is clicked, as a reminder of what the entity is and the type of images that represent that label.
For faster visual acuity the results of each region are colour coded and a success level icon assigned. For example, when the AI is very sure of its prediction (80% or higher) then the label colour will be green. If the top prediction is 80% or greater than a gold trophy icon will also be displayed.
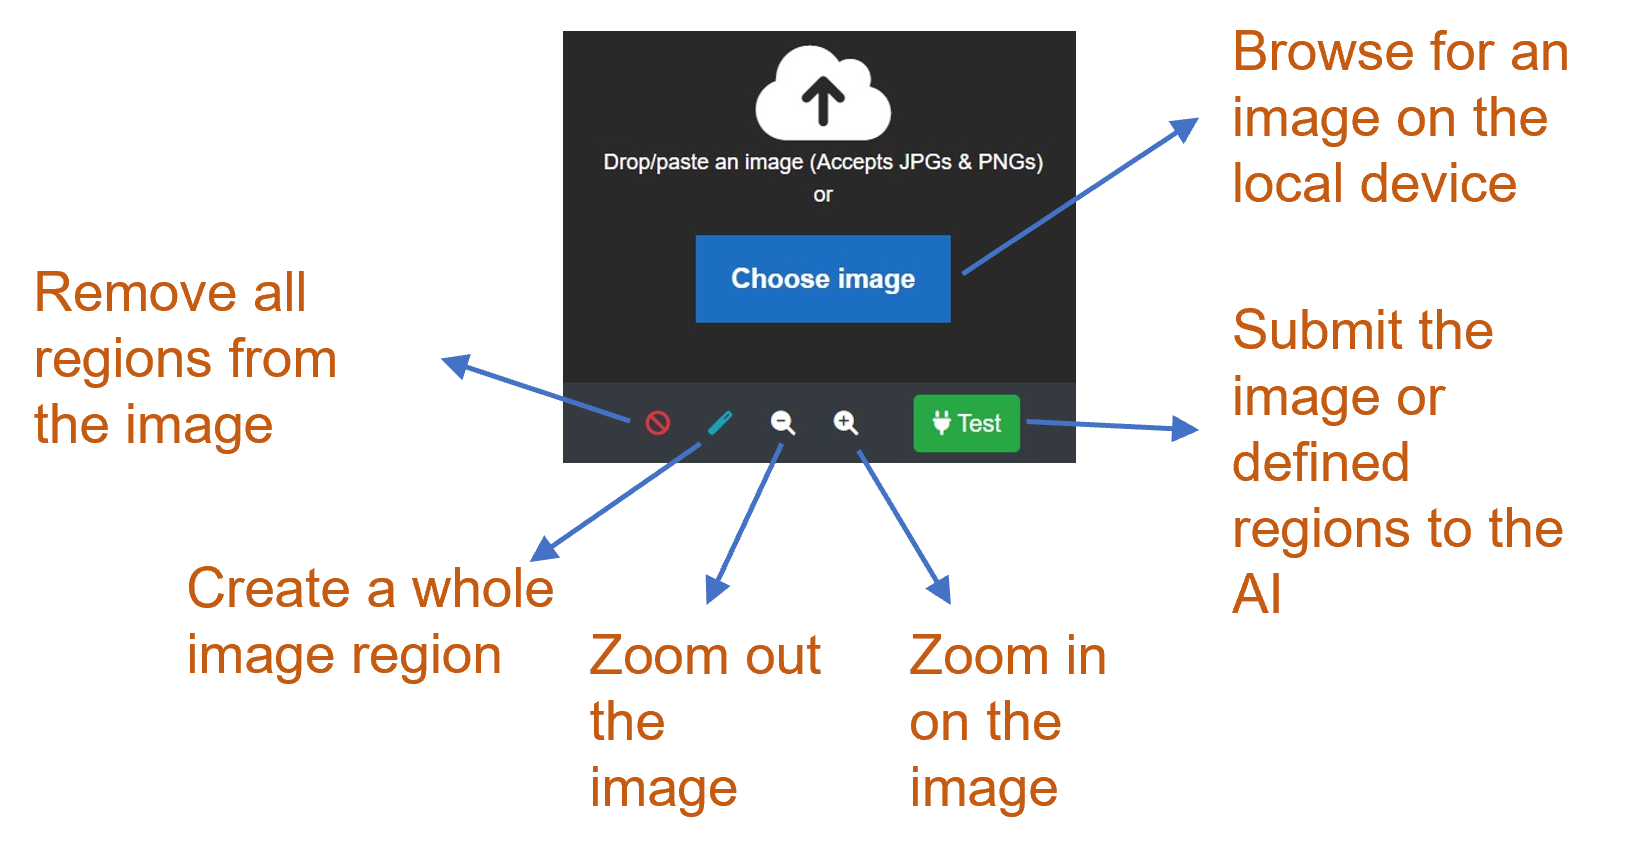
Lucid AI Test AI button options
Choose image
An image must be provided for the AI to test against. Either click the ‘Choose image’ button to browse for suitable JPEG or PNG image file on your local device. Or drag and drop one from your file system to the panel that contains the ‘Choose image’ button. Alternatively, you can simply paste a copied image from your system clipboard (E.g., Windows – Ctrl + v or for OSX – Command + v) left click on the panel to give it focus, then paste, if the clipboard image doesn’t update as the selected image.
Clear regions
Clears regions from the selected image.
Create whole image region
Automatically creates a whole image region.
Zoom image
Zoom in or out on the image. Large images may exceed the available space within the interface, zoom out will make it fully visible. The mouse wheel can also be used to zoom.
Adding testing regions
To annotate test regions right click on the image and select either the rectangle or polygon region option from the pop-up context menu. If the polygon region type is selected use the mouse right click pop-up context menu to complete the polygon drawing.
Tip
After the result of the region(s) are returned you can adjust one or more regions for retesting.
Test
Click the test button to submit the region(s) to the AI to analyse.
Note
If no region is defined, then a whole image region is assumed for the test.
Results
The right-hand side results panel will list each region along with its top five predictions. Each set of results will be numbered, along with the corresponding region label, including the top prediction entity label, to indicate region match result. Clicking on a result will load a random sample of images from the corresponding training set as shown in the screen shot below.
Lucid AI view sample images related to the results
When annotating entity label regions on an image Lucid AI will also create several different augmented versions of the image data to enhance the AI training process. Different augmentation methods are applied depending on the image data. Some simple examples of augmentations include view rotations, and color adjustments.
Augmented image data is extremely useful when only a small number of image regions have been defined for an entity label, though more importantly it can boost the Lucid AI recognition success anywhere from 15-50% when compared with no augmentation. Augmentation is also why you may see your AI trained on a much larger image dataset that your overall entity label regions.
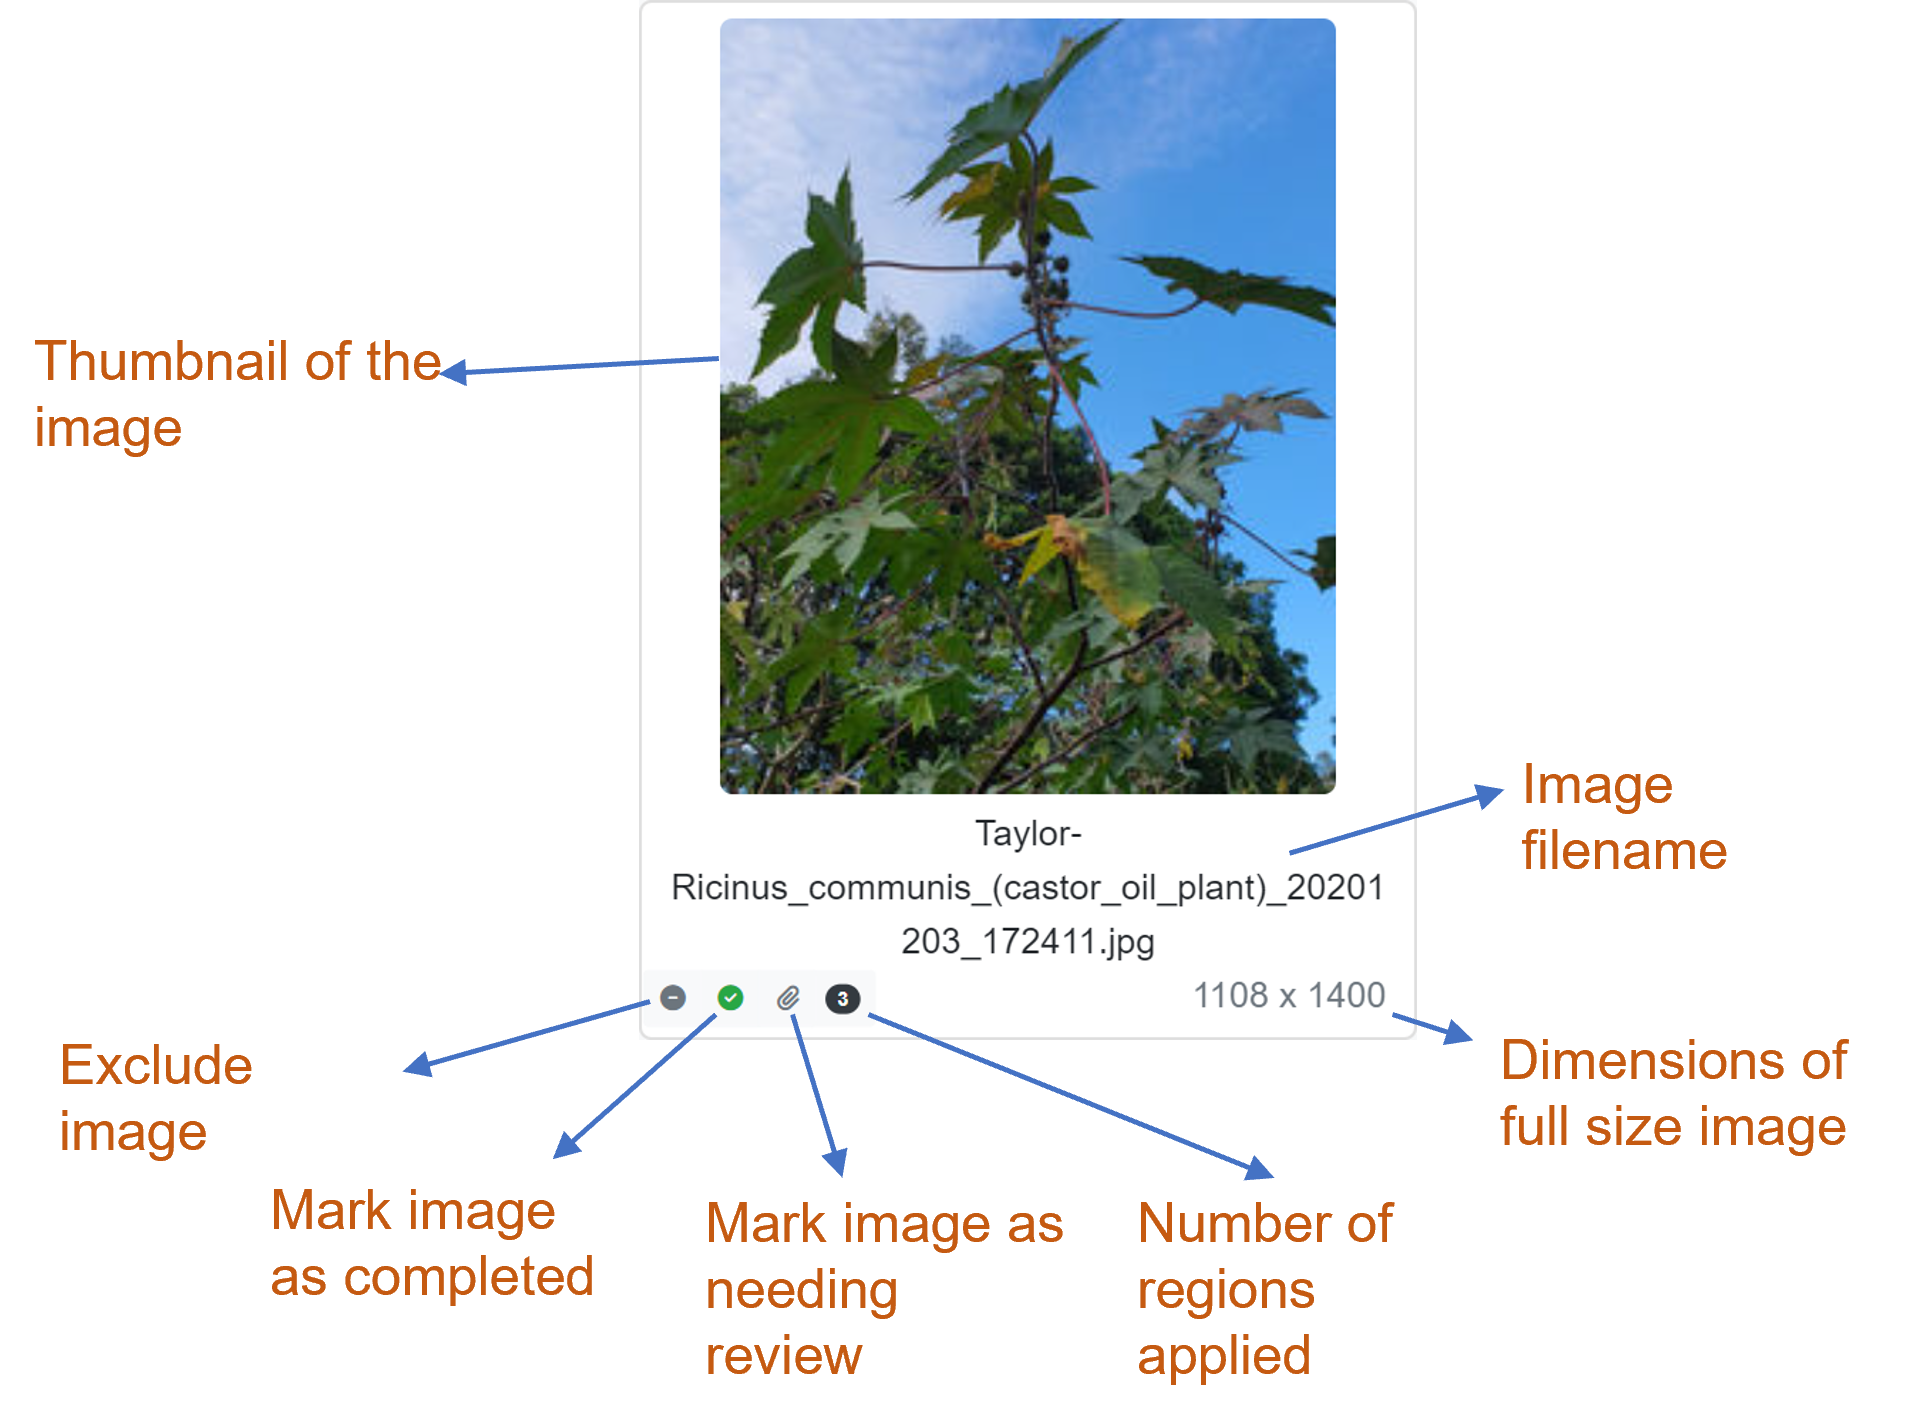
When browsing the thumbnail images of the category, each has a simple set of options below along with the image file name and large size dimensions. The image options, excluding delete, also allow enable you to filter your view of the images, via the search bar options. Filtering the images in this way can be very useful if the category contains large numbers of images.
Lucid AI Image properties
Include/Exclude
If toggled to exclude any entity label regions for this image will be excluded from the AI training. Each image is set to be included by default.
Incomplete/Complete
Allows team members to mark an image entity labeling as completed. This indicator is useful to see that no further region labeling is required, especially when viewing images that obviously needs a label other than the default whole image. By default, an image is set to incomplete when imported into the project.
Note
Regardless of the status of this option any annotated entity label regions will be included in AI training.
Delete image
This option is only present on images where the parent image category is not set to synchronize with projects media store library category. When this is the case mark the image as excluded (see the ‘Include/Exclude’ option above for further information).
Deleting an image from the image category also removes any associated entity labels.
Warning
This action cannot be undone.
Review image
Allows project team members to mark an image as needing review. An image marked for review normally means the image may not be the desired quality for training or subject(s) or the image may not be what the image category is representing. E.g., The image may be of a closely related species that the image category does not represent.
Note
Marking an image as needing review doesn’t exclude any annotated entity labels associated with it from the AI training.
At the heart of creating your AI is image annotation. This is the process of defining your images with one or more entity labels. Essentially image annotation is like teaching a child what it’s looking at.
An ideal image for AI training would only show the entity (subject) we are wanting the AI to recognize, not contain superfluous background or other undesired entities. However, this is rarely the case. The image annotation tool within Lucid AI helps you get the most out of your images.
It allows you to quickly and easily define label regions. A label region can either be a whole image or part of an image. The Lucid AI image annotation tool allows you to define multiple regions for one or more entity labels, either as a rectangle or polygon. In many cases an image might provide the opportunity to create several regions.
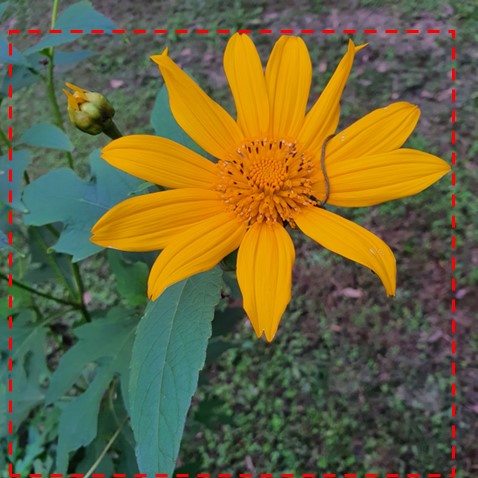
As shown in the example below, an image can be annotated with several entity labels, either of the same type or mixed labels. Label regions can also overlap.
Example image region annotation
To start annotating your images select the label images menu option and select an image category. Images contained within the category will be loaded ready for selection. Click one of category thumbnail images to begin. The larger version of the image will be loaded ready for labels to be applied.
Available entity labels will be loaded within the labels panel on the right. If your image category and entity label names match the corresponding label will be automatically selected for you. Otherwise, an entity label will need to be selected.
To begin labelling set the preferred zoom level of the image (if needed) and right click at a point on the image you would like to start a region. A pop-up context menu will appear. Select either a rectangle or polygon label type. Complete the desired region, excluding as much of the unwanted image data as possible such as background and other species.
Once a region has been created it can be adjusted via the round handles at the corners of the region. These allow the region size and shape to be changed. A region can also be moved about on the image, and its order within the stack of regions changed, so you can access any regions that may be behind another.
Once finished annotating your image click the save button located on the image toolbar (or press ‘ctrl + s’ keyboard combination). The return button will take you back to the pool of category images for selection of the next image to annotate (or press ‘ctrl + r’ keyboard combination).
Tip
If your project was created with automatic synchronization against an existing media store library, all the images by default will have had a whole image region created.
Zoom
Use the zoom in and out options to better view the selected image. The mouse wheel can also be used to zoom (in or out) the image while the mouse cursor is within the bounds of the image.
Region types
Two region types are supported. A rectangle and polygon region. Before a region can be created you must select an entity label the region is representing. See ‘Selecting entity labels’ further below for more information on this.
Rectangle region
The rectangle region type is the fastest to apply and should be used where it excludes as much unwanted background image data as possible.
Poor use of the rectangle region due to the amount of unwanted background content it captures.
A better use of the rectangle region where unwanted background content is minimized.
Applying the rectangle region can be done in one of two ways.
Option 1. Select the rectangle region type from the toolbar. To start a rectangle region, hold down the Ctrl key and click within the bounds of the image to start the region from the position clicked within the image. There is no need to continue to hold down the Ctrl key once the region has started. To create another region, Ctrl click again to start the region drawing process again.
Option 2. Right click within the image and select the rectangle region option from the pop-up menu. This option will immediately start the rectangle region from the position the right click took place.
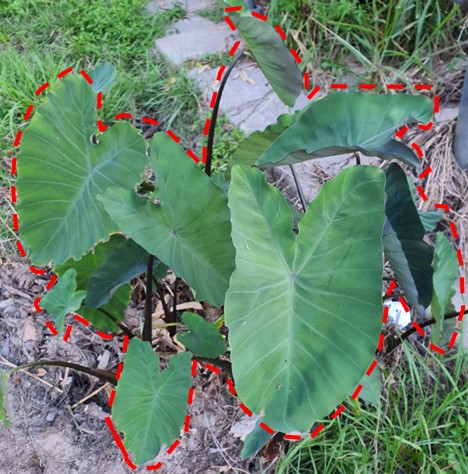
Polygon region
The polygon region type allows you to more precisely define a region around a desired area of the image. Applying the polygon region can be done in one of two ways.
Option 1. Select the polygon region type from the toolbar. To start the polygon region, hold down the Ctrl key and click within the bounds of the image to start. The start position is the location on the image where first clicked with the Ctrl key. There is no need to continue holding down the Ctrl key once the polygon drawing process has started.
Example polygon region.
Option 2. Right click the position on the image where the polygon is to be started, then pick from the context pop-up menu ‘Create polygon region’.
Creating the polygon coordinates (points)
After starting the polygon using either option 1 or 2, the next setup is to define the coordinates (or points) of the polygon. Move the mouse to the next position from the starting coordinate and left click the mouse to add a new point. Continue this process until you have defined the polygon around the desired image region. To complete the polygon (join the last point to the first point) right click and from the pop-up context menu select the ‘Complete polygon’ option.
Tip
When creating the polygon there is no need to follow precisely along the edge of desired area as doing so can be very time consuming. The main goal is to reduce the amount of unwanted data. Eliminating it entirely would be too time consuming and unnecessary.
Ordering regions
When creating multiple regions on an image it is possible to have one region completely cover another. When this is the case the only way to access the covered region(s) (without deleting the region above) is to change the z-order of the covering region to below the region you are trying to access. You can change a regions z-order, downward or upward or to the bottom or top, by selecting it, then right click to access the ordering options on the pop-up context menu.
Note
The ordering of regions has no impact on the training data is only used to gain access to covered regions for editing or deleting.
Deleting a region
Select the region that is to be deleted, then press the delete key on your keyboard or the delete button on the toolbar. Alternatively, the right click pop-up context menu can also be used to delete the selected region.
Warning
There is no undo when deleting a region once the regions have been saved. If you’ve made a mistake deleting a region don’t save the regions and return to the image selection screen and re-pick the image.
Delete all regions
To remove all regions on an image, use the delete all regions option found on the toolbar. All current regions for the image will then be deleted.
Warning
There is no undo when deleting all regions.
Whole image region
To apply a whole image region quickly use the whole image region option found on the toolbar. A rectangle region will be automatically created covering the entire image using the currently selected entity label.
Find area of interest (Experimental)
This function is designed to find the most significant area of the image and automatically apply a region label to it. The current version of this feature is still experimental and has conservative settings. For example, this feature is not really designed for ‘busy’ images with lots of background features. In these cases, almost all the image would still be annotated. Rather this feature is designed for images with large out of focus areas or those where the subject has been photographed on a standardized surface. E.g. Seeds photographed on a piece of paper etc.
In the future this feature may be released with several options to determine how conservative it in looking for the area of interest.
Saving regions
Use the save button on the toolbar to save any new or changed regions on the image or use the keyboard shortcut ‘ctrl + s’. Any changes to regions will be lost if the large image view is closed back to the image selection screen and another image selected.
Selecting entity labels
An image region is a defined area of the image for a given entity label. There are no image regions without an entity label association. All available entity labels are listed on the right of the large image view. By default, if the image category name matches an entity label the corresponding entity label will be automatically selected. Otherwise, an entity label needs to be selected before an image region can be annotated on the image. Entity labels can be searched via the search toolbar above them. See ‘Search Options’ help topic for more information on this.
Tip
When automatic selection of the entity label occurs, it is bookmarked at the top of the entity list for easy reselection, if the entity label is changed.
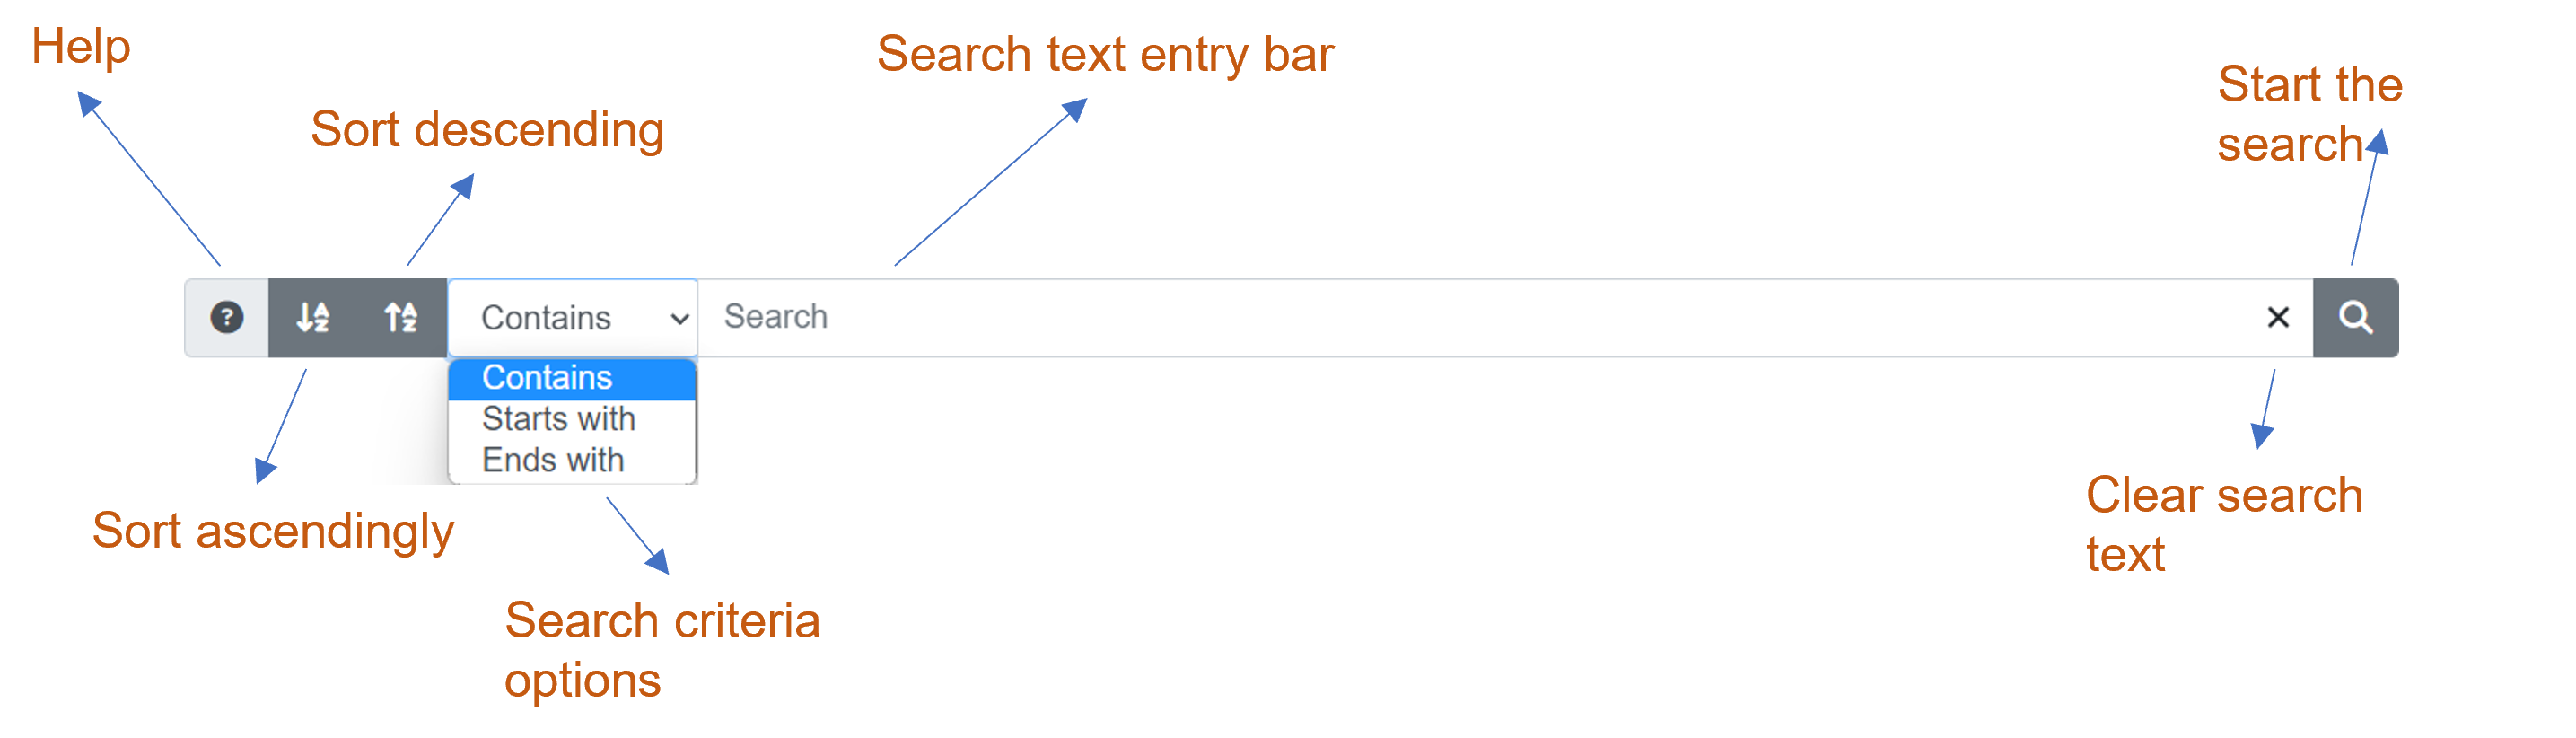
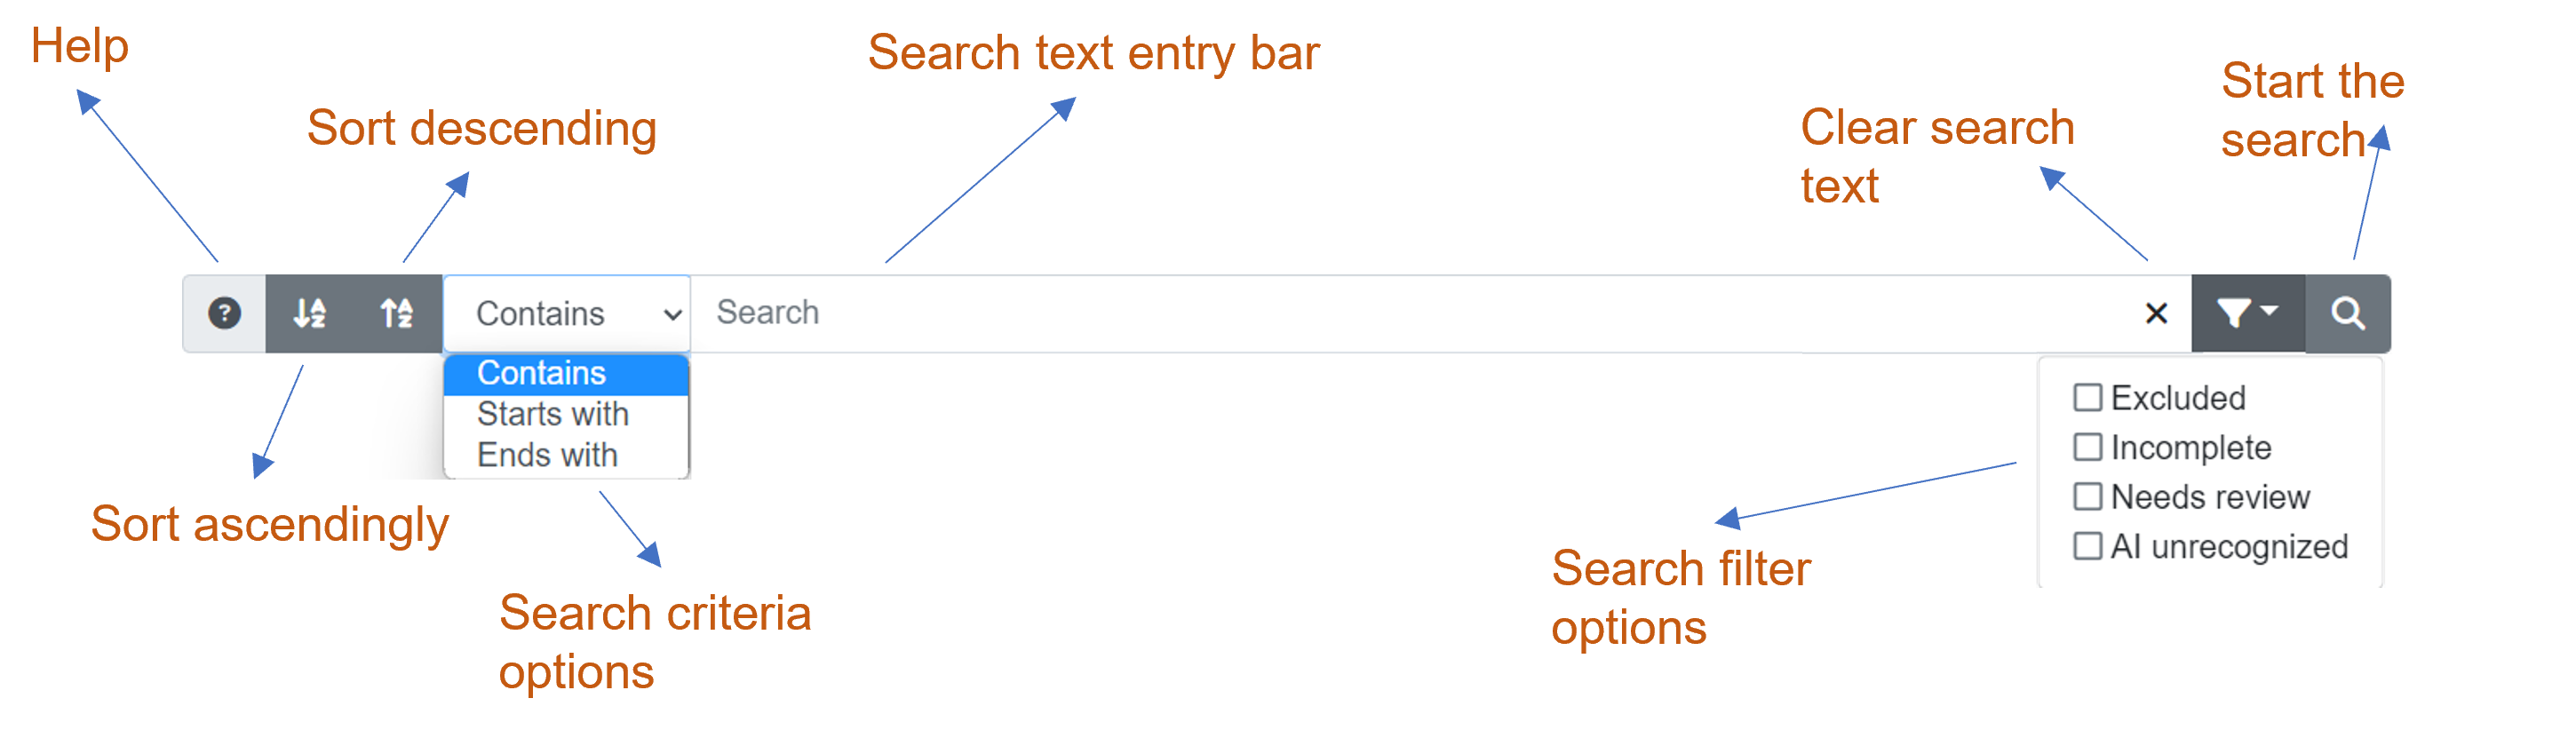
looks for the search text within any part of the item name (e.g., label or category etc).
Starts with
The search text must be found at the beginning of the item name to be match.
Ends with
The search text must be found at the end of the item name to be a match.
Search text
The search criteria text on which to search for within the item.
Clear button (X)
Clears the currently entered search text and restores the full available entity list, if it is currently showing search results.
Filters
Lucid AI Image labeling search bar
Filters allow you to include only items that that contain that property value. For example, in the case of searching within an image category, images have properties such as excluded, and review etc. The filter will allow you to restrict the images based on the value of one or more of these properties.
A special filter called ‘AI Unrecognized’ is also available after the AI has been trained. For more information on this feature please see the AI Unrecognized help topic.
There are a few different ways to add images to your AI project.
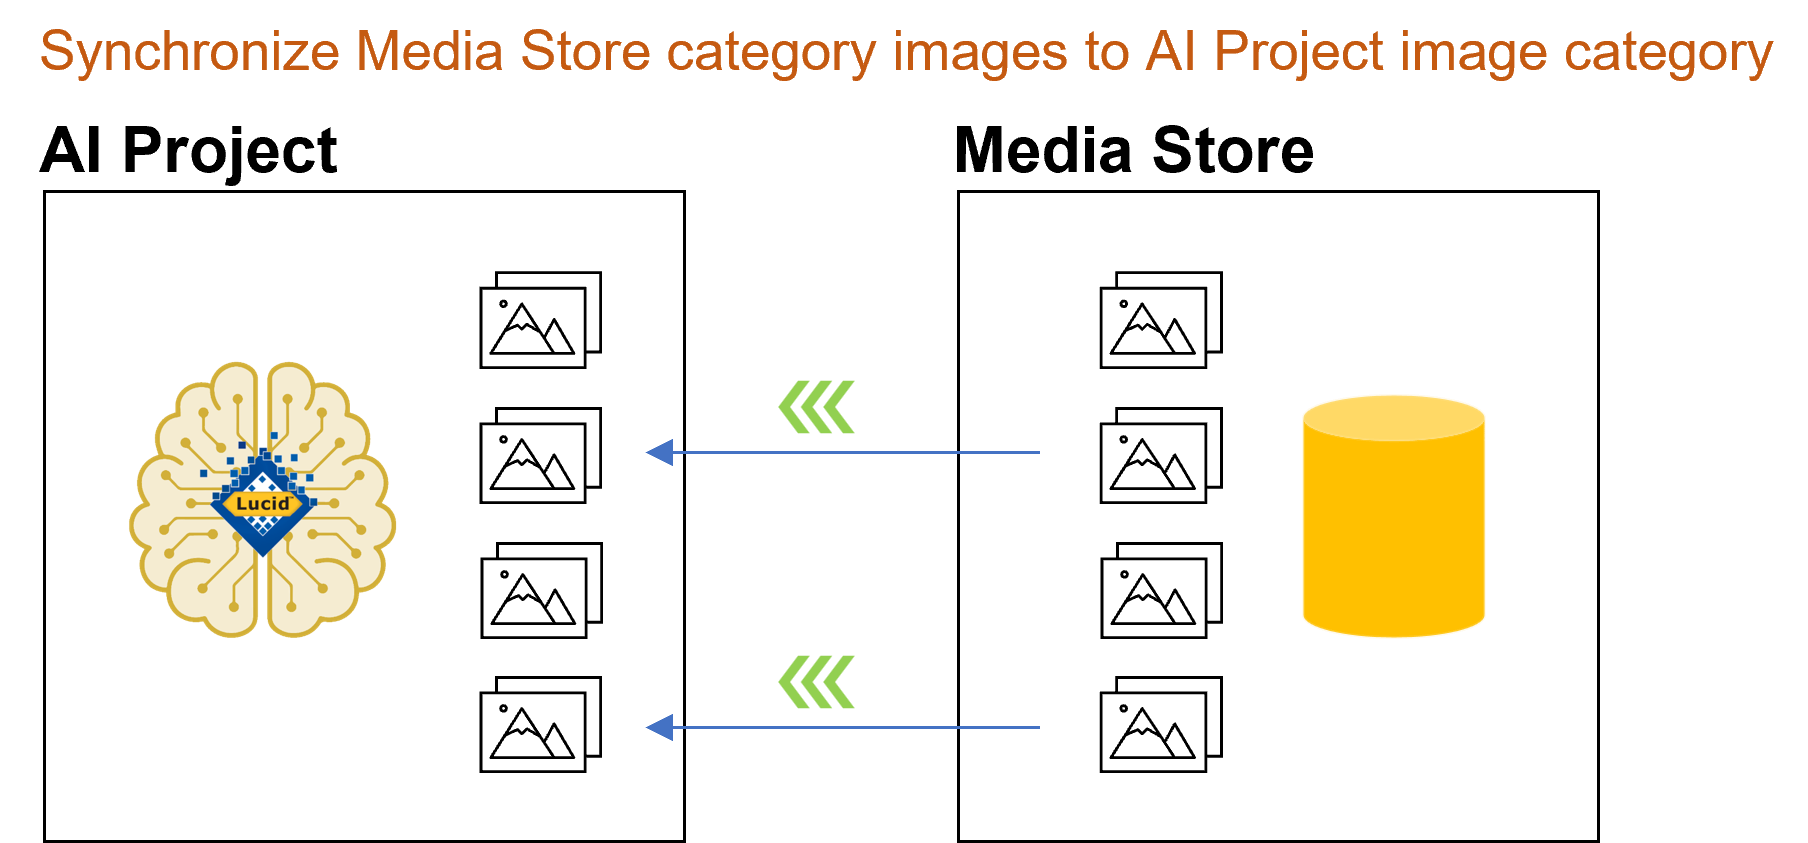
When creating an Entity label you can elect to have it linked to an existing Media Store category folder and automatically synchronize it across to your project into the linked AI project image category.Lucid AI synchronizing Media Store category images to AI project image categories
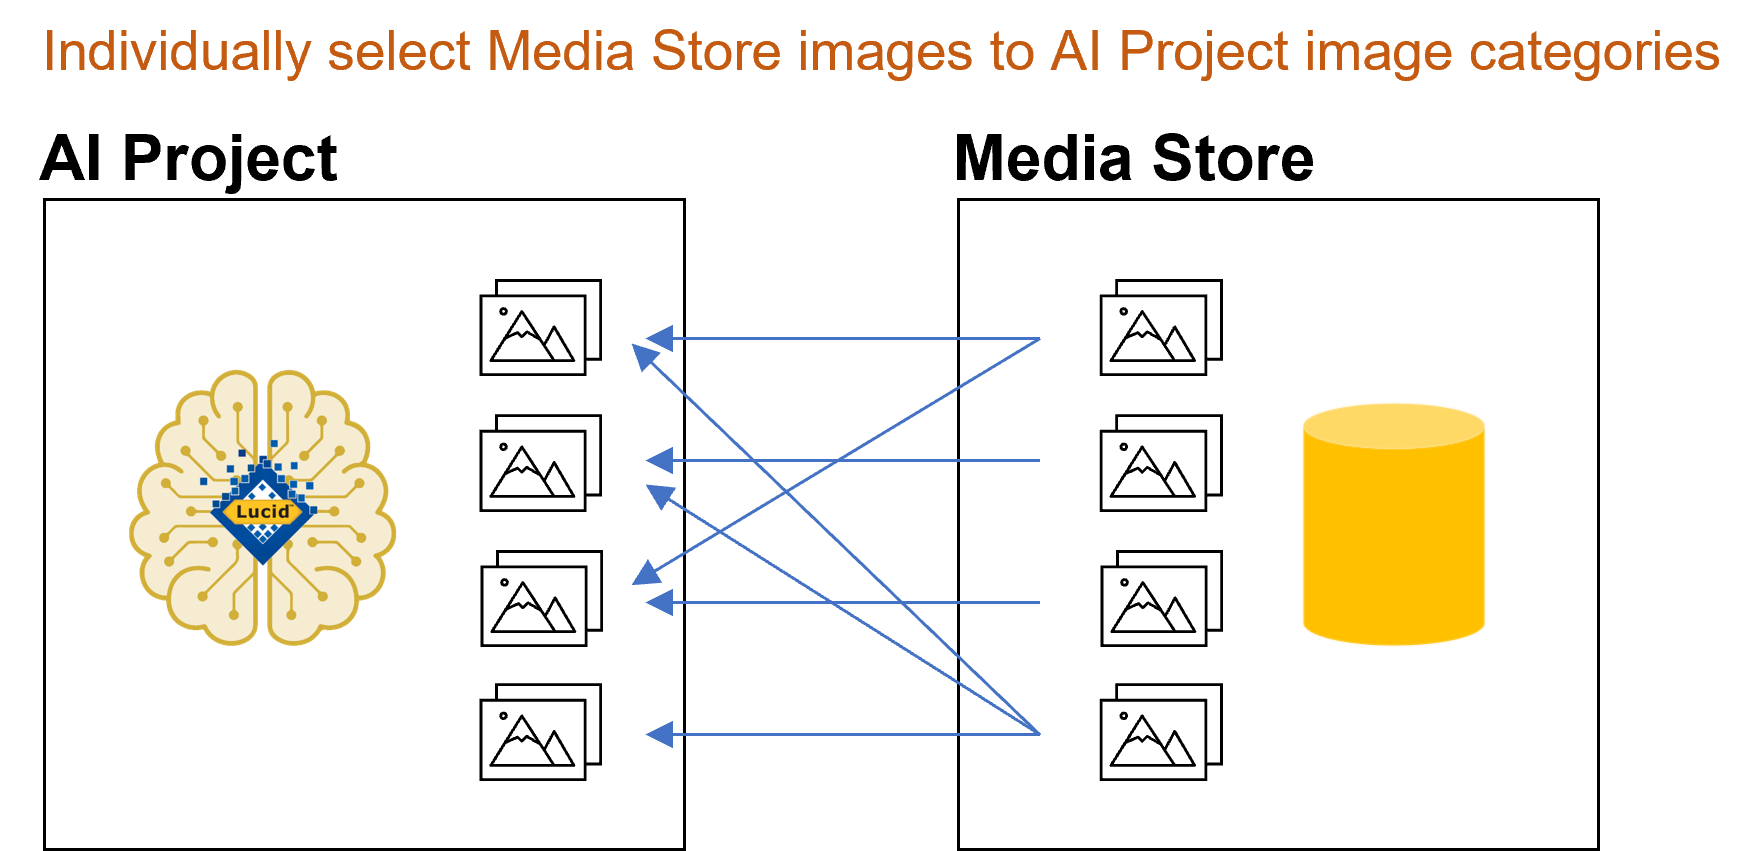
Manually selecting images from the Media Store, via the Manage Images option, by selecting an existing AI Project image category, then selecting images from one or more of the attached Media Store categories.Lucid AI Manually selecting images from Media Store categories into AI project image categories
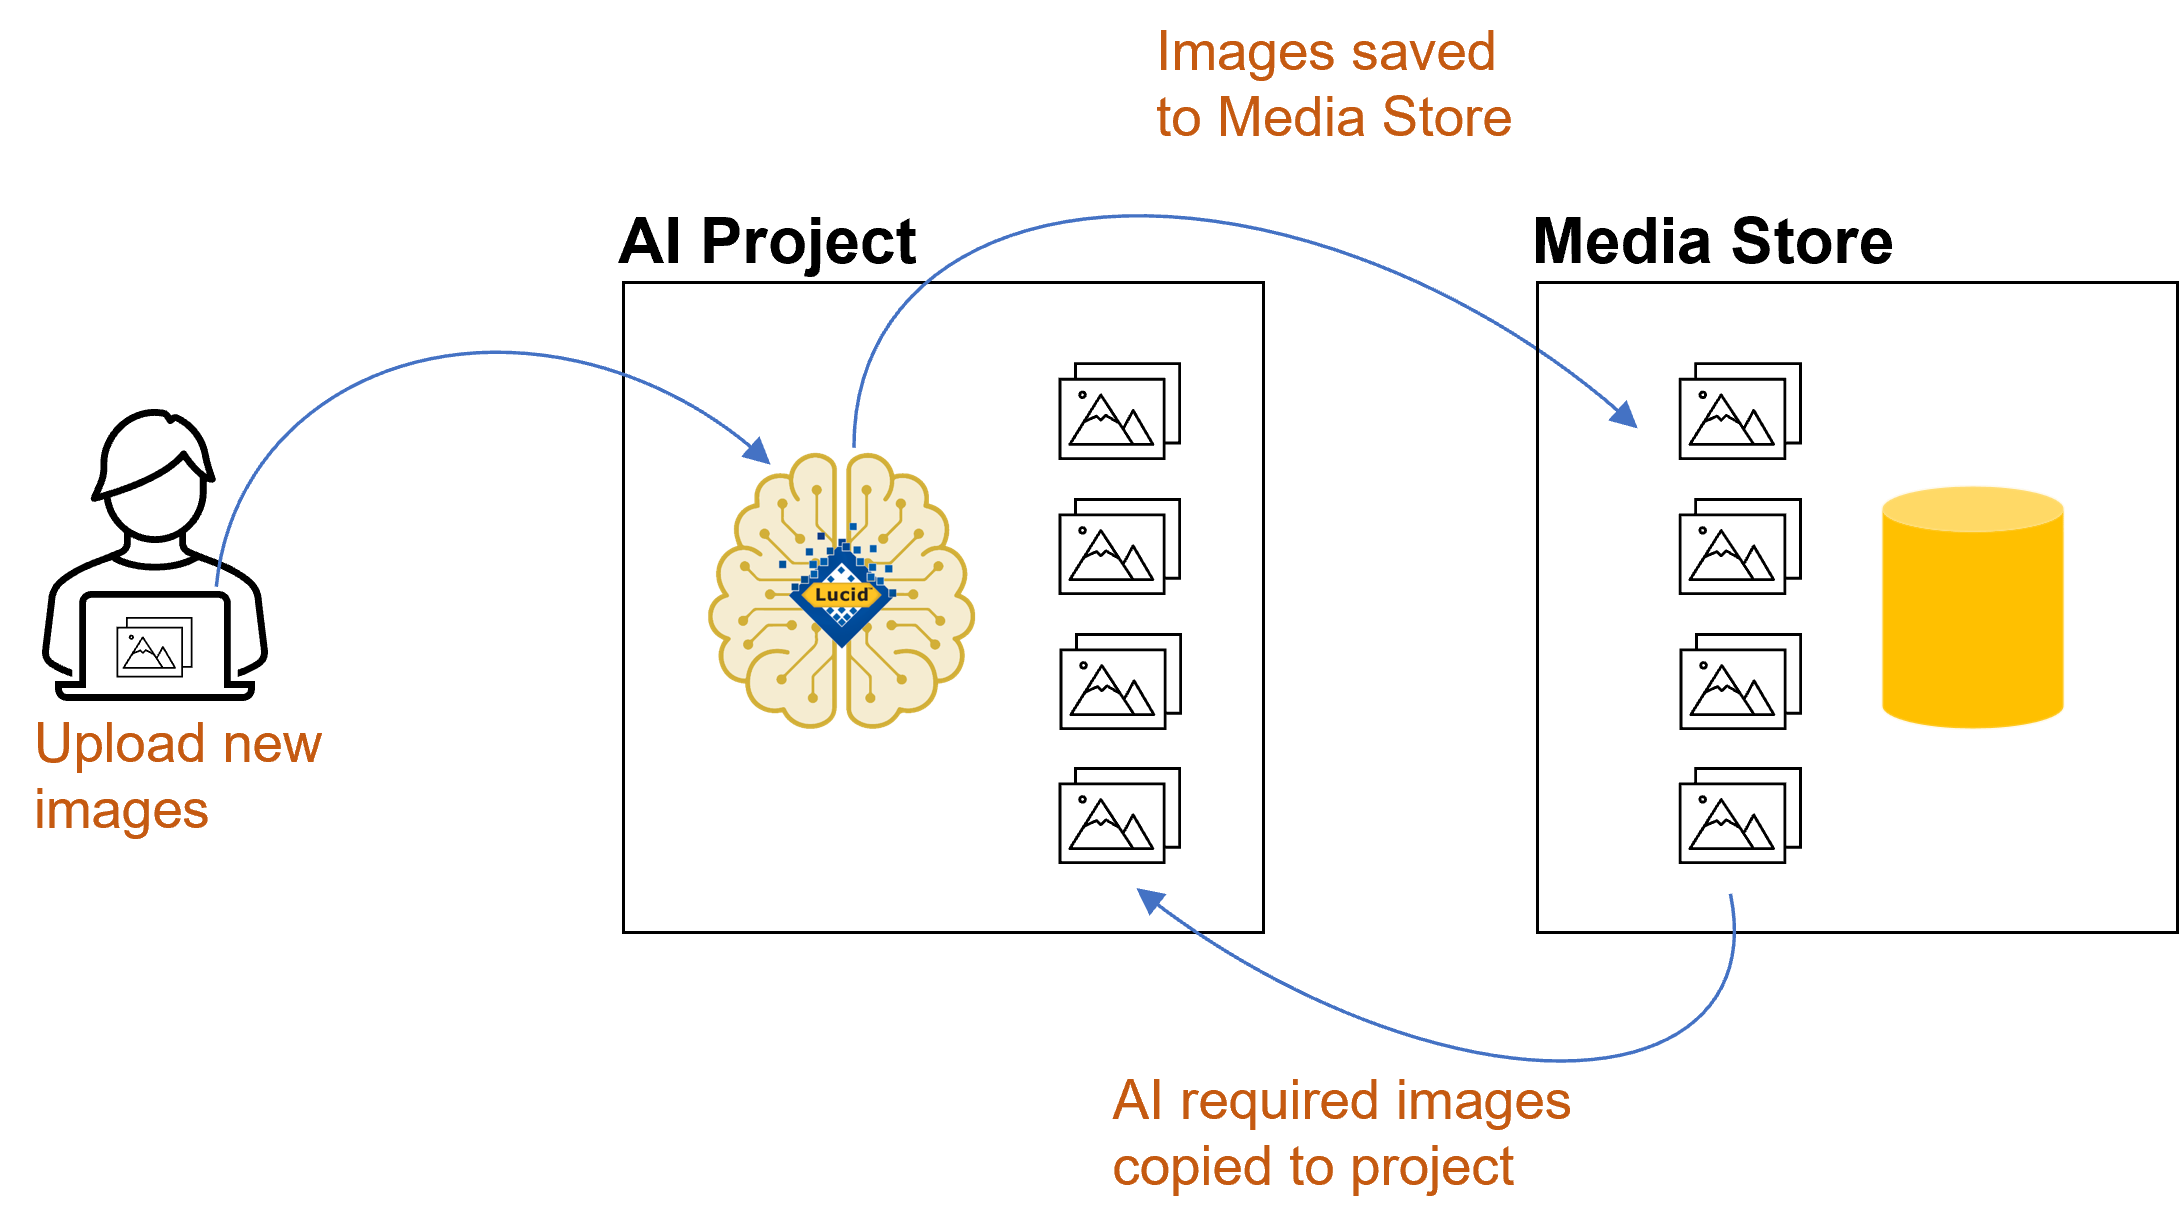
Uploading images from your device, via the Manage Images option, by selecting an existing AI project image category, then electing to upload new images from your device.Lucid AI Uploading new images to an AI project image category
Note as shown above any images uploaded from your device are actually first uploaded to your Media Store and then added to the AI project image category.
Tip
As a reminder when an image is added to your AI Project it is automatically assigned a whole image region annotation, if the image category has been assigned a default Entity label.
Lucid AI Selecting an image category to add images
Adding images from your Media Store
Images already held in your Media Store can be added to your AI project. This can be done automatically or manually.
Automatic synchronization of Media Store images
When creating your Entity labels you can create a corresponding Image Category folder or link to an existing Image Category folder. This Image Category folder can then also be linked to a Media Store category. This Media Store linkage allows the one-way synchronization of all images held in the Media Store category across to your AI projects Image Category.
Tip
When managing images within your AI project Image Category folder, where it is linked to a Media Store category folder, it is possible to delete images (within the AI Image Category folder) however, if the Media Store Category is re-synced the image will be reinstated. Rather than deleting the image, mark it as excluded. This way it can filtered from your available images via the search bar.
Tip
When an AI Image category is set to synchronize with a Media Store category you can’t add additional images to this category, other than via the corresponding Media Store category.
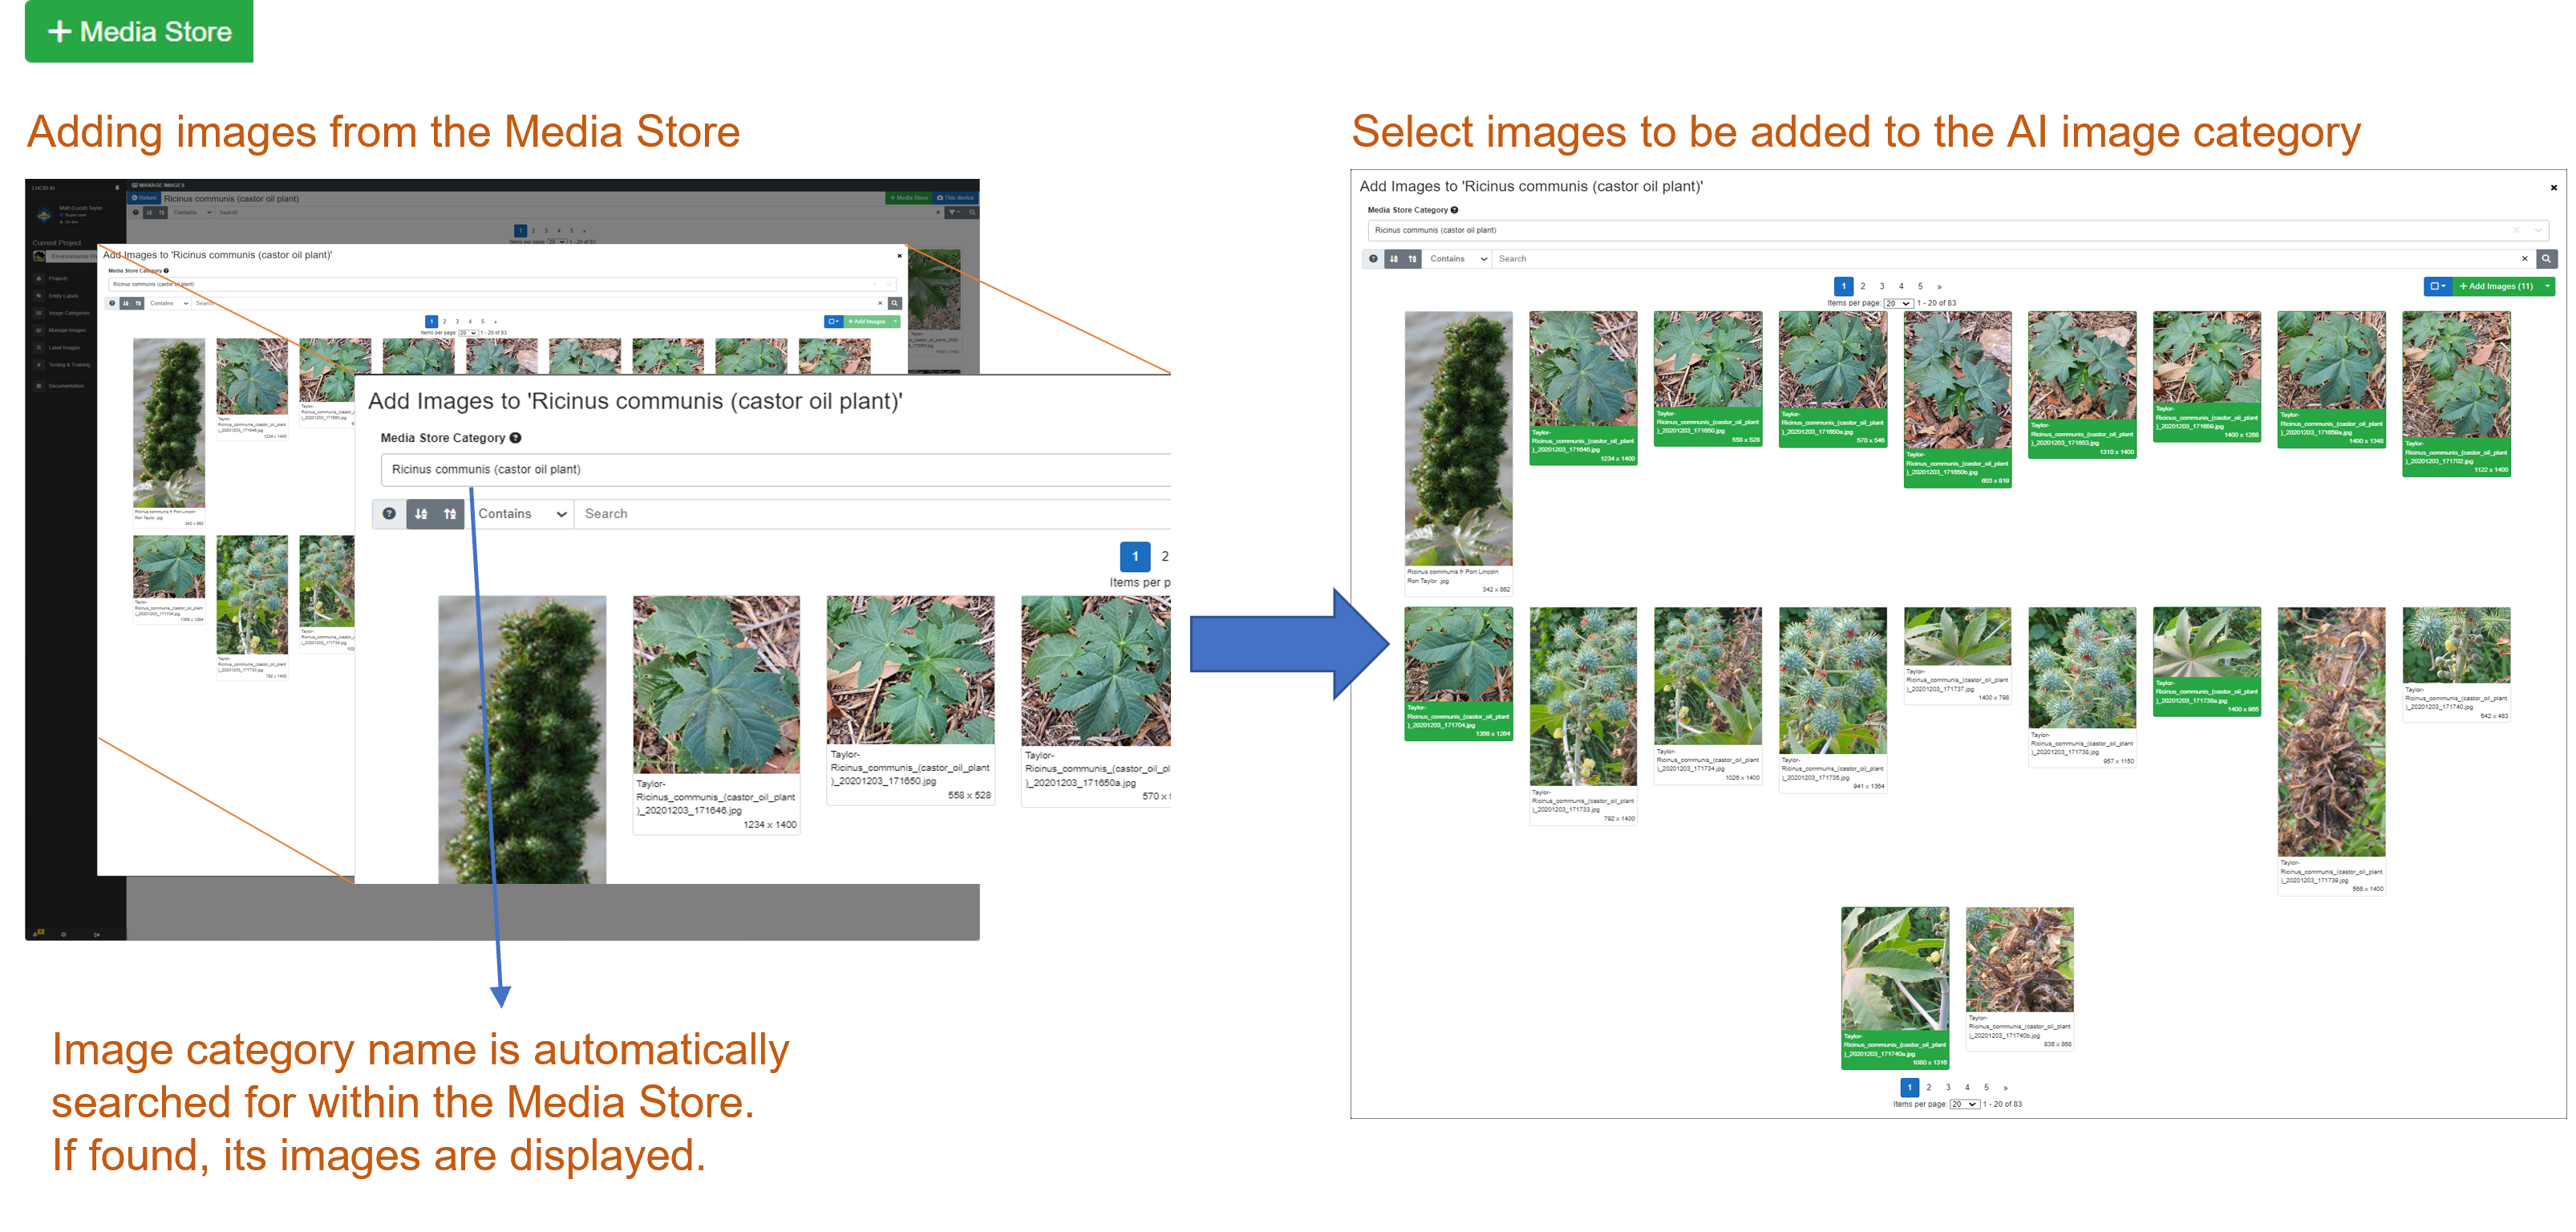
Manually adding images from the Media Store
Lucid AI Adding images from the Media Store
Images held in different Media Store category folders can be added to your AI Project Image categories. To do this first select the ‘Manage Images’ option in the left main menu. Select an image category and then select the green ‘+ Media Store’ button located at the top right of the screen. This will load an Add Images dialog. Within the dialog a search Media Store Category text box will be shown along with a search bars and images available further below. By default, the AI project image category name will be used to search for a corresponding Media Store category. If found, the images available in the Media Store will be shown below the search bar. If you wish to search for another Media Store category delete the current search text and start typing the name of the Media Store category you are interested in. A minimum of two characters need to be typed, this will trigger a lookup search for any partially matching Media Store categories. If a new Media Store category is selected any images it contains will be shown ready for selection.
Selecting images from the Media Store
As described above once the Media Store category has been selected the images it contains will be shown below. You can search and filter for particular images of interest – see the search bar help topic for more information on how to do this.
Individual images can be selected by clicking on the desired image. It will show as selected by being highlighted in green. You can continue to select images even if you move between pages of images if the Media Store category holds more than twenty (20) images. As images are selected or deselected the ‘Add images button selection count will be updated.
After selecting images, you can add them into the AI image category by pressing the ‘+ Add Images’ button.
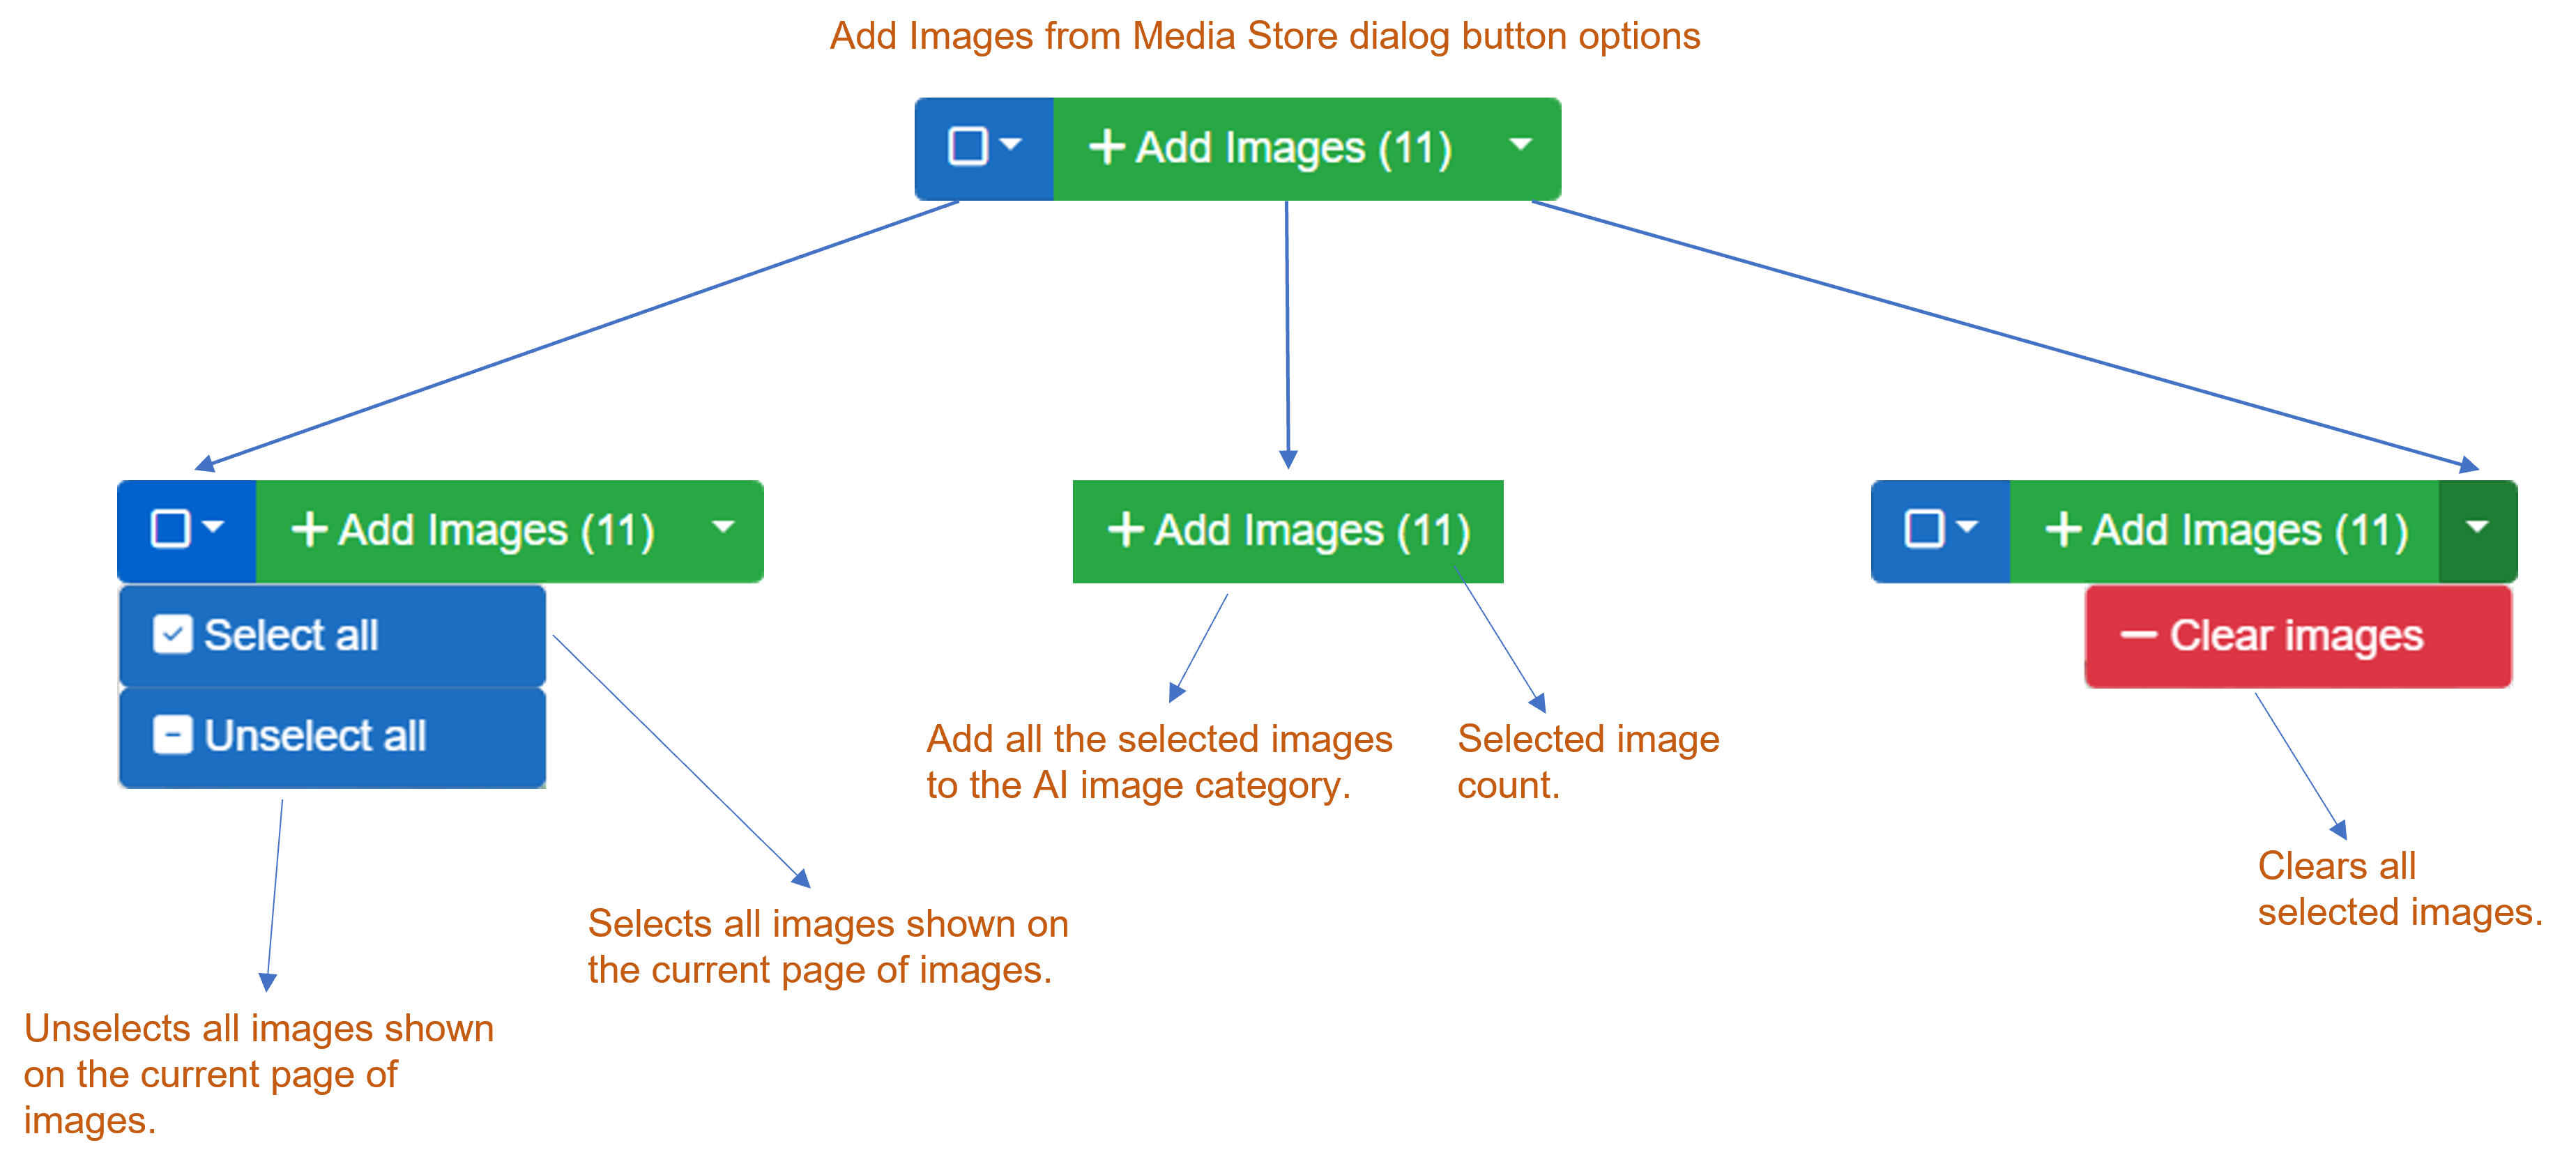
Lucid AI Add images from Media Store button options
Tip
Accidentally selecting an image from the Media Store that is already within your AI image category will not cause a duplicate to be created.
To select or unselect all images within the current page of Media Store images you can use the blue select dropdown options button left of the ‘+ Add Images’.
You can also clear all selected images waiting to be added please selecting the dropdown button on the right of the ‘+ Add Images’ button and selecting the Clear images option.
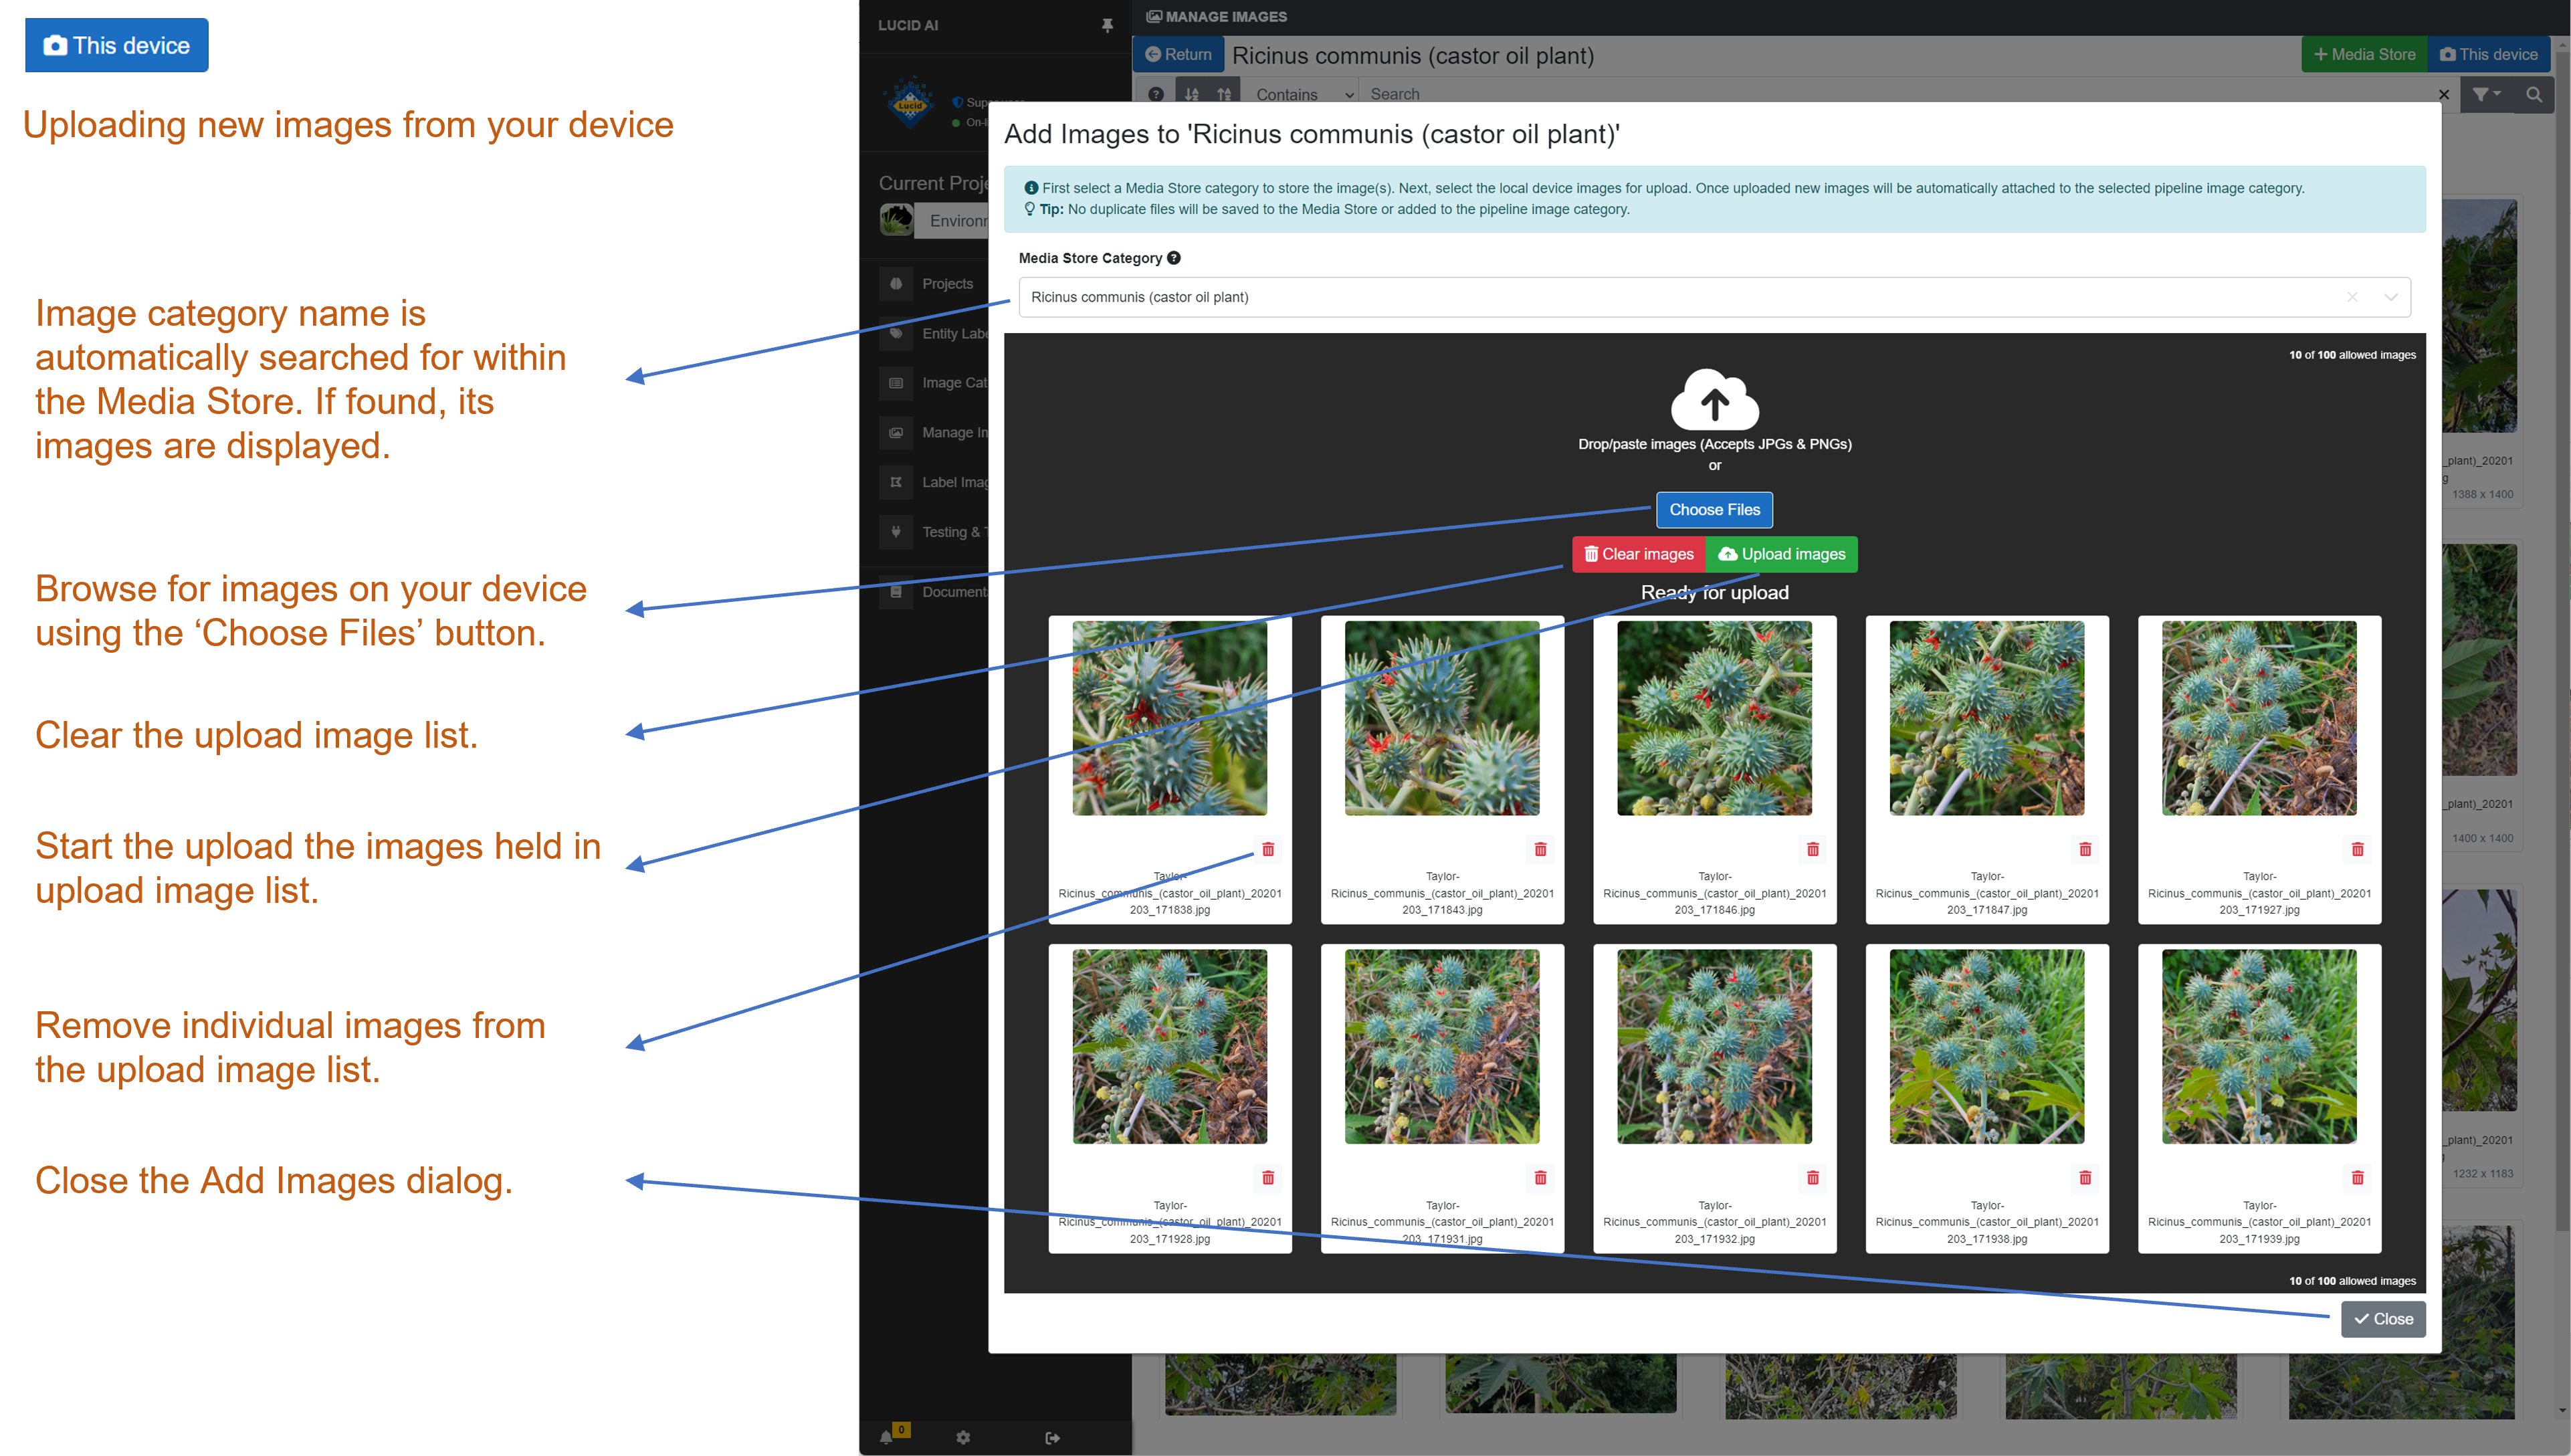
Uploading images from your device
Lucid AI Adding new images from your device
If you have new images, not already deposited into the Media Store, then you can upload these via the ‘Manage Image’ option and selecting the image category you want the image added. Next, select the blue ‘This device’ button located top right of the screen. This will open the add images dialog. Before any new images can be uploaded you first must select the Media Store category you wish to lodge them. By default, the select AI Project Image category name will be used to search for a corresponding Media Store category, if one is not found or you wish to use a different Media Store category then you can search for a category. Once a Media Store category has been selected you can add images found on your local device via the blue ‘Choose Files’ button. You can select up to 100 images at time for upload. Additional images can be added after each upload session has completed.
After the images on the local device have been selected, they will be validated (checked for file type and size etc) and displayed in the image upload list. If necessary, you can remove any unwanted images from the upload list by clicking on the small red trash can icon located at the bottom right of the image. Once satisfied with the upload image list click on the green ‘Upload images’ button. As each image is successfully uploaded a green tick icon will be overlayed on the image. Any images failing to upload will have a red cross overlayed.
Lucid AI Image upload success example
Lucid AI image upload failure example
Tip
In many cases images that fail to upload are due to being already within the selected Media Store category, or due to an unstable internet connection. After a failure (and the upload process has completed) you can remove the successful images from upload list and try uploading the failed images again.
Note
The time taken to upload each image is dependant on the file size, your network speed and current service load. Adding new images into your AI project is more than simply saving an image to the server. Adding an image into your AI Project is much more involved. An image is first saved to the Media Store, then a resized copy is lodged to your AI project, where a whole image region label is annotated (if a default Entity label is associated with the image category). This new image region is then augmented several ways to help with the AI recognition training.
After all the images have been uploaded click the close button to dismiss the Add Images dialog. This will trigger the selected AI project image category to refresh and show the newly added images.
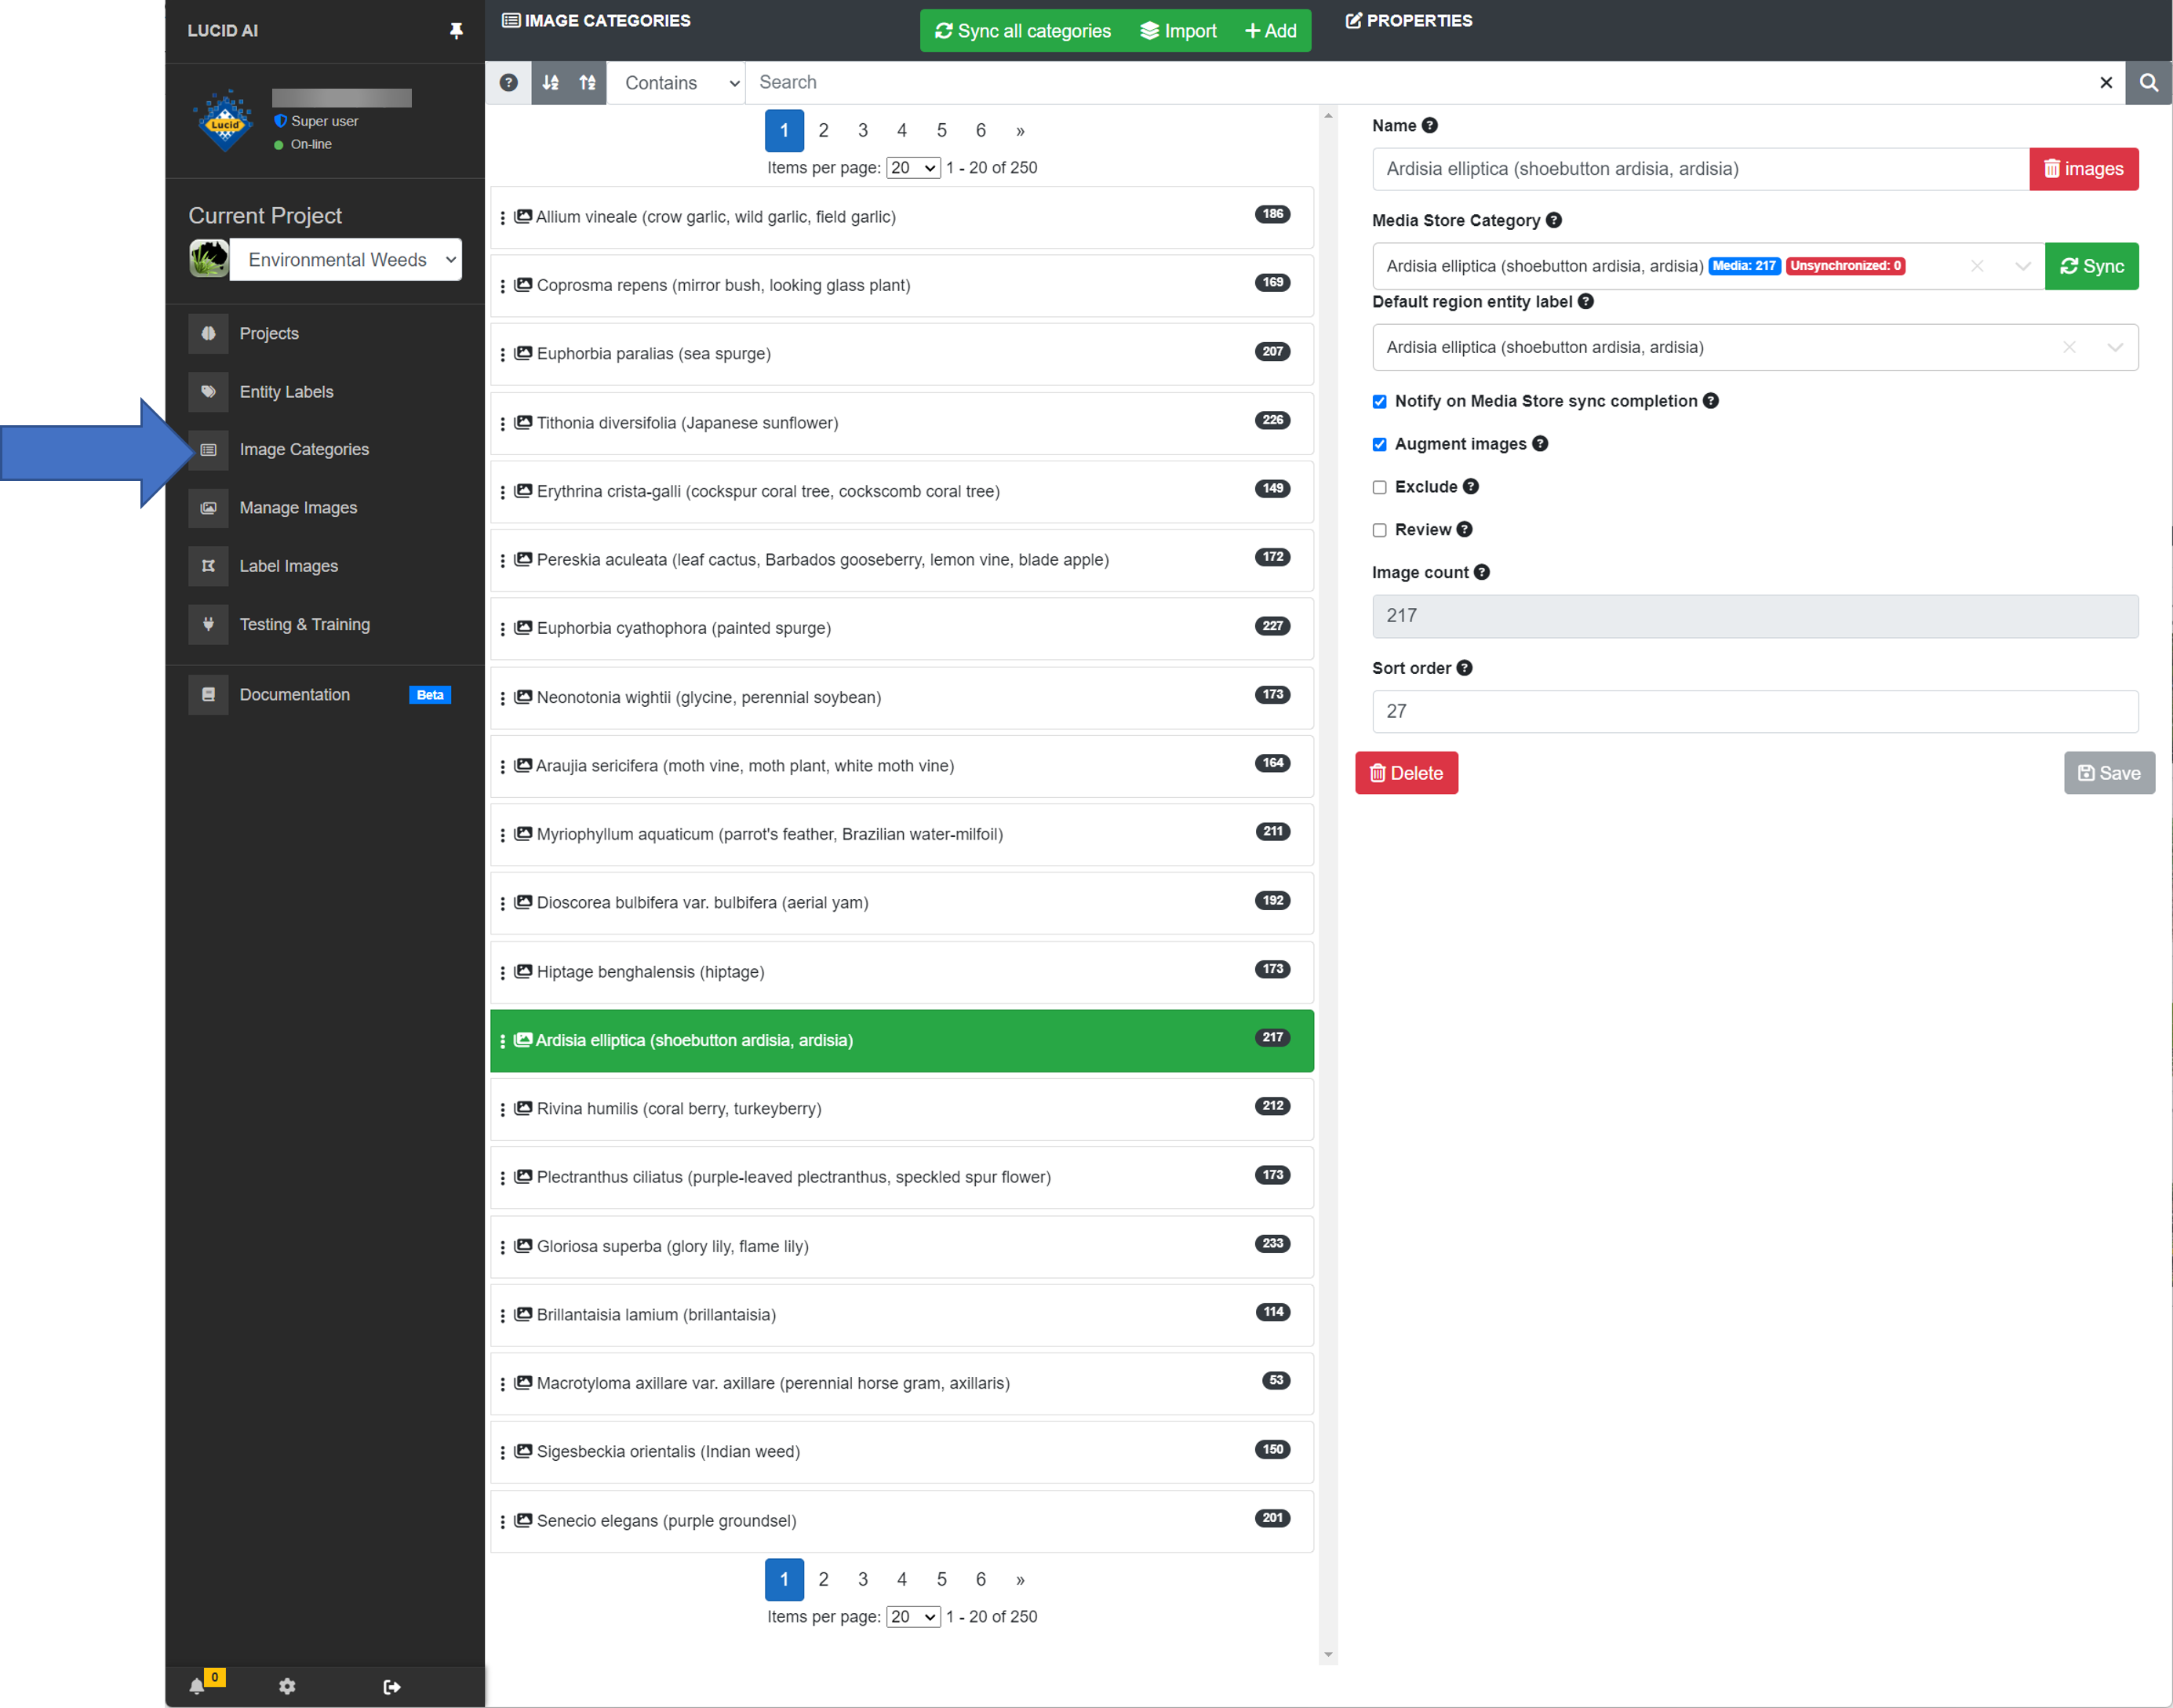
Image categories are a way of grouping related images together. They have no impact on the training or labelling of images. They essentially help organize large quantities of images in convenient way. For example, often users want to create image categories representing taxa they wish to train the AI to recognize, which is perfectly reasonable to do. Creating and naming categories that follow the naming of the entity labels in most cases is a logical approach, Lucid AI has in-built helpers that recognize this approach to help speed up the annotation of image regions.
Lucid AI image categories can be automatically created and synchronized from the categories found in the projects associated media store library or created on an individual basis.
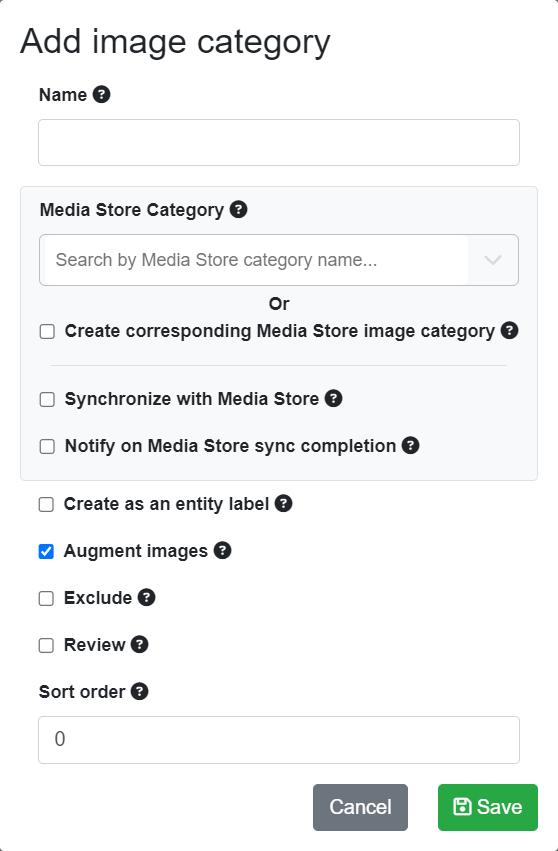
Creating a new category
Lucid AI Image categories button options – AddLucid AI Add a single new image category dialog
A new image category can be created by clicking on the Add category button. At a minimum a category requires a name. As outlined in the introduction to image categories you may wish to name your category based on a corresponding entity label, though this approach is completely optional.
You can also elect to associate a media store library category with your AI pipeline image category. If you do associate a media store library category to your AI pipeline category, then the images held in that media store library category can be synchronised across to your pipeline category.
Why link to a media store library category?
Your Media Store library is where all your images are stored and managed in the Lucid on-line universe. Storing and managing your media in a centralized way creates a single point of ‘truth’. It helps prevent duplicates and information such as captions, photographers, usage licences and security can all be applied once in an efficient manner. This media can then be associated with any number of projects such as creating an AI, used within a Lucid key or simply added to a fact sheet etc.
What if there are images I don’t want to use from the Media Store library category?
Your Media Store image library category may contain more images than you require or aren’t fit for training your AI. In these cases, simply mark the images as excluded from training – See the ‘Image options’ help topic for more information on how to do this.
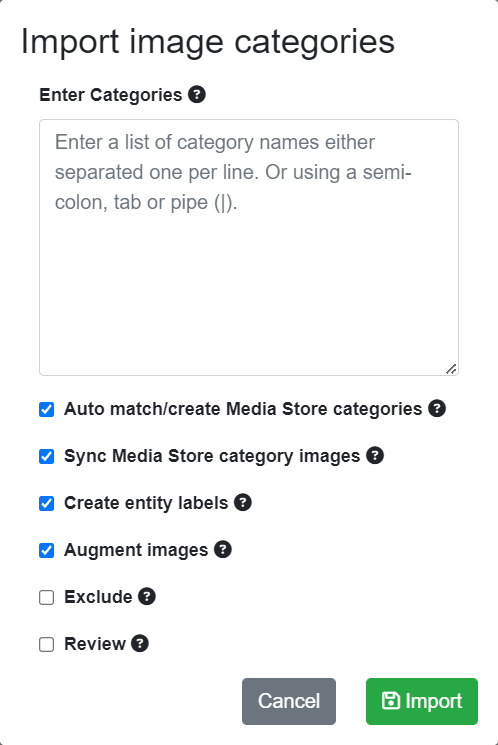
Importing categories
Lucid AI image category options – ImportLucid AI Import image categories dialog
To save time you may wish to create a large number of categories quickly without having to enter them one at a time. For example, you may have a list of taxa exported from your Lucid key or in an Excel spreadsheet. To start the import process, click the Import categories button.
Copy the list of category names from your data source (e.g., text file, CSV file or spreadsheet) then paste them into the category import dialog. The category names must either be on separate lines or separated with a comma (,), semi-colon (;), tab, or pipe character (|).
Tip
Don’t worry if there are duplicate names entered. Duplicates will be automatically excluded from the import process.
Next, select your preference for the following category import options.
Auto match and attach to media store
If selected, when the category is created the media store library associated with your project will be checked for a corresponding category of the same name. If a match is found the media store library category will be linked and its images synchronized to the AI pipeline image category.
Augment images
If set any images added to the category, either manually or via media store library synchronization will be automatically augmented.
You can set an image category (all images contained within) as excluded from the AI training process, even if the images have been annotated with entity label regions. You may want to exclude a category to begin with, so you can check over the images and the labelling to ensure they are suitable for the goals of your AI. For example, your image category may contain many images that show multiple unwanted species (i.e., multiple labels need to be applied), don’t show the correct growth stage (e.g., flowers or fruit) that you are wanting to AI to train on. Or simply the images require more labelling than the default whole image label that is applied by default when the image was added to the category.
Sync all categories
Lucid AI image category options – Sync all categories
When selected ‘Sync all categories’ triggers a background service to check your image categories that have a media store library category associated with them to re-synchronize with the media store. Re-synchronizing is a one-way process from the media store library category to the AI pipeline image category. For example, if a user deletes an image in the media store library category which was previous synchronized to the AI pipeline image category, this image would be removed, along with any labelling, from the AI pipeline image category. While any new images added to the media store library category would be added to the pipeline image category.
For large numbers of media store connected categories this synchronization process may take some time. You’ll will be automatically notified once this process has been completed.
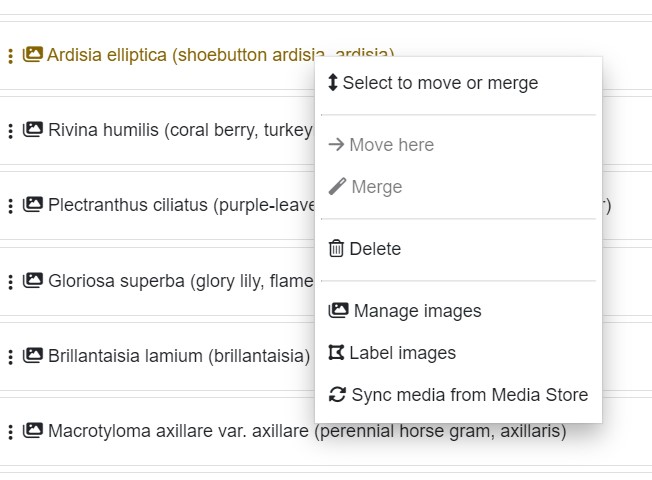
Right click context popup menu
Lucid AU Image category right click popup context menu example
Right click on an individual image category item to trigger the popup menu.
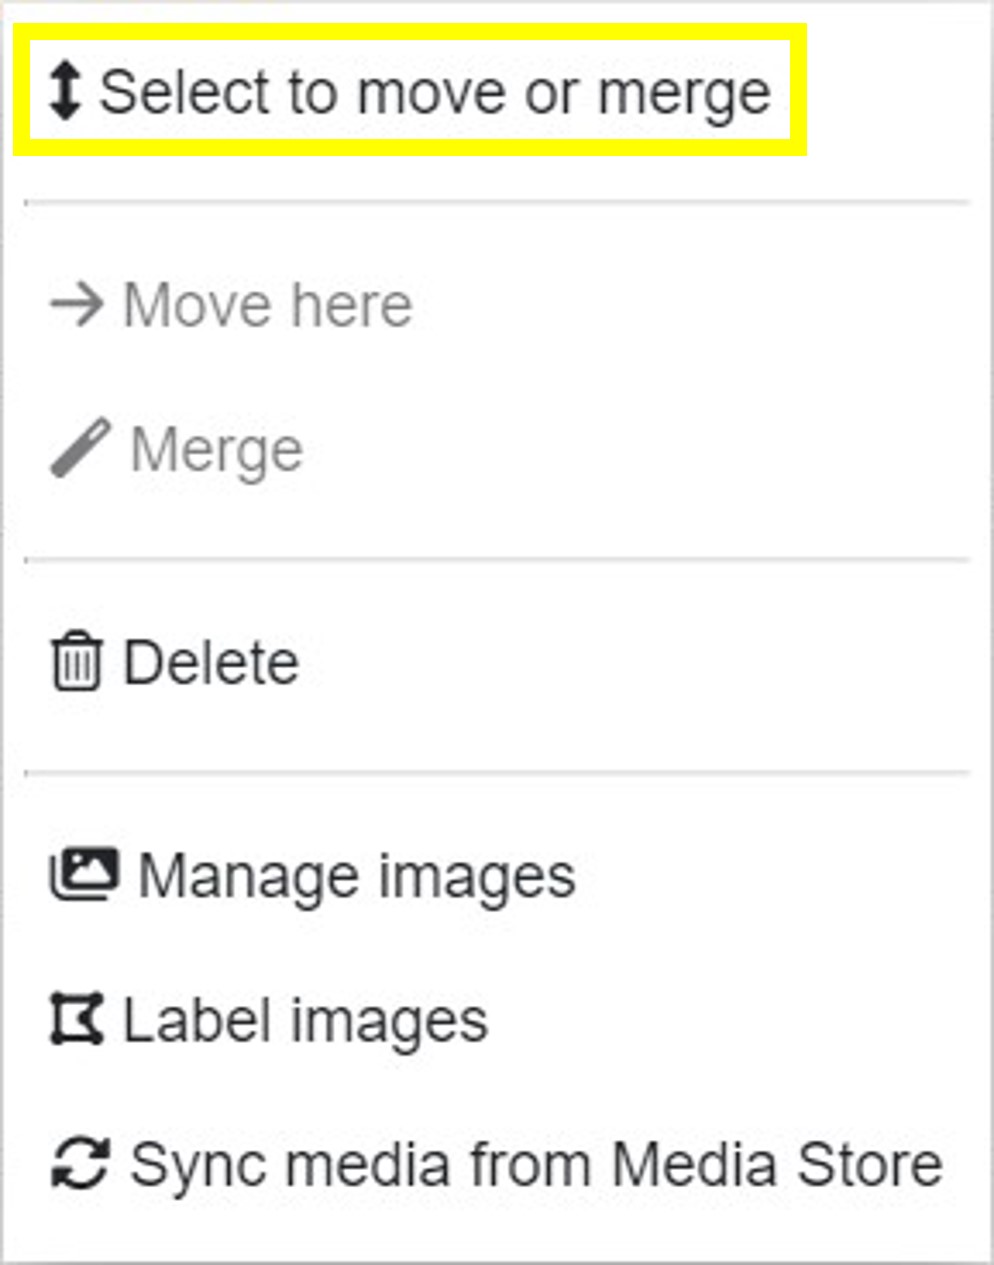
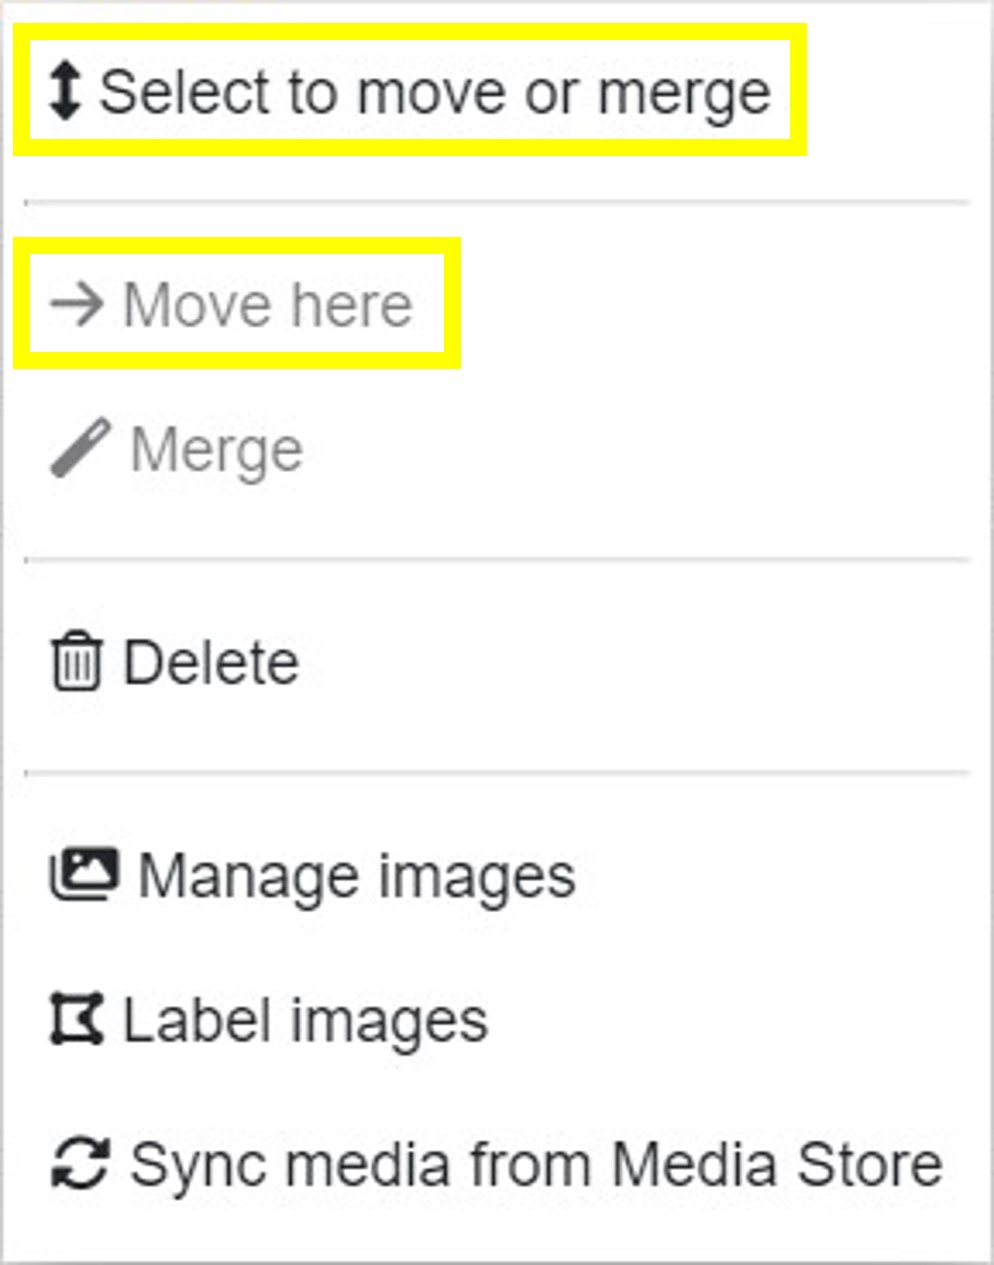
Select to move or merge
Lucid AI image category right click context popup menu – Select to move or merge option
Selects the image category for a move or merge operation. The move operation is designed where drag and drop is not possible due to the desired drop position exceeding the current image category page size. A selected image category is indicted by its green background. Once an image category has been selected it the ‘Move here’ or ‘Merge’ are enabled and one of these operation can be performed.
Move here
Lucid AI image category right click context popup menu – Move option
After selecting an image category you can move through the pages of image categories (if there are more than the page displays) and right click on an image category position where you would like to place the selected image category. A move confirmation dialog will be shown prior to the move being initiated.
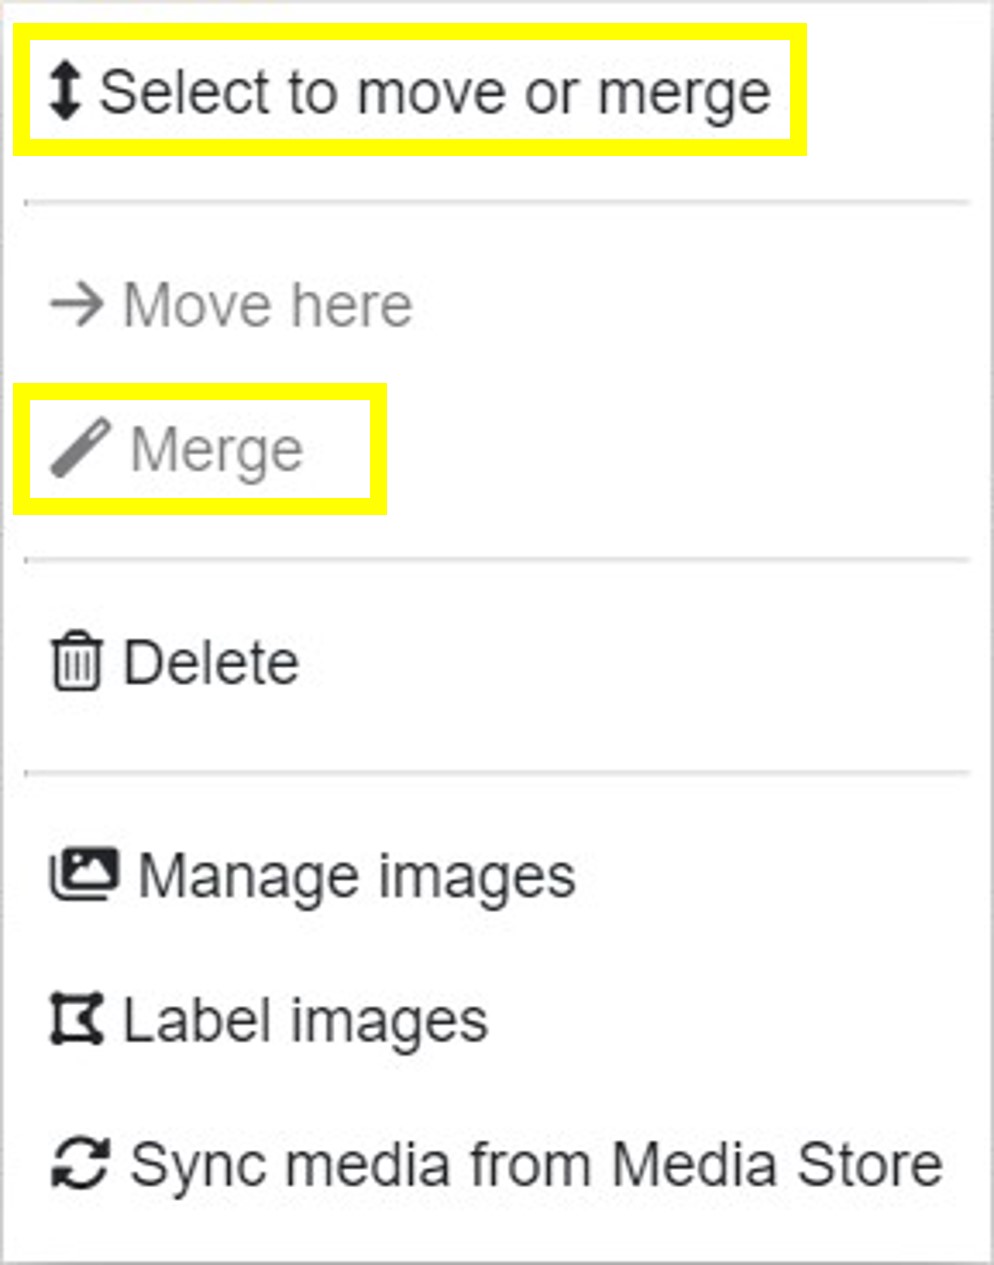
Merge
Lucid AI image category right click context popup menu – Merge option
This options merges one image category into another. The selected image category images are essentially copied to the merge category and then deleted. A confirmation dialog is shown prior to the merge proceeding. There is no undo for this operation.
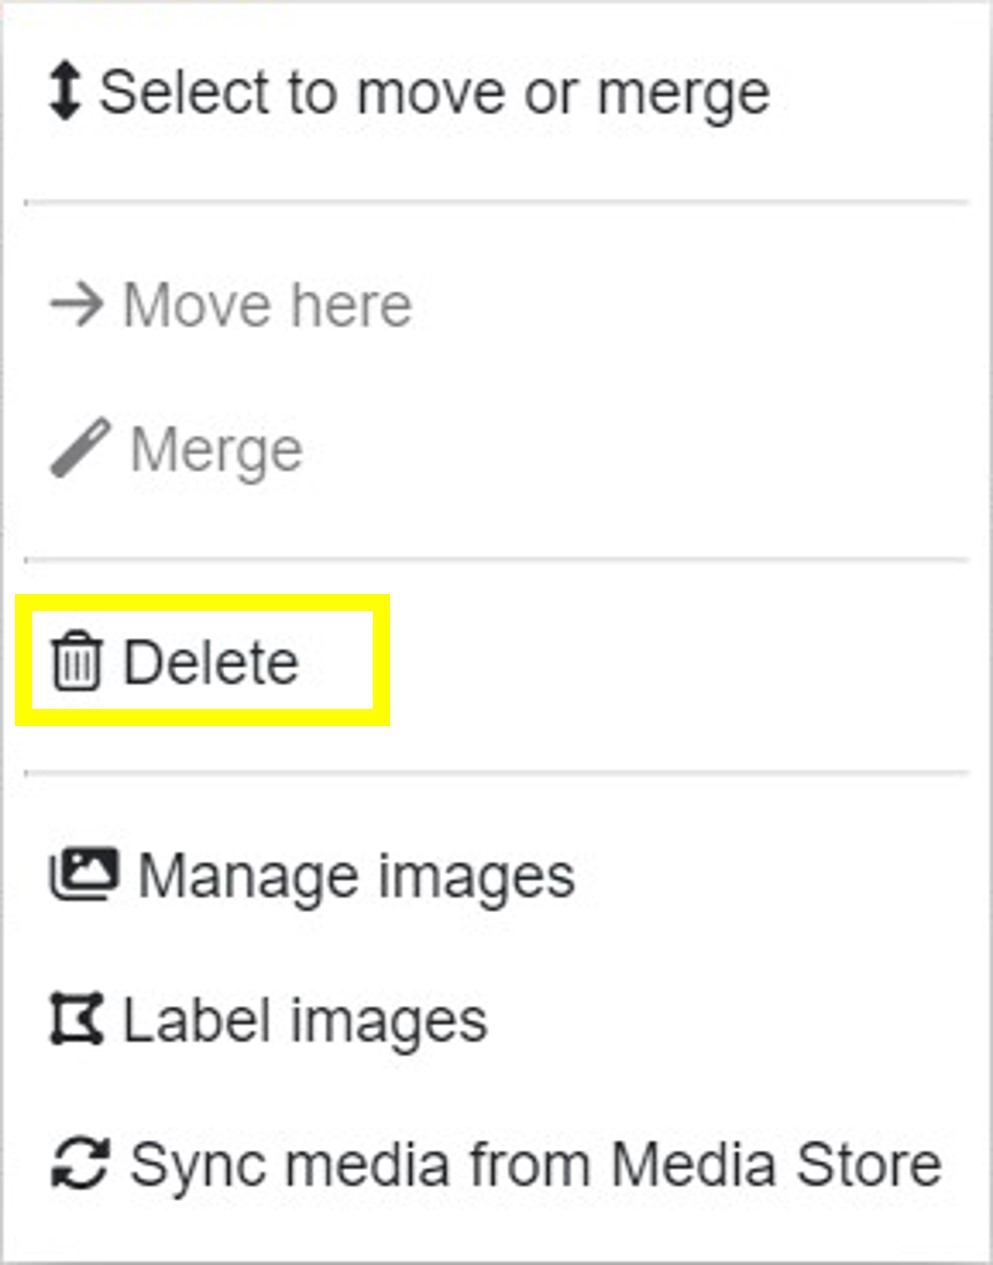
Delete
Lucid AI image category right click context popup menu – Delete option
See ‘Deleting an existing category’ below for more information.
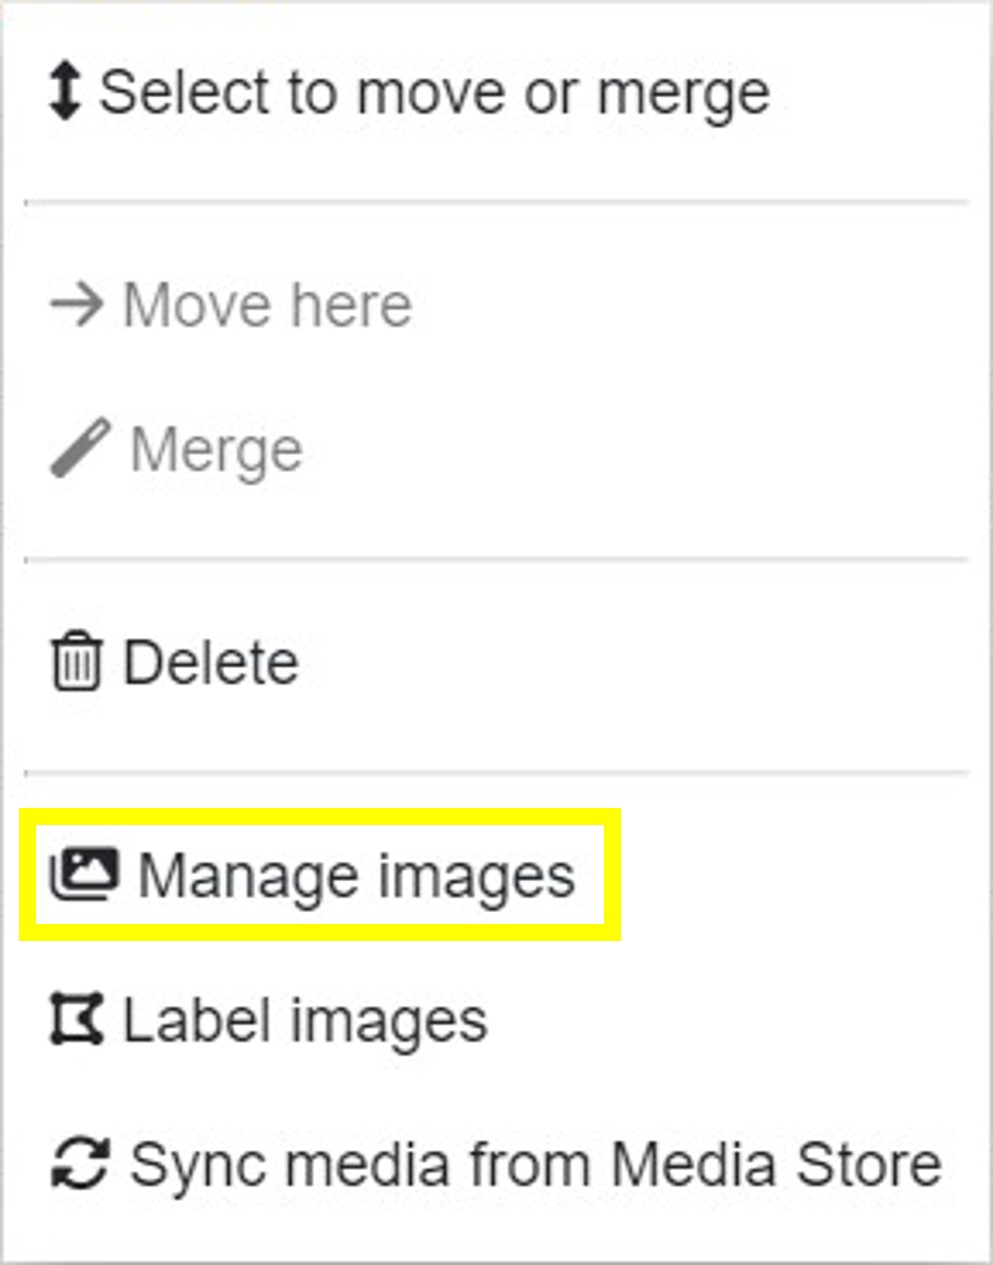
Manage images
Lucid AI image category right click context popup menu – Manage images option
Opens this image category in image management mode where you can procced to view, delete or mark images as excluded. Or import additional images either from the Media Store library or from your device.
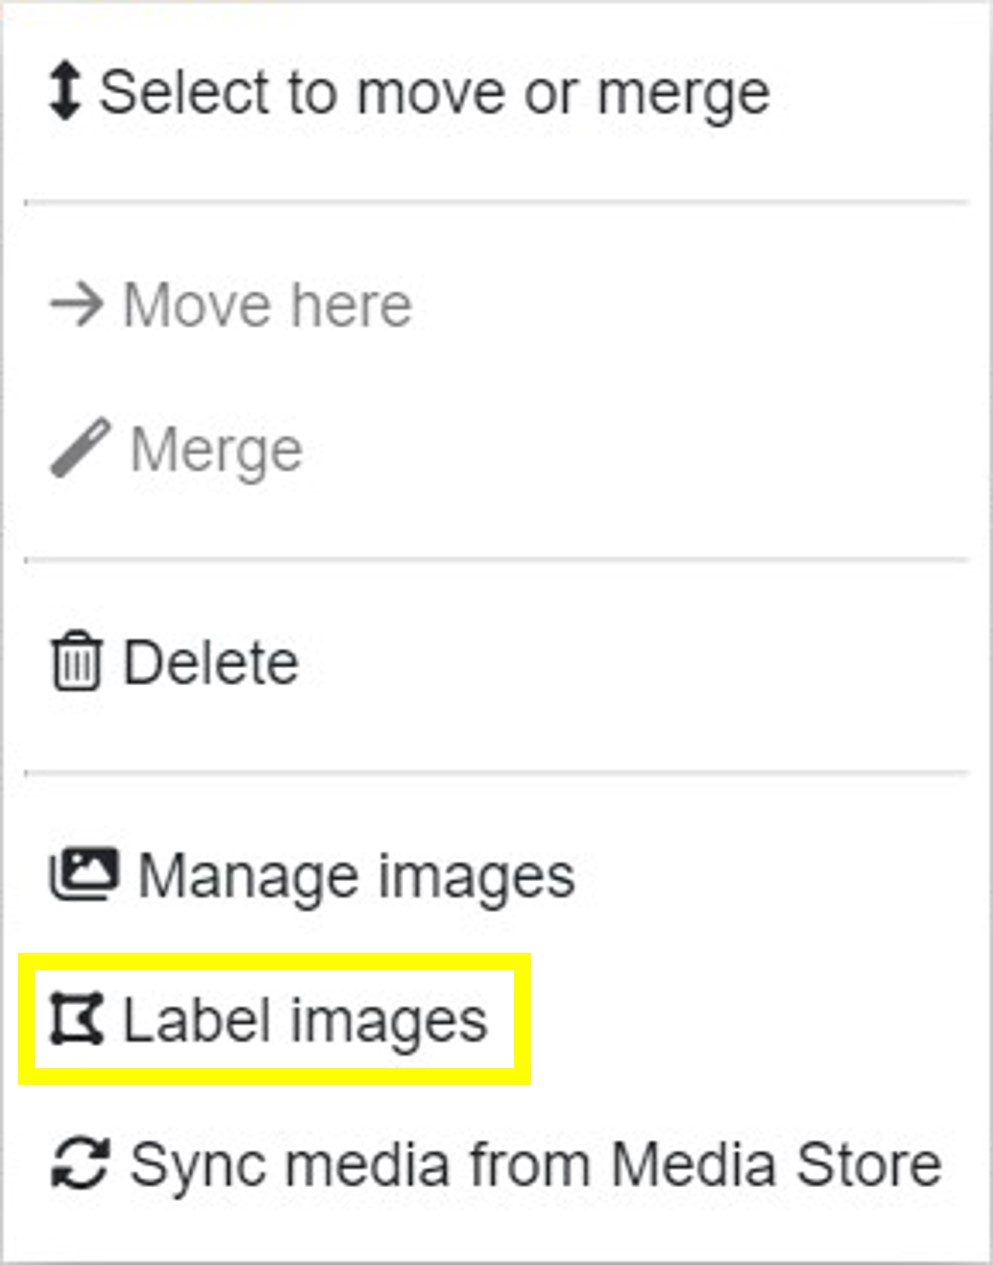
Label images
Lucid AI image category right click context popup menu – Label images option
Opens this image category images in ‘labeling mode’ where you can annotate entity labels on the contained images.
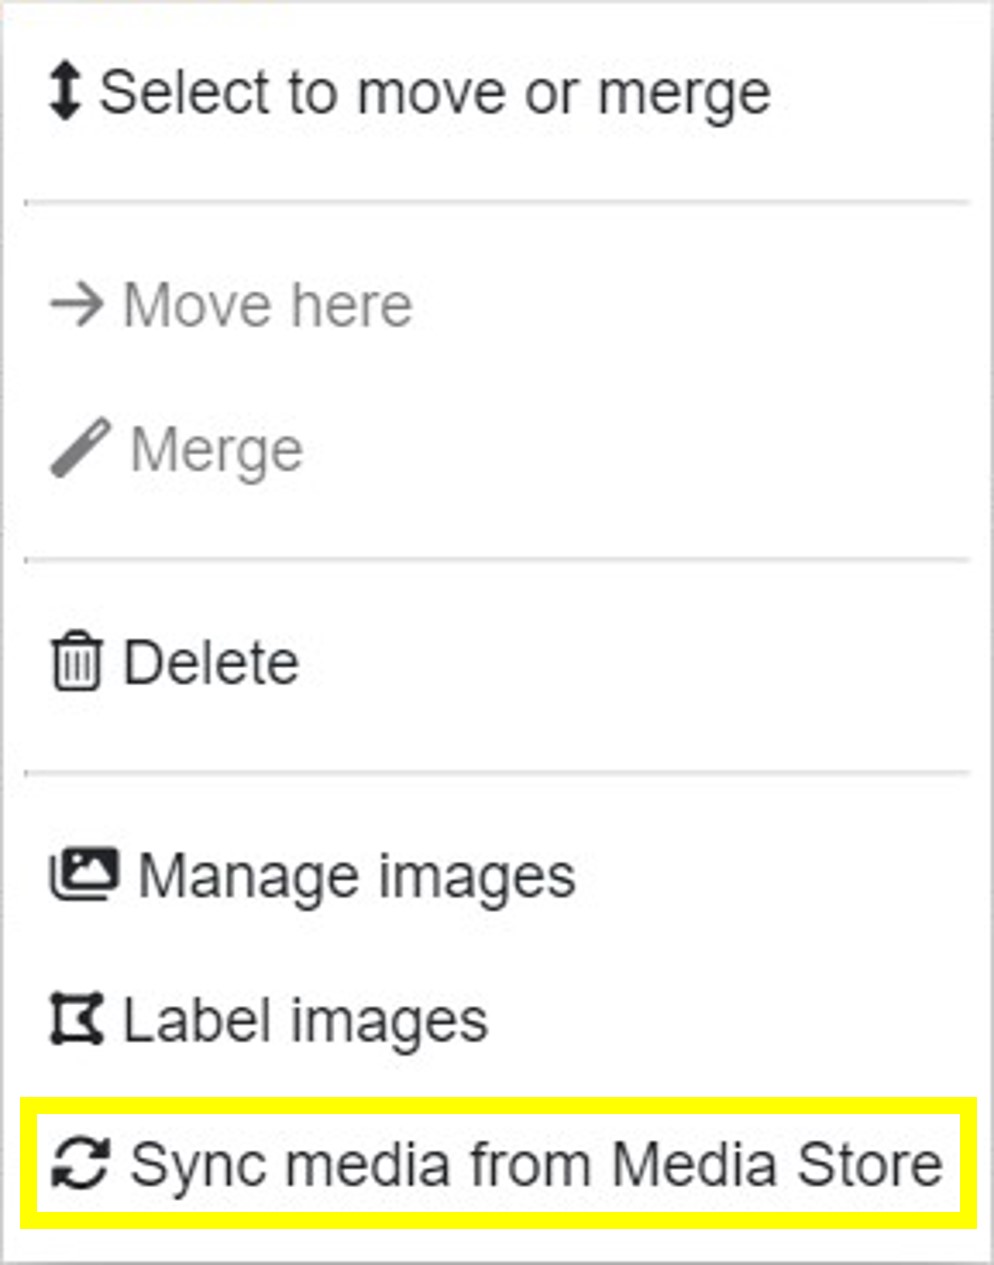
Sync media from Media Store
Lucid AI image category right click context popup menu – Sync from Media Store option
This option is only available if the image category has a linked Media Store category associated with it. If selected, a synchronization request is lodged to synchronize images contained in the Media Store category across to the image category. This process may take some time to complete. A notification will be sent once this has been completed.
Deleting an existing category
An image category can be deleted, but it is important to realize that any images contained within the category will also be deleted, along with any labels associated with those images.
Note
Any images held in the media store library will not be deleted, only the internal copy used by the AI pipeline will be deleted.
To delete an image category right click on it from the image category list and from the pop-up context menu choose the ‘Delete ‘{category name}’ category’ option. A confirmation dialog will be presented where the category deletion will only proceed, if confirmed.
Warning
There is no undo when deleting an image category. All images and their associated labels will be deleted.
Merge categories
If you find you need to merge two categories, for example, if your categories were based on scientific names and a subspecies was merged back to a species etc, then you can do this via the image categories list right click pop-up context menu. Firstly, select the image category you wish to merge to another by right clicking on it and selecting the menu option ‘Select ‘{category name}’ to move or merge’. Next, find the category to receive the other category images and right click on it. From the pop-up context menu select the ‘Merge category’ option. A merge confirmation dialog will be presented. If confirmed, all images, and their associated labels will be moved into the selected category and the other now empty category deleted.