Categories
Lucid AI

Image options

When browsing the thumbnail images of the category, each has a simple set of options below along with the image file name and large size dimensions. The image options, excluding delete, also allow enable you to filter your view of the images, via the search bar options. Filtering the images in this way can be very useful if the category contains large numbers of images.
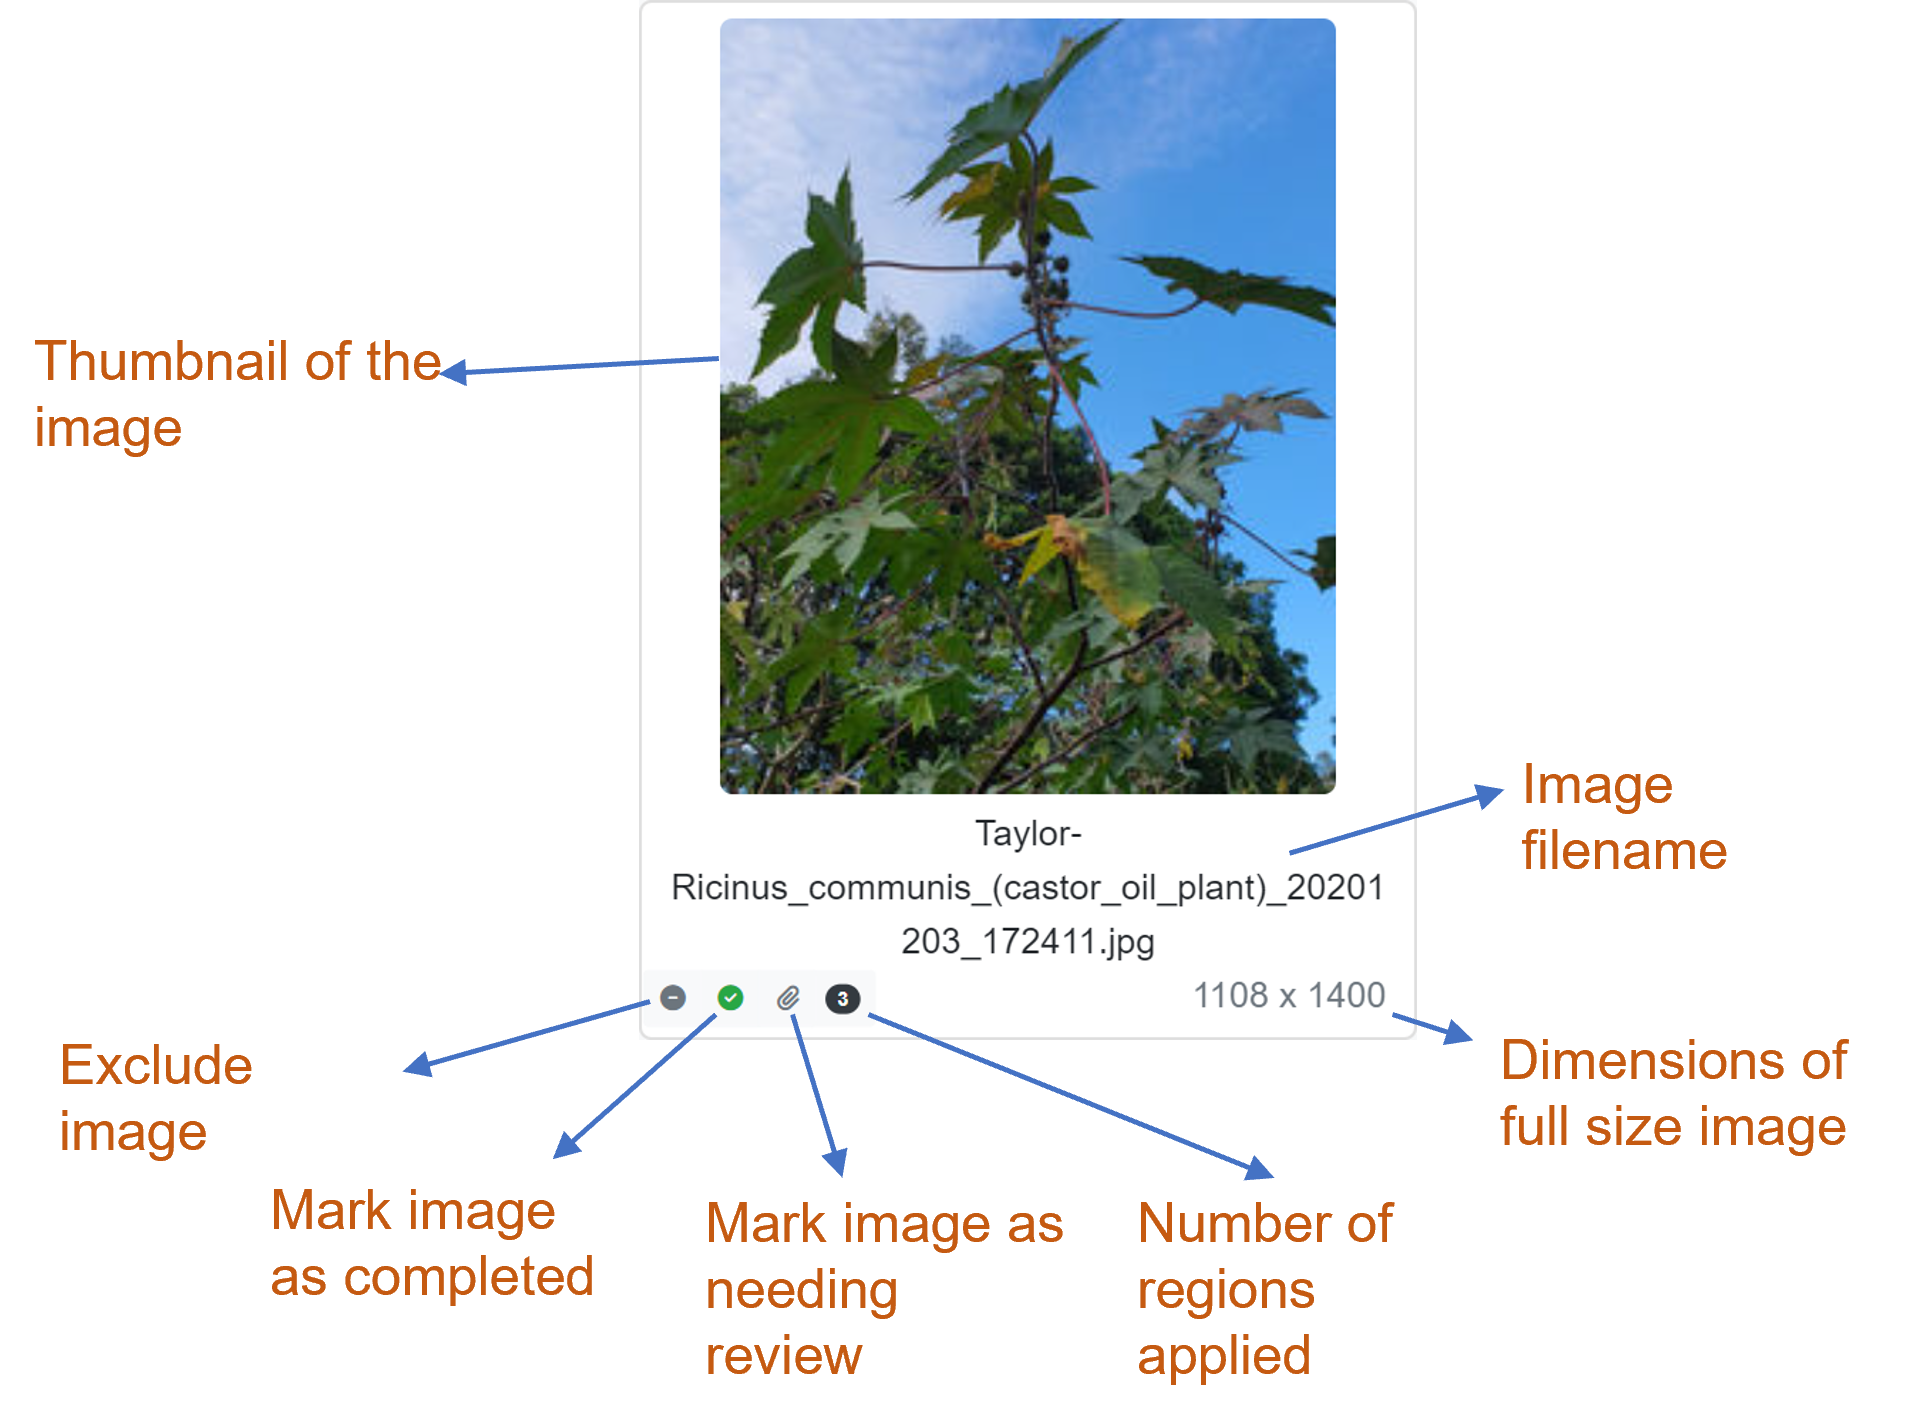
Lucid AI Image properties

Include/Exclude

If toggled to exclude any entity label regions for this image will be excluded from the AI training. Each image is set to be included by default.

Incomplete/Complete

Allows team members to mark an image entity labeling as completed. This indicator is useful to see that no further region labeling is required, especially when viewing images that obviously needs a label other than the default whole image. By default, an image is set to incomplete when imported into the project.

Note

Regardless of the status of this option any annotated entity label regions will be included in AI training.

Delete image

This option is only present on images where the parent image category is not set to synchronize with projects media store library category. When this is the case mark the image as excluded (see the ‘Include/Exclude’ option above for further information).

Deleting an image from the image category also removes any associated entity labels.

Warning

This action cannot be undone.

Review image

Allows project team members to mark an image as needing review. An image marked for review normally means the image may not be the desired quality for training or subject(s) or the image may not be what the image category is representing. E.g., The image may be of a closely related species that the image category does not represent.

Note

Marking an image as needing review doesn’t exclude any annotated entity labels associated with it from the AI training.

Categories
Lucid AI

Image annotation

At the heart of creating your AI is image annotation. This is the process of defining your images with one or more entity labels. Essentially image annotation is like teaching a child what it’s looking at.

An ideal image for AI training would only show the entity (subject) we are wanting the AI to recognize, not contain superfluous background or other undesired entities. However, this is rarely the case. The image annotation tool within Lucid AI helps you get the most out of your images.

It allows you to quickly and easily define label regions. A label region can either be a whole image or part of an image. The Lucid AI image annotation tool allows you to define multiple regions for one or more entity labels, either as a rectangle or polygon. In many cases an image might provide the opportunity to create several regions.

As shown in the example below, an image can be annotated with several entity labels, either of the same type or mixed labels. Label regions can also overlap.

Example image region annotation

To start annotating your images select the label images menu option and select an image category. Images contained within the category will be loaded ready for selection. Click one of category thumbnail images to begin. The larger version of the image will be loaded ready for labels to be applied.

Available entity labels will be loaded within the labels panel on the right. If your image category and entity label names match the corresponding label will be automatically selected for you. Otherwise, an entity label will need to be selected.

To begin labelling set the preferred zoom level of the image (if needed) and right click at a point on the image you would like to start a region. A pop-up context menu will appear. Select either a rectangle or polygon label type. Complete the desired region, excluding as much of the unwanted image data as possible such as background and other species.

Once a region has been created it can be adjusted via the round handles at the corners of the region. These allow the region size and shape to be changed. A region can also be moved about on the image, and its order within the stack of regions changed, so you can access any regions that may be behind another.

Once finished annotating your image click the save button located on the image toolbar (or press ‘ctrl + s’ keyboard combination). The return button will take you back to the pool of category images for selection of the next image to annotate (or press ‘ctrl + r’ keyboard combination).

Tip

If your project was created with automatic synchronization against an existing media store library, all the images by default will have had a whole image region created.

Zoom

Use the zoom in and out options to better view the selected image. The mouse wheel can also be used to zoom (in or out) the image while the mouse cursor is within the bounds of the image.

Region types

Two region types are supported. A rectangle and polygon region. Before a region can be created you must select an entity label the region is representing. See ‘Selecting entity labels’ further below for more information on this.

Rectangle region

The rectangle region type is the fastest to apply and should be used where it excludes as much unwanted background image data as possible.

Poor use of the rectangle region due to the amount of unwanted background content it captures.
A better use of the rectangle region where unwanted background content is minimized.

Applying the rectangle region can be done in one of two ways.

Option 1. Select the rectangle region type from the toolbar. To start a rectangle region, hold down the Ctrl key and click within the bounds of the image to start the region from the position clicked within the image. There is no need to continue to hold down the Ctrl key once the region has started. To create another region, Ctrl click again to start the region drawing process again.

Option 2. Right click within the image and select the rectangle region option from the pop-up menu. This option will immediately start the rectangle region from the position the right click took place.

Polygon region

The polygon region type allows you to more precisely define a region around a desired area of the image.  Applying the polygon region can be done in one of two ways.

Option 1. Select the polygon region type from the toolbar. To start the polygon region, hold down the Ctrl key and click within the bounds of the image to start. The start position is the location on the image where first clicked with the Ctrl key. There is no need to continue holding down the Ctrl key once the polygon drawing process has started.

Example polygon region.

Option 2. Right click the position on the image where the polygon is to be started, then pick from the context pop-up menu ‘Create polygon region’.

Creating the polygon coordinates (points)

After starting the polygon using either option 1 or 2, the next setup is to define the coordinates (or points) of the polygon. Move the mouse to the next position from the starting coordinate and left click the mouse to add a new point. Continue this process until you have defined the polygon around the desired image region. To complete the polygon (join the last point to the first point) right click and from the pop-up context menu select the ‘Complete polygon’ option.

Tip

When creating the polygon there is no need to follow precisely along the edge of desired area as doing so can be very time consuming. The main goal is to reduce the amount of unwanted data. Eliminating it entirely would be too time consuming and unnecessary.

Ordering regions

When creating multiple regions on an image it is possible to have one region completely cover another. When this is the case the only way to access the covered region(s) (without deleting the region above) is to change the z-order of the covering region to below the region you are trying to access. You can change a regions z-order,  downward or upward or to the bottom or top, by selecting it, then right click to access the ordering options on the pop-up context menu.

Note

The ordering of regions has no impact on the training data is only used to gain access to covered regions for editing or deleting.

Deleting a region

Select the region that is to be deleted, then press the delete key on your keyboard or the delete button on the toolbar. Alternatively, the right click pop-up context menu can also be used to delete the selected region.

Warning

There is no undo when deleting a region once the regions have been saved. If you’ve made a mistake deleting a region don’t save the regions and return to the image selection screen and re-pick the image.

Delete all regions

To remove all regions on an image, use the delete all regions option found on the toolbar. All current regions for the image will then be deleted.

Warning

There is no undo when deleting all regions.

Whole image region

To apply a whole image region quickly use the whole image region option found on the toolbar. A rectangle region will be automatically created covering the entire image using the currently selected entity label.

Find area of interest (Experimental)

This function is designed to find the most significant area of the image and automatically apply a region label to it. The current version of this feature is still experimental and has conservative settings. For example, this feature is not really designed for ‘busy’ images with lots of background features. In these cases, almost all the image would still be annotated. Rather this feature is designed for images with large out of focus areas or those where the subject has been photographed on a standardized surface. E.g. Seeds photographed on a piece of paper etc.

In the future this feature may be released with several options to determine how conservative it in looking for the area of interest.

Saving regions

Use the save button on the toolbar to save any new or changed regions on the image or use the keyboard shortcut ‘ctrl + s’. Any changes to regions will be lost if the large image view is closed back to the image selection screen and another image selected.

Selecting entity labels

An image region is a defined area of the image for a given entity label. There are no image regions without an entity label association. All available entity labels are listed on the right of the large image view. By default, if the image category name matches an entity label the corresponding entity label will be automatically selected. Otherwise, an entity label needs to be selected before an image region can be annotated on the image. Entity labels can be searched via the search toolbar above them. See ‘Search Options’ help topic for more information on this.

Tip

When automatic selection of the entity label occurs, it is bookmarked at the top of the entity list for easy reselection, if the entity label is changed.

Categories
Lucid AI

Adding Images

There are a few different ways to add images to your AI project.

  1. When creating an Entity label you can elect to have it linked to an existing Media Store category folder and automatically synchronize it across to your project into the linked AI project image category.
    Lucid AI synchronizing Media Store category images to AI project image categories
    Lucid AI synchronizing Media Store category images to AI project image categories
  2. Manually selecting images from the Media Store, via the Manage Images option, by selecting an existing AI Project image category, then selecting images from one or more of the attached Media Store categories.
    Lucid AI Manually selecting images from Media Store categories into AI project image categories
    Lucid AI Manually selecting images from Media Store categories into AI project image categories
  3. Uploading images from your device, via the Manage Images option, by selecting an existing AI project image category, then electing to upload new images from your device.
    Lucid AI Uploading new images to an AI project image category
    Lucid AI Uploading new images to an AI project image category

Note as shown above any images uploaded from your device are actually first uploaded to your Media Store and then added to the AI project image category.

Tip

As a reminder when an image is added to your AI Project it is automatically assigned a whole image region annotation, if the image category has been assigned a default Entity label.

Lucid AI Selecting an image category to add images

Adding images from your Media Store

Images already held in your Media Store can be added to your AI project. This can be done automatically or manually.

Automatic synchronization of Media Store images

When creating your Entity labels you can create a corresponding Image Category folder or link to an existing Image Category folder. This Image Category folder can then also be linked to a Media Store category. This Media Store linkage allows the one-way synchronization of all images held in the Media Store category across to your AI projects Image Category.

Tip

When managing images within your AI project Image Category folder, where it is linked to a Media Store category folder, it is possible to delete images (within the AI Image Category folder) however, if the Media Store Category is re-synced the image will be reinstated. Rather than deleting the image, mark it as excluded. This way it can filtered from your available images via the search bar.

Tip

When an AI Image category is set to synchronize with a Media Store category you can’t add additional images to this category, other than via the corresponding Media Store category.

Manually adding images from the Media Store

Lucid AI Adding images from the Media Store

Images held in different Media Store category folders can be added to your AI Project Image categories. To do this first select the ‘Manage Images’ option in the left main menu. Select an image category and then select the green ‘+ Media Store’ button located at the top right of the screen. This will load an Add Images dialog. Within the dialog a search Media Store Category text box will be shown along with a search bars and images available further below. By default, the AI project image category name will be used to search for a corresponding Media Store category. If found, the images available in the Media Store will be shown below the search bar. If you wish to search for another Media Store category delete the current search text and start typing the name of the Media Store category you are interested in. A minimum of two characters need to be typed, this will trigger a lookup search for any partially matching Media Store categories. If a new Media Store category is selected any images it contains will be shown ready for selection.

Selecting images from the Media Store

As described above once the Media Store category has been selected the images it contains will be shown below. You can search and filter for particular images of interest – see the search bar help topic for more information on how to do this.

Individual images can be selected by clicking on the desired image. It will show as selected by being highlighted in green. You can continue to select images even if you move between pages of images if the Media Store category holds more than twenty (20) images. As images are selected or deselected the ‘Add images button selection count will be updated.

After selecting images, you can add them into the AI image category by pressing the ‘+ Add Images’ button.

Lucid AI Add images from Media Store button options

Tip

Accidentally selecting an image from the Media Store that is already within your AI image category will not cause a duplicate to be created.

To select or unselect all images within the current page of Media Store images you can use the blue select dropdown options button left of the ‘+ Add Images’.

You can also clear all selected images waiting to be added please selecting the dropdown button on the right of the ‘+ Add Images’ button and selecting the Clear images option.

Uploading images from your device

Lucid AI Adding new images from your device

If you have new images, not already deposited into the Media Store, then you can upload these via the ‘Manage Image’ option and selecting the image category you want the image added. Next, select the blue  ‘This device’ button located top right of the screen. This will open the add images dialog. Before any new images can be uploaded you first must select the Media Store category you wish to lodge them. By default, the select AI Project Image category name will be used to search for a corresponding Media Store category, if one is not found or you wish to use a different Media Store category then you can search for a category. Once a Media Store category has been selected you can add images found on your local device via the blue ‘Choose Files’ button. You can select up to 100 images at time for upload. Additional images can be added after each upload session has completed.

After the images on the local device have been selected, they will be validated (checked for file type and size etc) and displayed in the image upload list. If necessary, you can remove any unwanted images from the upload list by clicking on the small red trash can icon located at the bottom right of the image. Once satisfied with the upload image list click on the green ‘Upload images’ button. As each image is successfully uploaded a green tick icon will be overlayed on the image. Any images failing to upload will have a red cross overlayed.

Lucid AI Image upload success example
Lucid AI image upload failure example

Tip

In many cases images that fail to upload are due to being already within the selected Media Store category, or due to an unstable internet connection. After a failure (and the upload process has completed) you can remove the successful images from upload list and try uploading the failed images again.

Note

The time taken to upload each image is dependant on the file size, your network speed and current service load. Adding new images into your AI project is more than simply saving an image to the server. Adding an image into your AI Project is much more involved. An image is first saved to the Media Store, then a resized copy is lodged to your AI project, where a whole image region label is annotated (if a default Entity label is associated with the image category). This new image region is then augmented several ways to help with the AI recognition training.

After all the images have been uploaded click the close button to dismiss the Add Images dialog. This will trigger the selected AI project image category to refresh and show the newly added images.

Categories
Lucid Builder v4

Lucid Builder Viewing, removing and deleting items from the Media folders

To view files that are currently attached to any item, select the item in the Features or Entities panels. The files attached to the selected item will be listed.

To view the full image or full web page for any attached file, either double click on the image or web page icon or thumbnail, or right click on the media item name and choose Open. The file will be displayed at full size in a popup window.

Media files that have been attached to an item may be unattached from that item by selecting the file in the Media panel’s file list and clicking the Remove Media button, or right-clicking on the file in the appropriate directory and choosing Remove. The file will be removed from the currently selected item, but will not be deleted from the Media directory.

You may delete media files from the Media directory by right-clicking on the file in the appropriate directory and choosing Delete. The file will be removed from the currently selected item and from any other items to which it has been attached, then deleted from the Media directory.

Note

Deleting web page files from the HTML directory may cause broken links on other pages. Lucid does not check for this. Use a Link Checker application to ensure your keys HTML content doesn't have any broken links.
For a great free open source link checker see https://wummel.github.io/linkchecker/

Categories
Lucid Builder v4

Lucid Builder How to attach an image to a Feature or Entity

JPEG, GIF or PNG images may be attached to any Feature or Entity.  If an image is selected outside the scope of the keys Media folder, a copy of the selected file will be made to the key’s Images folder. Images are copied to the Keys Image folder (or sub folder) so that all images are accessible when compiling the key, even if the original images have been moved or are on an inaccessible drive.

To attach an image to an item (Feature or Entity), first select the appropriate item. Right-click the Images folder in the Media panel or click the Attach Media button. To attach a local image file, choose the Attach Image File menu option and choose the file using the Open File dialog box that appears.

Lucid Builder attach image options

Note

When attaching local image files to your key, remember that a copy of the original file is created in the key’s Images directory. Editing the original file will have no effect on the key. You may edit the copy of the image in the Images directory using third-party image manipulation software.

Categories
Lucid Builder v4

Lucid Builder Images and Image Thumbnails

Lucid Builder Key Options - Thumbnail settings
Lucid Builder Key Options – Thumbnail settings

When you attach an image to an item (Feature or Entity), the Lucid Builder will create a thumbnail image from the original, and store it in a Thumbs directory in the key’s folder with the same file name. Thumbnails are used for displaying the images in the Player’s Features and Images panels.

By default, thumbnail images are created with a maximum dimension (height or width) of 128 pixels, with the aspect ratio of the original image preserved by default. You may choose to set the thumbnail images to a size other than default maximum pixels by selecting from the menu Key…Key Options, then select the media icon.  Within the Media options enter your preferred maximum thumbnail dimension in pixels. The Builder will then offer to automatically recreate any existing thumbnails. A warning will be given prior to this action occurring due to the amount of time potentially required to complete this operation in large keys with many image attachments. Alternatively, you can manually trigger the recreation of the keys thumbnails, via the main menu option ‘Key…Media…Update Thumbnails’.

Lucid Builder update thumbnails menu option

In some cases, you may find it useful to create your own thumbnails instead of using the thumbnails generated automatically by Lucid. Remember to size the thumbnails to the dimensions specified in the Options dialog.