The settings are where you can set defaults for the AI interface or access other modules related to Lucid AI application.
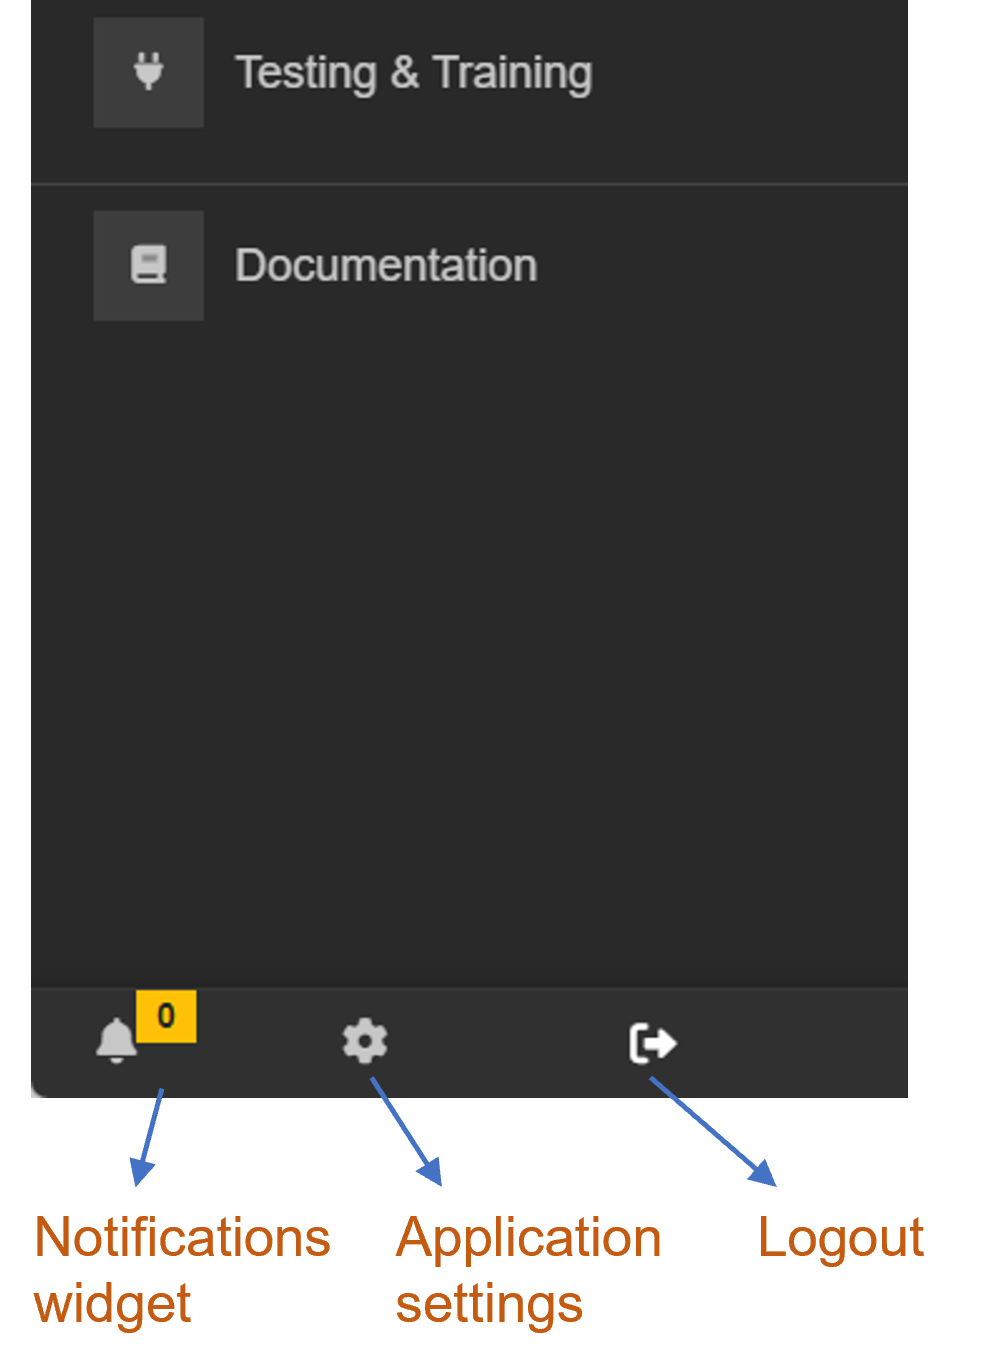
Lucid AI Menu bottom bar options
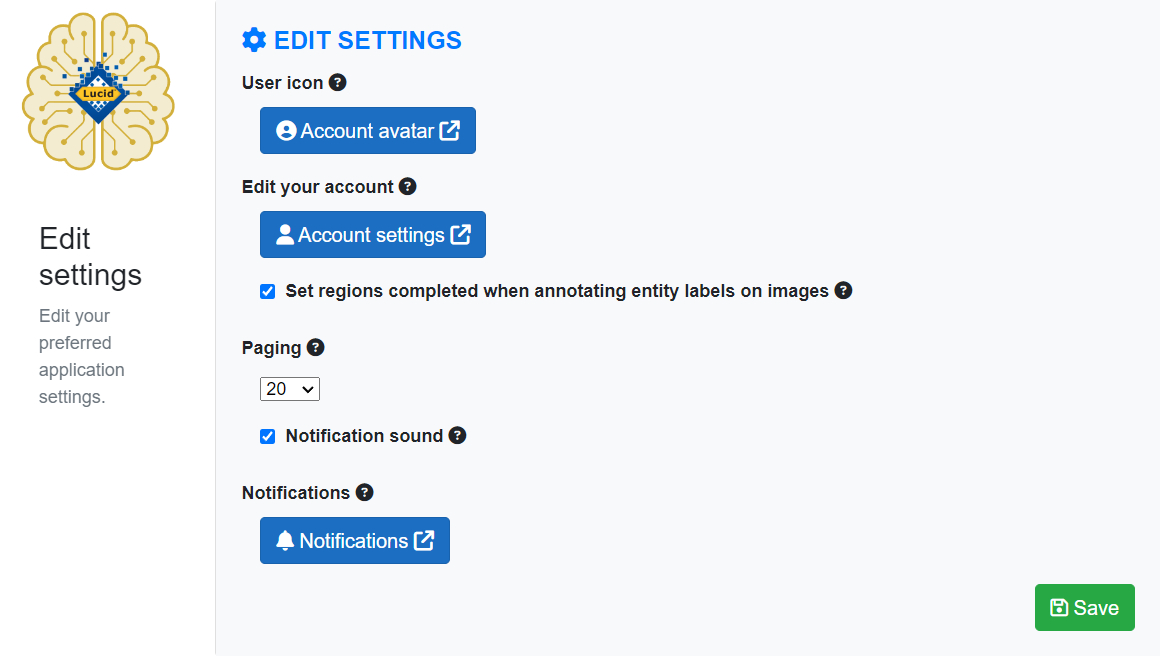
Lucid AI General applications settings screen
User icon
The on-line suite of Lucid based products, such as Lucid AI, use a global user icon service called Gravatar. You can create your own account icon (associated with your email address) via this free service. Millions of other on-line services and applications use this service such as WordPress.
Edit your account
This external link returns you to the Lucid Identity service where you can edit your account settings.
Set regions completed
This option automatically sets the region labeling (annotation) of the image as completed when the regions are saved. The regions complete checkbox within the labeling interface will be automatically set to true. This value will only be updated for the image if the regions of the image are saved.
Paging
Set the default number of records to return when paging occurs. For example, the number of thumbnails shown per page, or the number of labels shown per page.
Notification sound
If enabled the Lucid AI application will play a short notification sound to indicate a new notification has been received.
Notifications
The Lucid AI application shows up to ten (10) of the most recent notifications received while using the application. Other notifications may have been received while you were offline or exceeded ten notifications before you have reviewed them.
The notification button links you to the centralized Lucid notification application. The notification application stores notifications across several related applications such as the Lucid AI application. You can access all notifications, including those that have been dismissed within the Lucid AI application. For more information on the notifications please see the notification and messages help.
Depending on your Windows display settings (e.g. scale settings etc) you may find that the Lucid Builder interface appears blurry with the icons appearing somewhat jagged. This can be easily corrected by using the High DPI Scaling Override settings for the Lucid executable.
First ensure the Lucid Builder is closed, then find, using Windows Explorer, the Lucid Builder executable, installed by default to:
C:\program files\Lucid4\Lucid4 Builder.exe
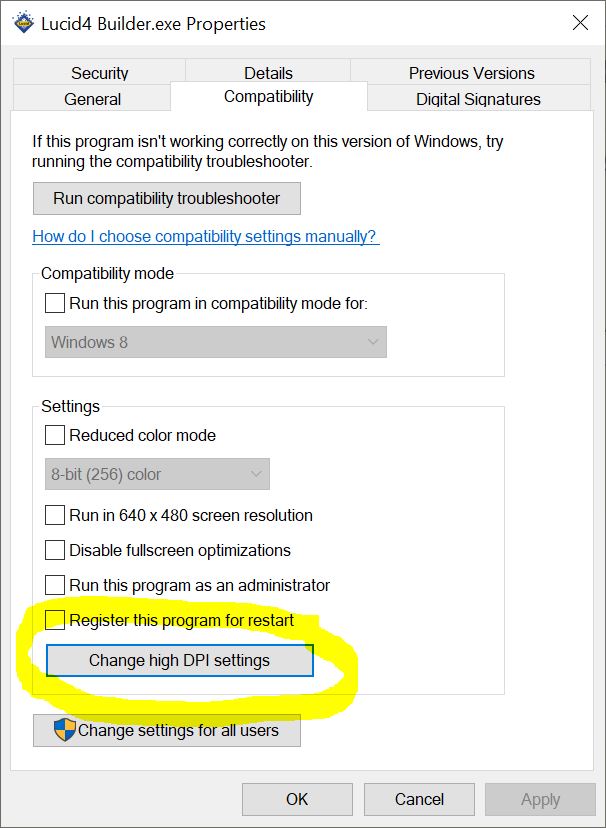
Within Windows Explorer right click on the Lucid Builder executable. Select the Properties menu item from the context pop-up menu. From the Properties dialog that will open, select the Compatibility tab as show below.
Lucid Builder Executable Properties High DPI Settings.
Click on the Change high DPI settings button. This will open the high DPI settings dialog.
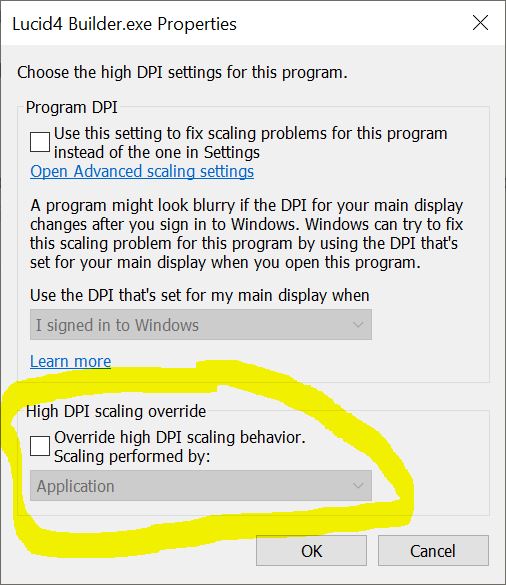
Lucid Builder Executable High DPI Settings dialog.
Click on the Override high DPI scaling behavior option and select the ‘System (Enhanced)‘ option as shown below.
Lucid Builder Executable Properties high DPI System (Enhanced) option.
Restart the Lucid Builder. You should now see the interface display is now corrected.
Key options are set using the Key > Key Options menu. These options allow you to specify aspects of the behaviour of your key when opened in the Lucid Player. In most cases, the key user can change these settings when using the player. For more information, consult the Lucid Player Help.
The Key option dialog has a number of options accessible via the tabs on the left. Select the desired tab option to view the options available.
The default options settings should cover most types of keys when opened in the Player. You should understand and carefully consider the implications of changing any of these settings.
Lucid Builder Key Options dialog.
Key Options
The Key options allow you to adjust the default operational settings the Lucid Player will use when it opens the key.
Matching Options
In the Lucid Player, Matching Options determine the way in which two special scores, Present by Misinterpretation and Uncertain are handled. See the Player Help for more information.
Allow Misinterpretations
With Allow Misinterpretations checked, the Player will be set to treat entities scored using By Misinterpretation scores in the same way as ones scored using Common and Rare. This is the correct behaviour for normal identification as it allows you to pre-empt likely mistakes made by a user.
With Allow Misinterpretations unchecked, the Player will be set to treat entities scored using the By Misinterpretation scores in the same way as ones scored as Absent.
See the topic Present by misinterpretation for more information.
Retain uncertains
With Retain Uncertains checked, the Player will be set to treat entities scored as Uncertain for a feature in the same way as ones scored as Common. This is the correct behaviour for normal identification.
With Retain Uncertains unchecked, the Player will be set to treat entities scored as Uncertain for a feature in the same way as ones scored as Absent.
See the topic Uncertain for more information.
Sort Mode
In the Lucid Player, the Sorting Mode determines the way in which entities that do not match the selected features are handled. See the Player Help for more information.
Filtered
With Sort Mode set to Filtered, entities that do not match the currently chosen features will be removed from Entities Remaining into Entities Discarded. This is the most common mode for using the key.
Ranked
With Sort Mode set to Ranked, the Entities Discarded panel is removed and all entities remain in Entities Remaining throughout the key session. Entities are prefixed with a percentage value showing the proportion of chosen features that match the entity; the entities list is ranked by this value.
Matching Mode
In the Lucid Player, the Matching Mode determines the way in which the selection of one or more states of a feature results in entities being retained or discarded. See the Player Help for more information.
Any State
With Any State checked, the Player will be set to use the Any State match method. Under this method, an entity scored for several states of a feature will be retained in Entities Remaining if any of its scored states is selected. This is the default mode for normal identifications.
For instance, if a key has a feature Flower colour with states white, cream, yellow, red, and blue, and a user selects white and cream, Entities Remaining will list all entities with white or cream flowers.
All States
With All States checked, the Player will be set to use the All States match method. Under this method, an entity scored for several states of a feature will be retained in Entities Remaining only if all its scored states are selected.
For instance, if a key has a feature Flower colour with states white, cream, yellow, red, and blue, and a user selects white and cream, Entities Remaining will list only entities scored for both (and only) white and cream flowers.
Automation Options
In the Lucid3 Player, two functions Best and Prune Redundantscan be automated so they are invoked after each state is selected. See the Player Help for more information.
Auto Best
Check Auto Best to set the Player to invoke the Best function automatically after each state is selected.
Auto Prune
Check Auto Prune to set the Player to invoke the Prune Redundants function automatically after each state is selected.
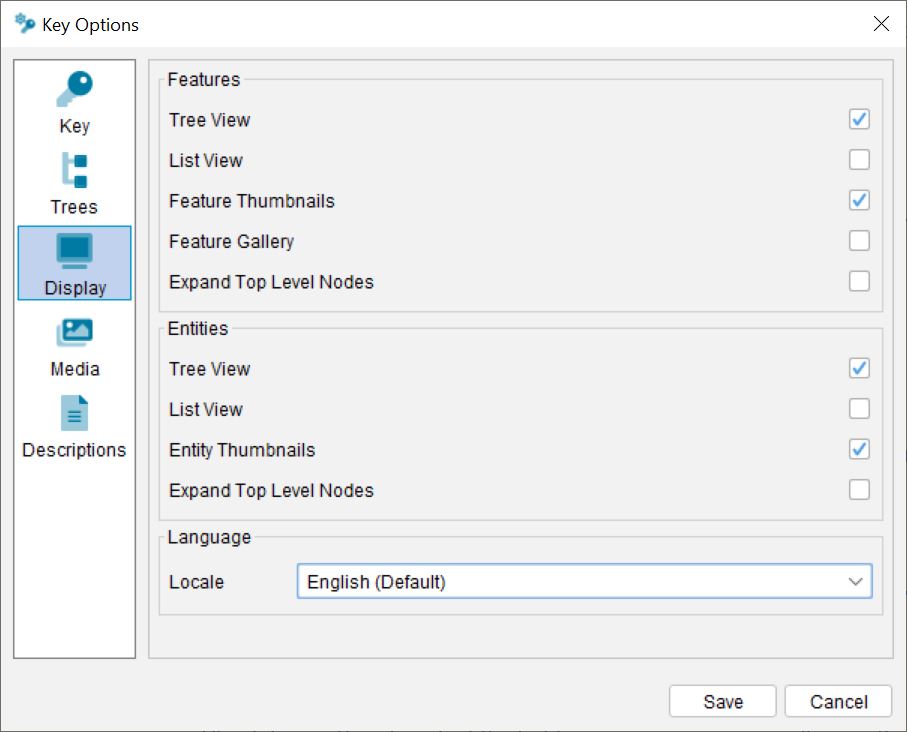
Display Options
Lucid Builder Key Options dialog Display tab.
The Display options allow you to set how the Player interface and key should look when opened in the Lucid Player.
Features
Tree View
Check Tree View to set the Player to show the Features in Tree View (hierarchical view) mode. Selecting this option will automatically toggle off the List View, if selected.
List View
Check List View to set the Player to show Features in List View (flat list view) mode. Selecting this option will automatically toggle off the Tree View, if selected.
Feature Thumbnails
Check Feature Thumbnails to show thumbnail images in the keys Features.
Feature Gallery
Check Feature Gallery to show feature states in a gallery view rather than the vertical view.
Expand Top Level Nodes
Select Expand Top Level Nodes to open each of the top (root) level Features listed in the key when opened by the Player.
Note
This option will be ignored if the Features are set to List View.
Entities
Tree View
Check Tree View to set the Player to show the Entities in Tree View (hierarchical view) mode. Selecting this option will automatically toggle off the List View, if selected.
List View
Check List View to set the Player to show Entities in List View (flat list view) mode. Selecting this option will automatically toggle off the Tree View, if selected.
Image View
Check Image View to select the Entities remaining image gallery as the default Entities view in the Player for the key.
Entity Thumbnails
Check Entity Thumbnails to set the Player to show default Entity thumbnails in either Tree View or List View.
Expand Top Level Nodes
Select Expand Top Level Nodes to open each of the top (root) level Entities listed in the key when opened by the Player.
Note
This option will be ignored if the Entities are set to List View.
Language
Locale
The local drop down box displays the available Player language files available. Additional language files can be created via the Lucid Builder and will be automatically listed here. For more information on creating language files see Multilingual Support.
Note
Certain languages, including eastern Asian languages such as Japanese, Chinese, and Thai, require specific font's to be able to display the extended character sets. If you are translating interface strings, or deploying a key using these languages, please add the font to the Lucid Player deployment folder (or an on-line source. E.g. Google Fonts.) and make a style sheet reference in the player container HTML file.
Media Options
Lucid Builder Key Options dialog – Media Tab.
Media options determine the default settings for media when added to the key via the Builder.
Thumbnails
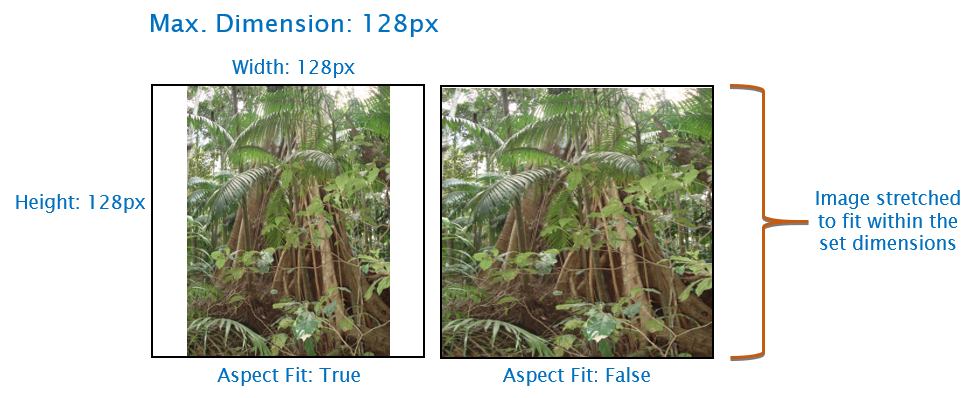
Max. Dimension (px)
The maximum height and/or width the thumbnail will be created to. See the ‘Aspect Fit’ option below for additional details that effect the thumbnail creation.
Aspect Fit
If checked (default), then the thumbnail will be created keeping its aspect ratio within the maximum dimension set. This stops the thumbnail from being distorted when fitting (size) to the maximum dimension.
Lucid Builder Thumbnail Aspect Fit example.
Media Panel
Display Image Thumbnails
If checked, thumbnail images, rather than the filename will be displayed within the Builder’s Media Panel.
Defaults
Image Caption
The ImageCaption allows you to set a default caption for images. The default caption will be applied within the Media Panel caption text box when the image is first attached. You can override the default caption by replacing it with your preferred caption text.
Image Copyright
The Image Copyright option allows you to set a default copyright label to images. You can override the default copyright label by replacing it with your preferred copyright text within the Media Panel.
HTML Caption
The HTML Caption allows you to set a default caption for HTML pages attached to the key. The default HTML caption text will be applied within the Media Panel caption text box when the HTML file is first attached. You can override the default caption by replacing it with your preferred caption text.
Item Name as Caption
If the Item Name as Caption is checked then the default caption for an attached image or HTML file will be the label text of the selected item (e.g. Feature, Feature State or Entity). You can override the default caption by replacing it with your preferred caption text within the Media Panel.
The Output Template option allows you to save your preferred template for customising the keys description structure. The output template is an XML based file with a ‘.xml’ file extension.
Transformation File
The Transformation Template option allows you to save your preferred template for transforming the XML based key data to “human” readable format. The transformation template file is an XSL based file with a ‘.xsl’ file extension.