Categories
Lucid AI

Entity labels

Example Lucid AI Entity Labels
Example Lucid AI entity labels

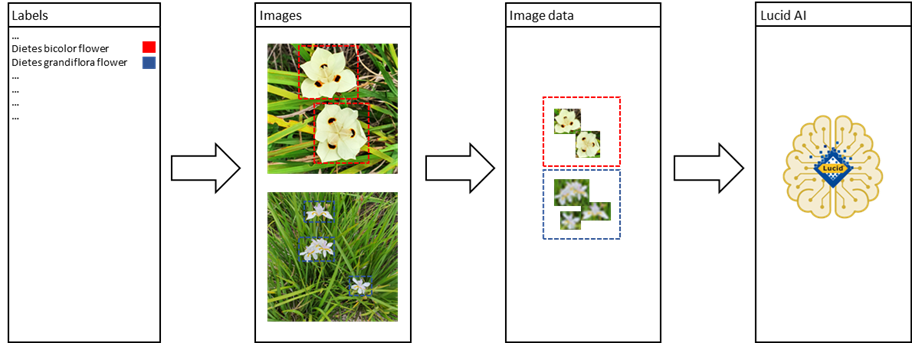
Entity labels represent the things you are trying to classify (identify). For example, a very simple set of entity labels could consist of ‘cat’, ‘dog’, ‘cow’ or ‘sheep’. Entity labels are then used to annotate (label) images or parts of images that contain that entity. This annotated image data is then used to train the AI.
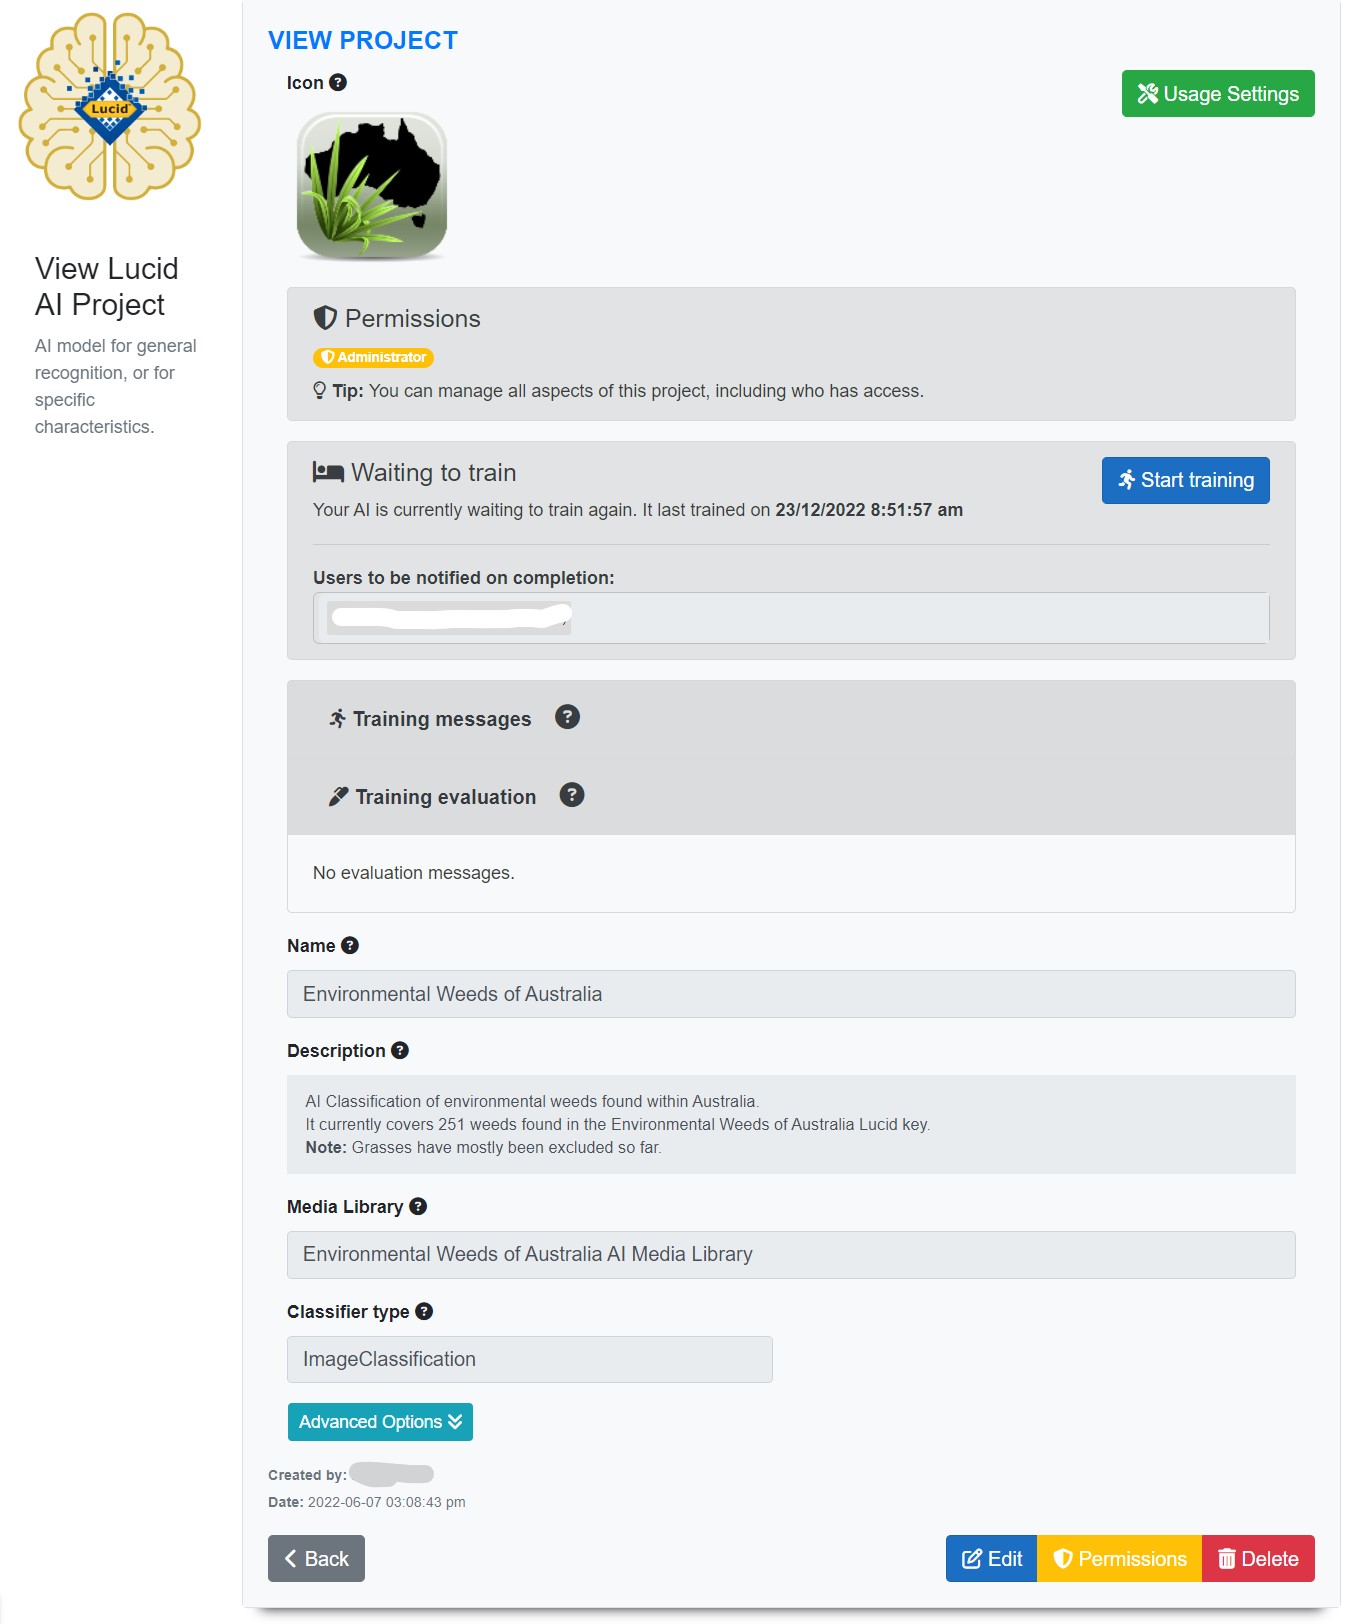
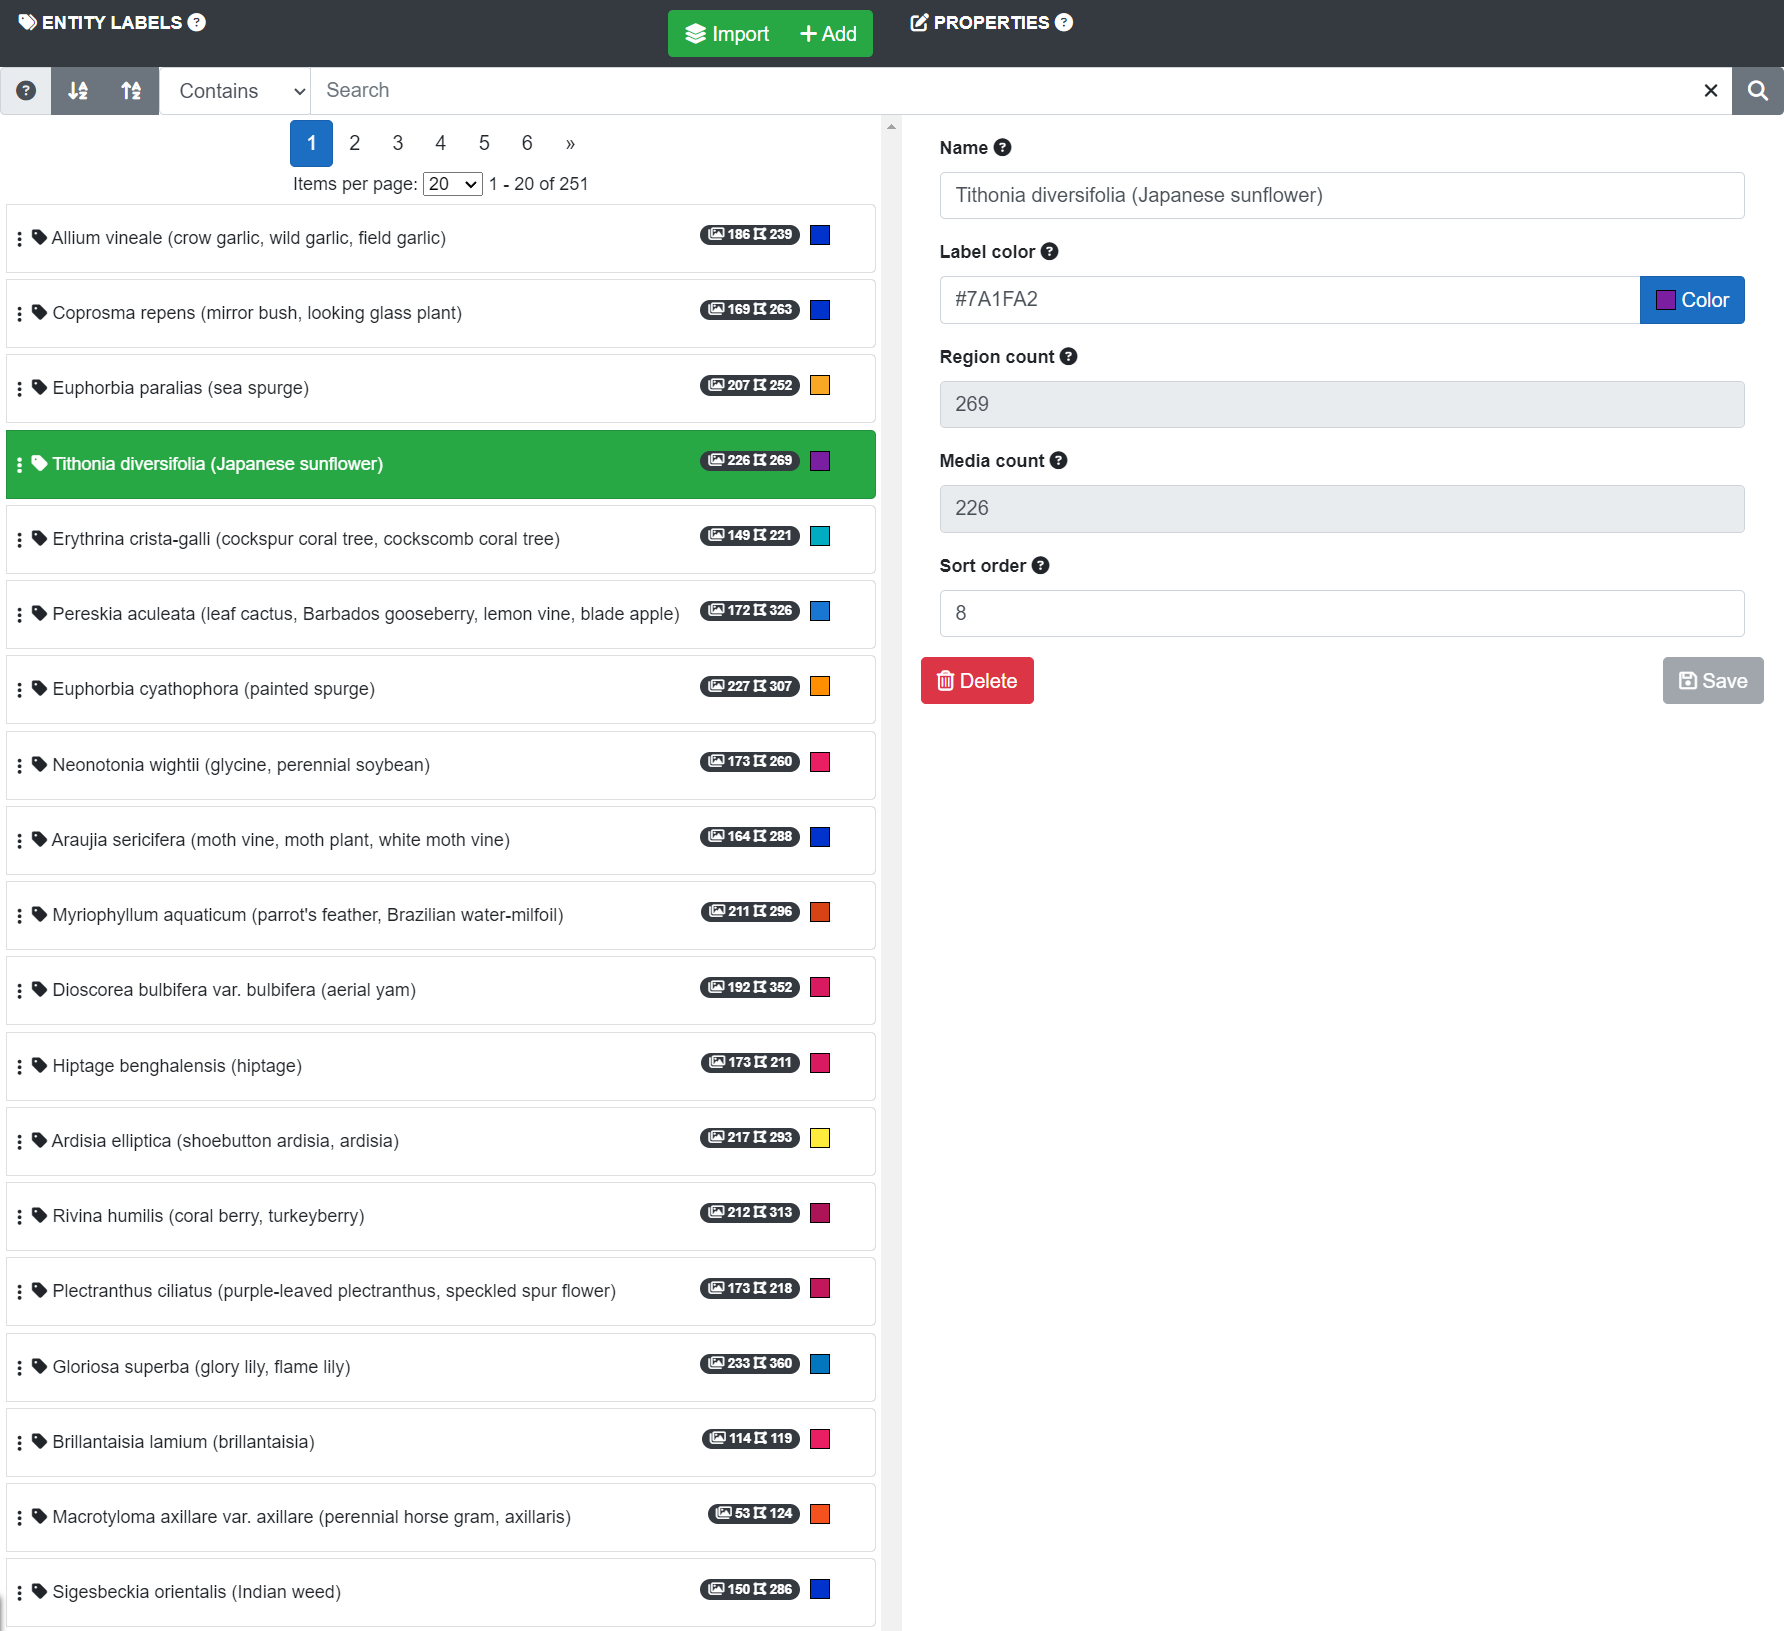
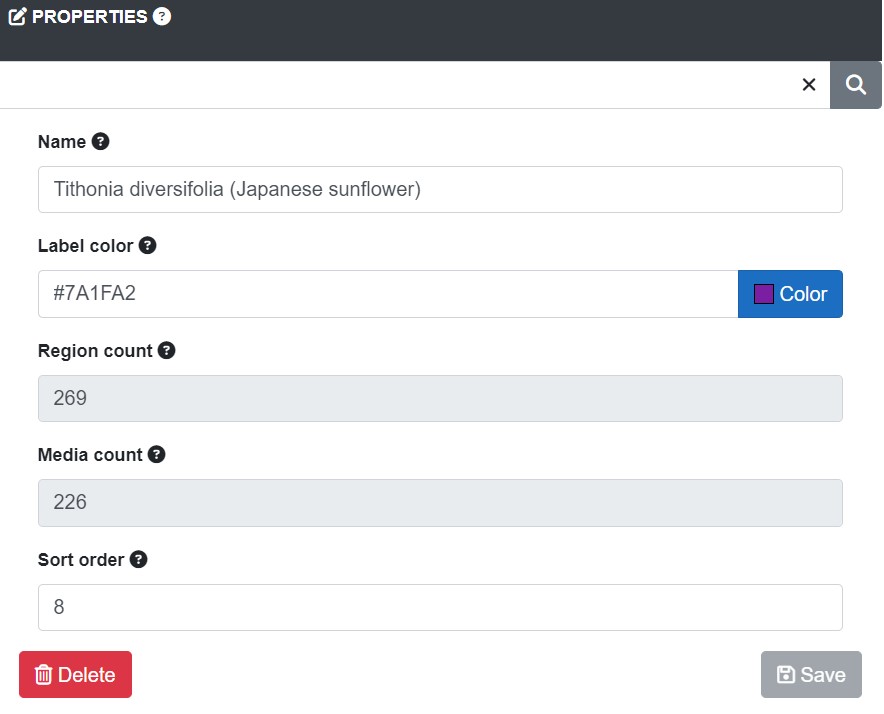
Lucid AI Anatomy of an entity label item

Name

The name of the object/subject you are wanting to classify.

Note

You cannot have duplicate entity label names within your project.

Label color

Define a label color to help it stand out when multiple, but different, entity labels are used on the same image.

Region count

A count of how many times the entity label has been used. This value is read-only and not settable by the user. This along with the media count give an indication of the labels usage if you were considering deleting or merging the label.

Media count

A count of how many images the label has been applied. This value is read-only and not settable by the user. This along with the region count give an indication of the labels usage if you were considering deleting or merging the label.

Sort order

Optional – Set your preferred order of the label when listed with other labels.

Note

You can sort the entity labels ascending or descending, without having to set this on an individual basis.

Adding an entity label

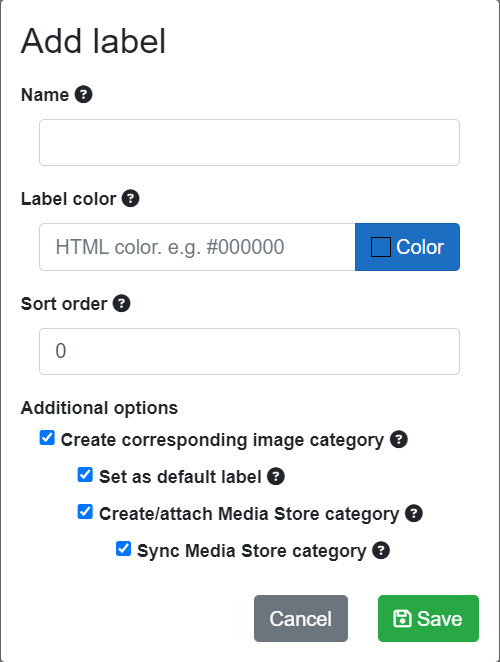
To add an individual entity label click the Add button located at the top of the labels list. Multiple labels can be added in one action via the Import option. See the Import entity labels topic further below for more information on this.

Lucid AI Add Entity Label dialog

Name

Enter the name of the label. A label can comprise a maximum of 255 characters. Duplicate label names are not allowed.

Label color

Lucid AI Entity Label color selection dialog

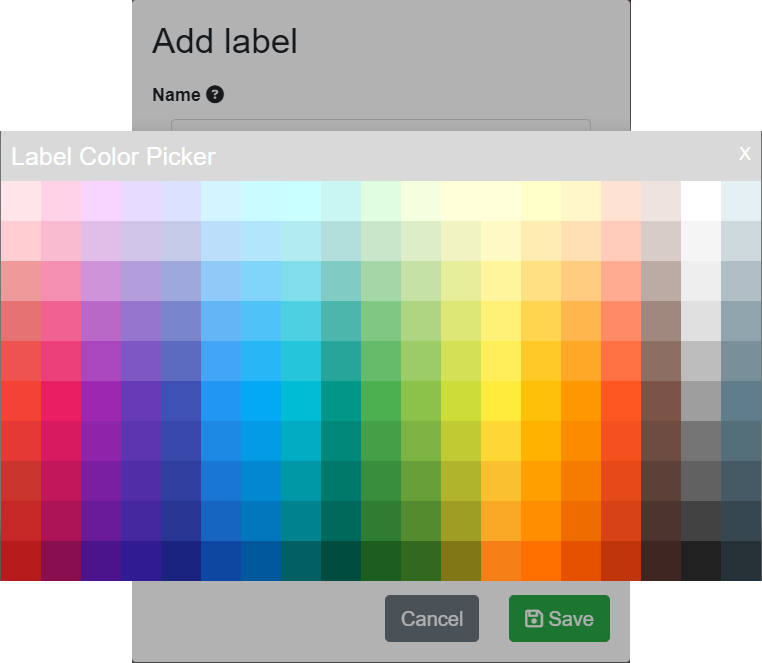
Enter or paste a valid HTML hex color code, or click the color button to select a color from the color selection dialog as shown above.

Sort order

Set your preferred sort order (numeric value) for the label. If left with the default value (0) it will be added to the top entity label list. The order can be be changed at anytime. Note the sort order value may change automatically if the sort order of other labels are changed. For example, via a drag and drop operation on the entity labels.

Additional options

Create corresponding image category

If checked this option will create an Image Category of the same name as the entity label, if it doesn’t already exist.

Set as default label

Enabling this option will set the label to become the default entity label associated with the image category. This option comes into effect when selecting an image category for region labeling (annotating). When the image category is selected for region labeling (of the images it contains) the default entity label, if defined, will be automatically selected as the region label to be applied. For more information please see the image region labeling help topic.

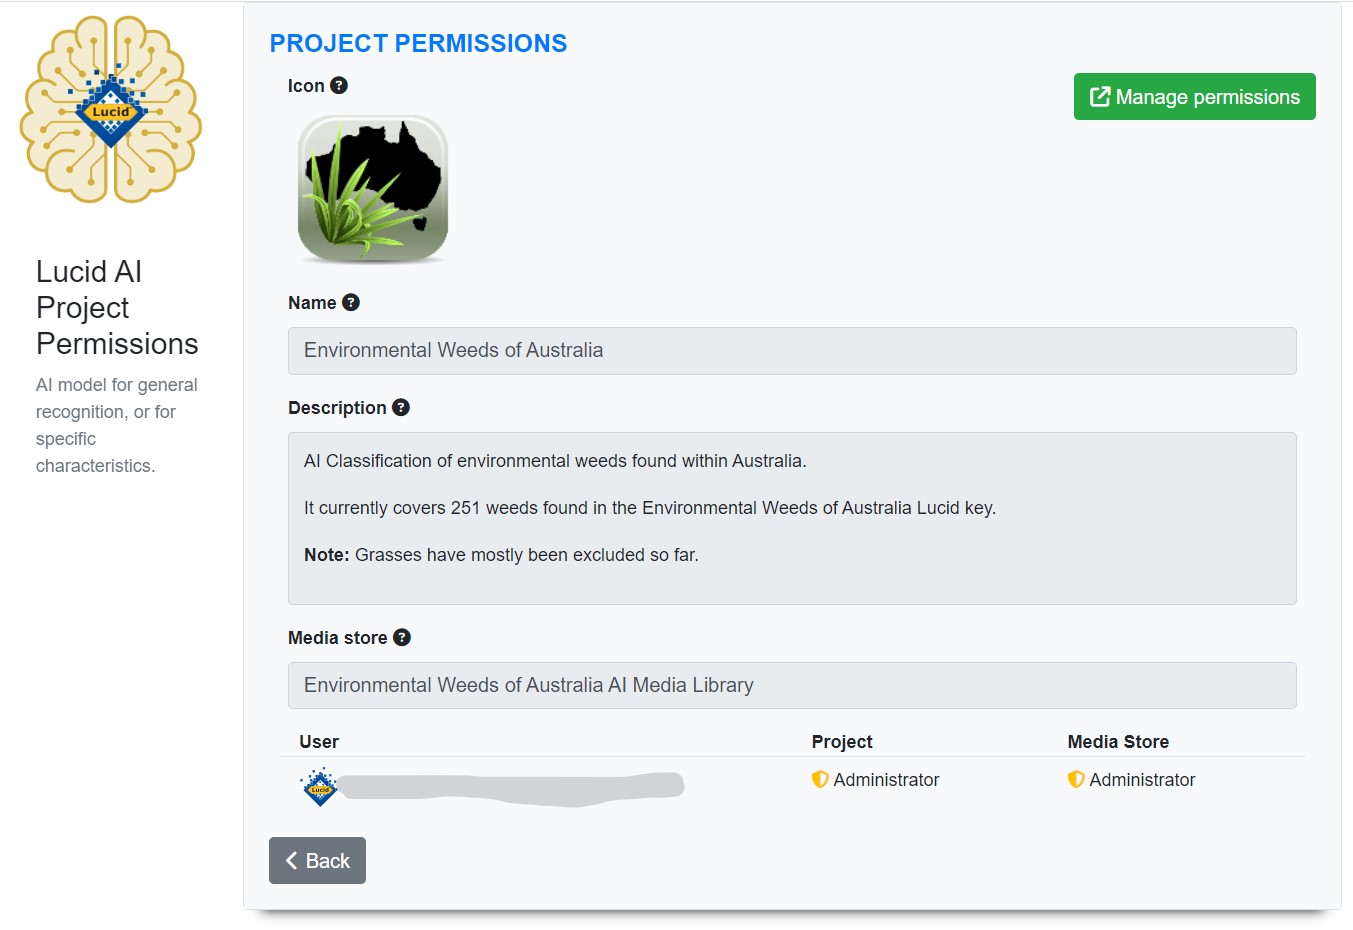
Create/attach Media Store category

If selected this entity label will be associated (linked) to a Media Store category of the same name as the entity label. If the Media Store doesn’t already have a category with the same name as the entity label it will be automatically created.

Sync Media Store category

If the Media Store already contained a category of the same name as the entity label, any images it contains will be automatically synchronized across the entity labels image category.

Note if the Media Store category contains a large number of images they may not immediately appear within the AI project image category as it can take some time to process them. You will receive a notification when the synchronization process has been completed.

Save button

Click the save button to create the entity label. After the entity label has been created it will be added the Entity Label list. Remember, if you happened to have set a preferred sort order for your label it may not be shown in the current page of entity labels. Use the search bar to find it or use the page options to browse the labels.

Cancel button

Closes the add entity label dialog without saving a label.

Importing Entity Labels

Lucid AI Import Entity Labels dialog

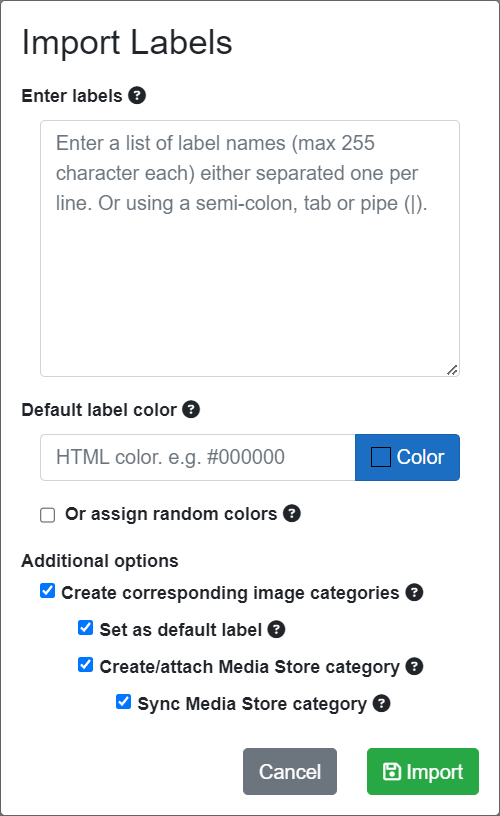
The import entity labels option allows you to enter a number of labels at once or copy and paste them from another source such as Excel. These labels will then be created with the default options set within the dialog.

Enter labels textbox

Each label entered into the ‘Enter labels’ textbox should be on their own separate line or be separated by either a semi-colon (;), tab, or pipe character (|). Each label must not exceed 255 characters. Any duplicates within the list (or that already exist) will be automatically removed during the creation process.

Default label color

Set a preferred color for all the labels by either manually entering a valid web hex color, or by choosing a color via the color selection dialog after clicking the color button to the right. Or alternatively, allow each to be assigned a random color. See the ‘Assign random colors’ options below.

Assign random colors

If selected, each entity label will be assigned a color at random.

Additional options

See the ‘Add individual entity label’ option above for information on these options as they function in the same manner.

Import button

Starts the import process to create the entered entity labels. Any immediate problems detected will be reported via pop-up ‘toast’ message. The finalisation of the entity labels creation process will be reported as a notification since this process may take some time, particularly if a large number of images are being synchronized from the Media Store.

Cancel button

Closes the import dialog without actioning any import process.

Edit an entity label

To edit an existing label select it by clicking anywhere on the label item row. This will load the entity for editing within the entity properties on the right of the interface. After making changes to the entity label text or properties click the save button to save the changes.

Lucid AI Example entity label selected for editing

Deleting an entity label

Lucid AI right click context popup menu - delete entity label option
Lucid AI Editing Entity Label interface highlighting the delete button option
Lucid AI Editing entity label interface highlighting the delete button option

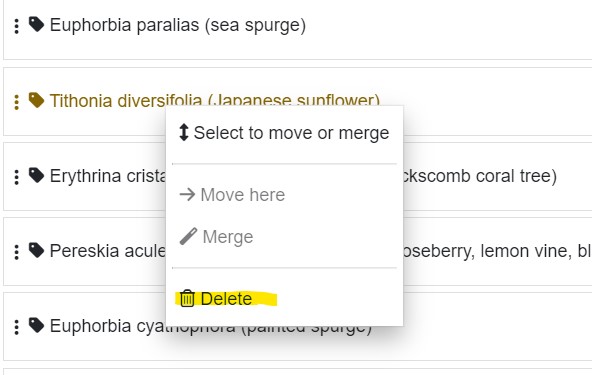
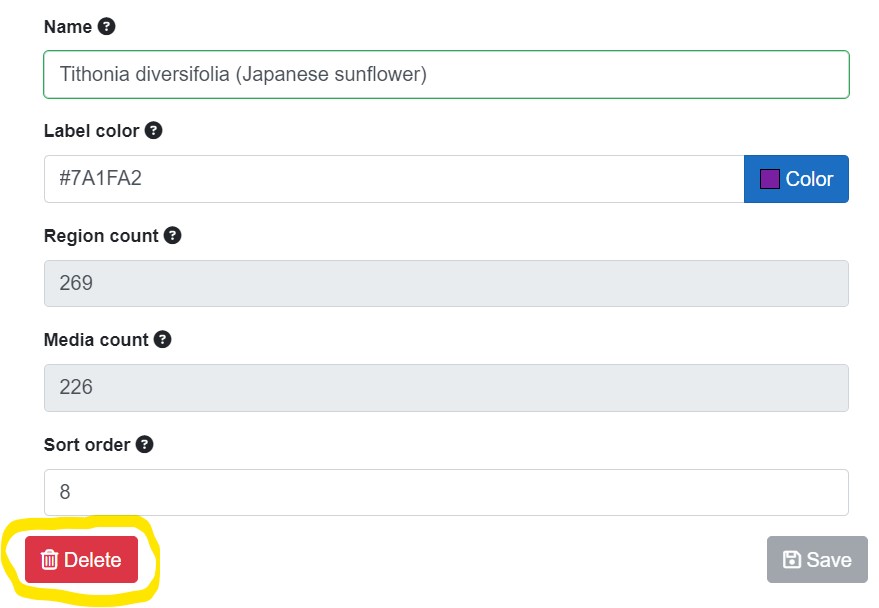
There are two ways in which to delete an entity label. Either select an entity label and click the delete button shown on the right, where the label properties are shown. Or right click on the entity label, within the label list, to be deleted and select the ‘Delete’ option from the context popup menu.

Using either delete method will trigger a confirmation dialog prior to its deletion.

Paging

Allows you to select the number of entity labels to list at a time and to move through pages of labels by clicking on the page numbers. 

Sort order – drag and drop

You can drag and drop entity labels to new sort positions. To initiate the drag and drop operation hold down the left mouse on any part of the entity label row and drag it to the desired position with the entity list. If the sort position is beyond the current page you can use the select and paste method – see below for details.

Sort order – select and paste

Lucid AI Entity label right click context popup menu

If the desired sort order is beyond the current page size you can use right click context popup menu to select the ‘Select to move or merge’ option, then page to the desired location and again use the context menu option ‘Move here’.

Merge entity labels

Lucid AI entity label merge confirmation dialog example

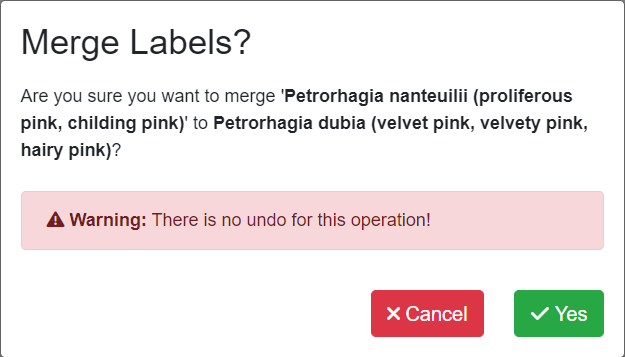
There may be instances where you wish to merge two entity labels (e.g., the collapse of two species into one). To do this use the right click context popup menu to use the ‘Select to move or merge’ option. Next, select the entity label you wish to merge with via the context popup menu ‘Merge’ option. A confirmation dialog will ask if you wish to proceed. Once the merge has been completed all image regions labeled with the selected label will become the label of the destination label.

Searching entity labels

If you have a large list of entity labels you can search for labels using the search bar. Simply type in the name or partial name of the label and click the search button. Any matching labels will then be listed. See ‘Search Options’ help for additional information on this topic.

Categories
Lucid AI

Project View Details

Lucid AI Project View page example

The project view page gives you several pieces of additional information and options regarding your AI.

Permissions

Your permissions for the project is shown. Not all users have access to the over arching permissions page (project administrators only).

AI Status

Indicates if the AI is currently training or waiting to train again along with the last time it completed a training session and users who are to be notified on training completion.

Training messages

Any messages regarding your AI’s last training session can be accessed here.

Training evaluation

If evaluation was selected as part of the last AI training session, a breakdown of its performance statistics will be available here.

Usage Settings

If the AI has successfully completed at least one training session the ‘Usage Settings’ button will become available.

Usage settings enable you to to define how the AI is accessed, usage instructions and data collection options amongst other settings. Please see the Usage Settings help section for additional details.  

Categories
Lucid AI

Project Permissions

Lucid AI project permissions page example

The project permissions page shows a summary of your project (title, description and Media Library) along with all users associated with the project.

The permission level for the AI project and the Media Library is shown for each user.

Permission Levels

Administrator

A user with Administrator level access can manage all aspects of the project, including deleting it.

Editor

Editor level access allows the user to add, edit or delete most aspects of the project, other than editing the project listing or managing users.

Read-only

This user level grants a read-only view within the project along with the ability to submit identification requests to the AI.

No access

A special permission level that specifically blocks a users access to the project/AI. For example, the AI is made public (not anonymous access – login required) and in a rare instance a user is problematic (submitting inappropriate content or exceeding reasonable usage etc). 

Managing Permissions

Managing users and their rights within the project is done via the Lucid Licence Manager, a separate application. A link to the licence manager is provided top right of the permissions page. Note you must be a licence owner or administrator to manage permissions on a licence.

Note: A user normally would have at least read-only access to the Media Library if they are granted higher permissions than read-only access to the AI project. Otherwise they would only be able to access and annotate images already added to the AI project.

Categories
Lucid AI

Project Selector

The project selector located in the left hand menu allows you to select the AI project you wish to work on. If no AI project has been created, then a note about creating a project to get started is shown instead. As shown in the screen shot below.

Lucid AI Project selector - No projects available yet
Lucid AI Project selector – No projects available yet

When one or more projects are available the project selector will allow you to choose one to work with.
 
Lucid AI Project selector with one or more project available to select

Below is a screen shot showing a selected project. Note the user status for the project is updated (under the username – blocked out) once the project has been selected. For example, you may have editor rights in one project, and read-only access in another.

Lucid AI Project selector showing an example project selected


Categories
Lucid AI

AI Project

An AI project can be thought of as a ‘container’ where all the settings and information needed to build an AI are held.

Lucid AI - Create a new project interface
Lucid AI – Create a new project interface

Once you have created one or more AI projects these will become available in the project selector located in the main left menu.

To create a project select the ‘Projects’ menu item in the left main menu. This will load your available project, if any. At the top right of the project listing page select the ‘Add’ button as shown in the screen shot below.

Lucid AI Create a new project option

The following are options related to creating or editing a project.

Licenses

Lucid AI projects can only be created within the confines of a licence. A licence defines how many projects you may be able to create and what resources are available to it such as Media Libraries. A licence also allows the management of users within your organization or team members that have access to your project and their roles within it.

Choose the license (if multiple licenses are available to you) you wish to create your project under.

Note

Your licence must have an available AI Project instance available to create a new project.

Title

The title of your project is to help you, your team members and potential users identify your project. It is also used when displaying the AI as a service, if the AI is made publicly accessible.

Icon

Allows you to associate an image that represents your AI project. This along with the title and description will be used in the listing of the AI, if it’s made publicly visible. The image can be either a Jpeg or a PNG. The image will be automatically resized for saving with your project.

Description

Use the description field to outline what your AI objective is. Also detail any specific information users of your AI should know when interacting with your AI. For example, if you were building an AI to identify a genus of flies, did you train the AI with a specific set of images such as dorsal views only, where the user of the AI should submit images in the same view.  

An example usage description – for users of your completed AI product:

Please submit images of the subject showing leaves, flowers, or fruit. Any view angle should be ok except from underneath. Ideally the photo will show the subject from 10-20 inches, not macro parts or distance shots of the subject.  The subject should be in focus. The selected image regions should only include the one subject and exclude as much background as possible. The subject should not be a dried specimen, insect damaged, sprayed with water droplets or covered in snow or other contaminates such as dust and dirt. Hands and fingers should also be excluded as much as possible. For the latest taxa this AI has been trained on, please see this list.

Media library

Your AI project requires a Media Library to be associated with it. The Media Library provides all the image services the AI building process needs such as storage, image sizing and image augmentation. By utilizing a Media Library multiple projects (i.e. not just an AI project) can share the same set of images. For example, a Lucid key and an AI project can share the same set (or subset) of images. A Media Library provides a single ‘point of truth’ for your images such as labels, ownership, copyright and licence details.

You and any project team members must have at least read-only access to the selected Media Library associated with your AI project. If you have Editor or higher (E.g., Administrator) rights then you can add images to your Media Library, via the Lucid AI interface.

Tip

The Lucid AI application is not designed to manage your Media Library (i.e., edit/add categories and delete and move media around etc), this is done via the Media Library’s own user interface. Login to your Media Library application if you wish to manage it.

Automatically create project components

If your Media Library already contains categories that represent the entity labels (plant, insect, other taxa) you are interested in using within your AI project, then using this option can save a considerable amount of time setting up the components of your AI project.

For example, if your Media Library had been created from a Lucid key upload, the Media Library categories may already reflect the entities (taxa) you wish to use as AI entity labels and hopefully the contained images will be useful for AI training.

If this option is selected the AI project will be created based on the Media Library. The AI image categories will be automatically created to reflect the Media Library categories. All the images contained within the Media Library categories will be synced to the corresponding AI image categories and augmented, entity labels will be created based on the Media Library categories and each image will be automatically “whole image” labelled (annotated) ready for AI training.

Depending on how many categories and images are contained within the Media Library, this process can take anywhere from several minutes to several hours. Synchronizing can be time consuming because each image is specifically sized and augmented for your selected AI model type (See Classifier Type below for more information on model types).

Once the AI project setup has completed you will be notified via the application notifications and email.

Note

The original images contained within the Media Library are not modified in anyway when used within your AI project.

Classifier Type

There are two possible types of AI project classifiers, overall image classification and object recognition within an image. At the moment only overall image classification is available. Object detection is planned for the near future.

Advanced Options

Architecture type

Lucid AI supports several AI architectures, each with different advantages (size, speed, platform targets such as mobile devices).

ResNet V2 101

ResNet short for Residual Neural Network, is a family of network architectures for image classification with a variable number of layers. ResNet V2 101 implementation contains 101 layers. It gives excellent recognition results but is slower to train and slightly slower prediction speed. It is currently considered one of the best architectures for image classification. It is the current default architecture type for a project.

ResNet V2 50

ResNet short for Residual Network, is a family of network architectures for image classification with a variable number of layers. ResNet V2 50 implementation contains 50 layers. It is faster to train along with faster predictions, with only slightly lower recognition results compared to ResNet V2 101.

Inception V3

Inception v3 is the third edition of Google’s Inception Convolutional Neural Network. It can attain significant recognition accuracy. The model is the culmination of many ideas developed by multiple researchers over the years. It is based on the original paper: “Rethinking the Inception Architecture for Computer Vision” by Szegedy, et. al.

Mobile Net V2

Is a convolutional neural network architecture that seeks to perform well on mobile devices. 19 layers. It is specifically designed for use within mobile applications on the device (as opposed to an on-line AI service that requires an internet connection). Has faster training times than the other architectures, but its recognition accuracy isn’t quite as high as the others.

Testing percentage

You can set the percentage of the images within each entity labelled dataset that should be held back from training for testing accuracy of the AI during the training process. A smaller percentage can be selected if you have a limited number of images/regions per entity label. Test images are important as they are used to determine if the AI is continuing to gain prediction accuracy for each entity label during the training session. See the ‘Epochs’ help topic for more information regarding this.

Batch size

You can determine how many images (batch size) are pushed through each training cycle of your AI before its internal parameters are updated. At the end of each batch of images, the AI predictions are compared to the expected output and an error variable is calculated. From this variable, an update algorithm is used to then improve the model.

Batch size is used to limit the amount of data being processed at one time, as it is normally impossible to process all the images at once through the model.

Epochs

Defines the number of times the AI learning algorithm will work through the entire image training dataset. The AI training will automatically stop iterating through epochs when it no longer improves, when tested against the images held for testing.  Setting this value too high can cause your AI to overfit (by learning patterns very specific to the training set), which may perform poorly on images outside of the training set.

Determining the best Batch Size and Epoch values

Unfortunately, there is no magic formula for determining the best values for these two parameters. You may need to try different values to determine what works best for your classification problem. The default values in most instances should give respectable results. If you are getting poor results, examine the number of images/regions for each entity label to ensure there is enough coverage of data for your classification needs. 50-100 images per entity label is normally adequate, with augmentation.

“Training complete” notification emails

Search and select from a list of users associated with your license. These selected licence members will be notified when an AI training session completes.

Note

Only valid licence users will receive notifications.

AI public

You can allow your AI to be accessible to the public via Lucidcentral AI services. Enabling this option does not make it visible in public listing.

Note

By default, all valid users on your licence who have at least read-only access to the project will have access to the AI regardless of the AI public or visibility settings.

AI publicly visible

You can make information (title, description and icon) about your AI project publicly visible via the Lucidcentral AI services. Making information about your AI project publicly visible doesn’t make it accessible to the public.  To make your AI available to the public, mark your project as AI Public.

Editing a project

You may at any time edit the settings of your project. After making any adjustments, click the Save button to save the changes.

Deleting a project

A project can be deleted. If a project is deleted, all data associated with it along with the AI will also be deleted.

Do not delete a project if you have other services or applications that relies on the AI.

Since deleting a project can impact other services that rely on the AI, you must type in the name of the project to proceed with the deletion.

Warning

There is no undo for the project delete action.

Categories
Lucid AI

Getting the most out of your AI

The better your training image set represents the labels (i.e., the characteristic feature state of the spp), the better the identification results will be. It is particularly important to train your AI on the same type of images (that is, unusual flower, leaf, features) you expect it to receive for identification requests.

For example, creating an image training set with the same background, viewing angle and perfect lighting conditions will produce an AI that would likely result in very poor recognition of images received from the field where the background, lighting and viewing angles can be highly variable.

If the entities you want the AI to recognize are highly variable, it may be better to split the entity into several labels to train on separately, rather than as one entity. For example, if you were wanting to train an AI to recognize some arthropods, it may be better to create labels that represent each distinct instar/life cycle stage for the arthropod, if you weren’t just targeting the adult stage. Take the Coconut rhinoceros beetle (Oryctes rhinoceros) life cycle. It has three very different stages, excluding the egg stage, three instar grub stages, pupa and the adult. Entity labels for this species could be designed as follows:

Coconut rhinoceros beetle (Oryctes rhinoceros) grub

Coconut rhinoceros beetle (Oryctes rhinoceros) pupa

Coconut rhinoceros beetle (Oryctes rhinoceros) adult

It’s also important to describe the aims and the kind of image data you’ve used to build your AI, along with what it’s trying to classify. In some ways an AI can be likened to a hammer looking for a nail. If a user provides an image for identification that’s well beyond its scope (nothing like its training data) or labels, it will still try and classify it, often with puerile results.

It would also be useful to tell the user the best conditions, camera angles and any other relevant information about the type of images they should submit to the AI to get the best results. This information can be added to your project description (See the ‘AI Project’ help topic below for further information, including an example ‘best use’ description).

Categories
Lucid AI

FAQs

Lucid AI

Can I delete my AI Project and create another?

Yes, you can. Please note there is no undo when deleting a project.

Can I give other users access to my AI project?

This depends on your licence and how many separate users are allowed. If you need grant access to more users please contact your licence administrator or contact Lucid support.

Can I still use my AI if it’s retraining?

Yes. The current AI is still available to use while retraining. Once retraining has been completed the AI will be automatically updated.

Can I train my AI more than once?

Yes, definitely! You can retrain your AI whenever you want (if it’s not already training). We highly recommend building your AI iteratively.

Do I need to apply at least one region to every image within a category?

No. Not all images need to have a region applied. It doesn’t matter if an image has any regions. It will be ignored in the training process.

Do I need to be logged in while my AI trains?

No. You only need to be logged in to initiate the training session, after which you may logout if you wish.

How long will it take for my AI to train?

This depends on a number of factors such as the number of Entity labels and defined image regions, along with the current service load. If your AI is only training on a few thousand image regions then the time needed may be less than an hour, while training on tens of thousands of image regions may take several hours. You will receive an email notification once your AI training has completed.

If I delete my AI project will this delete my Media Store?

No, the Media Store and the images it contains will not be deleted when an AI project is deleted.

Is there a way I can tell how well my AI is recognizing my Entity labels?

Yes. Use the ‘AI Examination’ tool on an Entity label folder within the Regions area. All the image regions will be examined by your AI. It will record its recognition status against each. You can then use the search filter tool to view all images containing unrecognized regions. Click on the images to view the regions, then click on the individual regions to see the results. You can also upload individual images to the AI for recognition, in a similar way end users may interact with it.

What is the minimum and maximum number of image regions per Entity label needed?

The minimum number is five (5) image regions, but in most cases, you will need more for better recognition results. We currently haven’t put an upper limit in place for images, however for reasonable recognition results you’ll need anywhere from 20-150+ image regions per entity label. More images (e.g., 50+) may be required if your entity label is covering something broad such as a whole plant (i.e., not just the flowers, leaves or fruit of the plant). It also depends on how flexible you want the submitted photography to be for recognition. For example, different viewing angles and differing states of the plant may be allowed, rather than just a single view and state type. More images may also be required if your entity labels are very similar looking. It’s also important have a reasonable balance of image regions across your Entity labels, otherwise the AI may give more weight towards the label(s) with the largest training set.30

What is the minimum number of Entity labels I need before I can train the AI?

You need a minimum of two entity labels. Don’t forget each entity label also needs a minimum of five (5) image regions associated with it.

Categories
Lucid AI

How does it work?

Creating an AI requires lots of image data upon which to train. The Lucid AI platform brings together a range of  tools necessary to prepare this data and to use it to train an AI. The broad steps of building your AI are outlined below.

  1. A list of labels needs to be created that indicate the ‘things’ you are wanting the AI to be able to recognize. This can be anything you can take photos of, such as plants and insect species associated with an existing Lucid key.

  2. Next, a set of images is needed representing examples of the subject denoted by each label, for example, a specific weed or insect species. These images are then annotated with the appropriate label and become the data the AI will train on. In simple terms the AI training produces a model of labelled patterns. These desired patterns are in turn used when comparing the pattern of the provided image for identification. How an AI works under the ‘hood’ is beyond the scope of this help. If you are interested in finding out more about the most common AI technology type see the Wikipedia article on convolutional neural networks.
Simple overview diagram outlining the steps to AI creation.
Categories
Lucid Builder Tutorial

Tutorial 3 – Associating Entities with Leads (scoring your key)

Coming soon….

Categories
Lucid Builder Tutorial

Tutorial 2 – Importing an existing ‘paper based’ key

Coming soon….